How to Import Home-made and Commercial DVDs to iMovie?
I guess Apple users are more satisfied with iMovie to edit videos imported from iPhone, iPad, GoPro, cameras, etc. When referring to DVDs, many users may ask how to import DVDs to iMovie for editing purposes. This is because iMovie cannot import directly from a video DVD unless it was created by iDVD with the option to include the source video file in the ROM portion of the disc selected.
To import movies from DVD into iMovie, you need to convert DVD to iMovie supported formats. So here we'll explain what formats iMovie accepts and how to rip movies from a home-made DVD or a commercial copy-protected DVD for importing to iMovie.
Best Way to Import Home-made and Commercial DVD to iMovie
WinX DVD Ripper for Mac can fast rip any homemade and commercial DVDs to iMovie on Mac. Any region-locked and copy-protected DVDs can be converted to iMovie compatible MP4 and MOV formats with original quality reserved for easy editing.
Please DO Not use WinX DVD Ripper to rip rental DVDs.
For Windows and Mac only. If you are a mobile user, please click here.
Table of Contents
Part 1. Learn iMovie Compatible Formats before Copying DVD to iMovie
We are talking about methods of ripping DVD to iMovie on Mac here just because what's in the VIDEO_TS folder is MPEG 2 video, which is not included in the iMovie list and you may get stuck with a box with message like "Incompatible Video Format". So, learn about iMovie format information first and you will know which format you should convert your DVD to for importing to iMovie.
- Video: Apple Animation Codec, Apple Intermediate Codec, Apple ProRes, AVCHD (including AVCCAM, AVCHD Lite, and NXCAM), DV (including DVCAM, DVCPRO, and DVCPRO50), H.264, HDV, HEVC, iFrame, Motion JPEG (OpenDML only), MPEG-4 SP, Photo JPEG, XAVC-S.
- Audio: AAC, AIFF, BWF, CAF, MP3, MP4, RF64, WAV.
- Still-image: BMP, GIF, HEIF, JPEG, PNG, PSD, RAW, TGA, TIFF.
- Container formats: 3GP, AVI, M4V, MOV (QuickTime), MP4.
Part 2. How to Rip Homemade DVDs to iMovie on Mac?
In case what you collect are homemade DVD discs, you don't have to pay for paid DVD ripper software. Instead, the highly-accalimed Handbrake can address your needs. With the support of both MKV and MP4 output formats, handbrake enables you to free rip homemade DVDs to MP4 H264, MPEG-4 or HEVC codec for iMovie without much sweat. Certainly, if your DVD disc comes from other region codes or contains CSS protection, install libdvdcss for Mac codec library, which will assit handbrake removing region/CSS protections.
You can also opt for Apple devices profile as your final output profile, which is well -designed for your Apple devices with most suitable parameters like resolution, frame rate, audio codec, audio mode, etc. Check the detailed tutorial if you're unfamiliar with handbrake Mac.
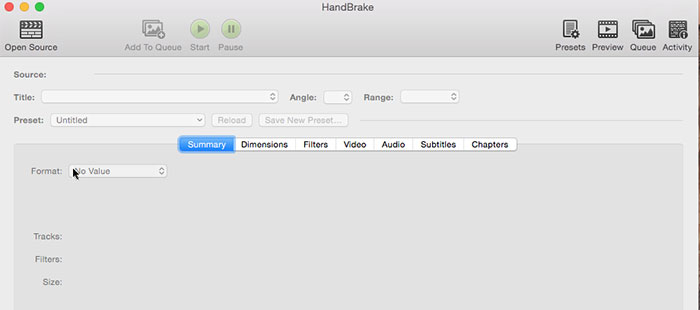
Step 1. Load Homemade DVD Disc
Insert a common/homemade DVD disc with no copy protections to your Mac DVD drive. Launch HandBrake on Mac. Click Open Source to choose the DVD you have inserted to have HandBrake scan it automatically. The whole process may take some time, which varies from DVD drives and DVD content.
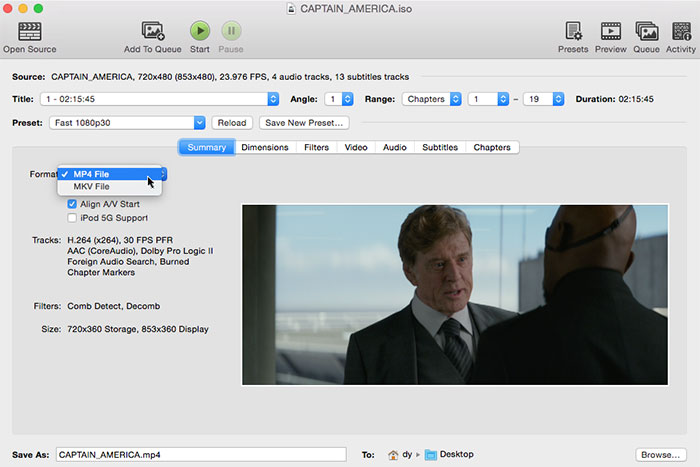
Step 2. Choose MP4 as Output Video Format
Select MP4 files as output format to rip DVD to iMovie MP4 format on Mac. Generally, the default output format will also go to MP4 in H264 codec.
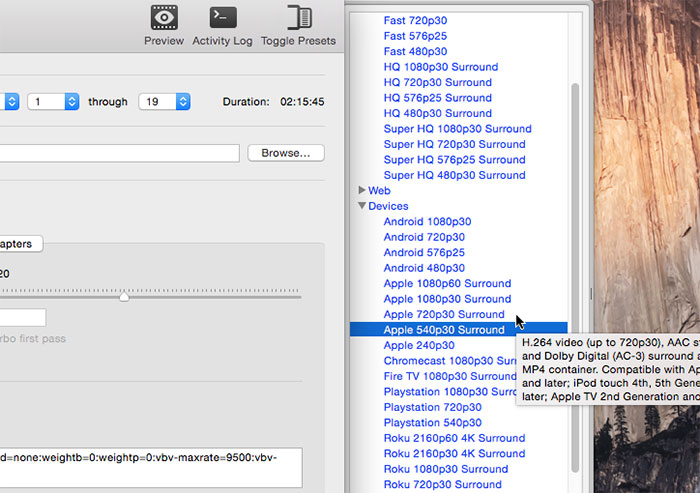
Meanwhile, you can manually select the output profile from the Preset option. As for Apple devices, tap Devices and choose specific profile for your Apple devices like Apple 540p30 Surround, Apple 720p30 Surround, Apple 1080p30 Surround, Apple 1080p60 Surround.
Step 3. Set Output Folder and File Name
Tap Browse to specify your destination storage folder for final iMovie MP4 saving. For file destination, make sure that the location has enough disk space to accommodate the ripped file. (1GB is the average size for full length movies.)
Step 4. Free Rip DVD to iMovie MP4 format on Mac
Simply use Start or Pause button to control the process of ripping DVD to MP4 on MacBook.

Part 3. How to Rip Copyright Protected DVDs to iMovie on Mac?
First of all, you need to download and install a DVD ripper that can rip your DVDs to iMovie compatible formats. As we mentioned above, WinX DVD Ripper for Mac is a good choice. With this tool, you can do the following things:
- Rip all types of DVDs, be old or new, home-made or commercially protected. Bypass region codes and copy protections without libdvdcss.
- Convert DVD disc, ISO image, and VIDEO_TS folder to iMovie, iTunes, iPhone, iPad, Apple TV, etc. over 350 output profiles.
- Convert DVD to MP4, MOV, AVI, M4V, H264, MPEG-4, HEVC, 3GP, MKV, MP3, and so on.
- Make an exact copy of your DVD by choosing "clone DVD to ISO image" or "clone DVD to DVD folder".
- Do basic video editing: merge titles, trim video, crop video, and add subtitles.
You can download WinX DVD Ripper for Mac to try it for free and follow your steps below.
Step 1. Import DVD into WinX DVD Ripper for Mac.
Insert the DVD you want to import to iMovie into your computer's DVD drive. Next, open WinX DVD Ripper for Mac and click the "DVD Disc" button to open the inserted DVD. Then, it will begin scanning your DVDs in no time.
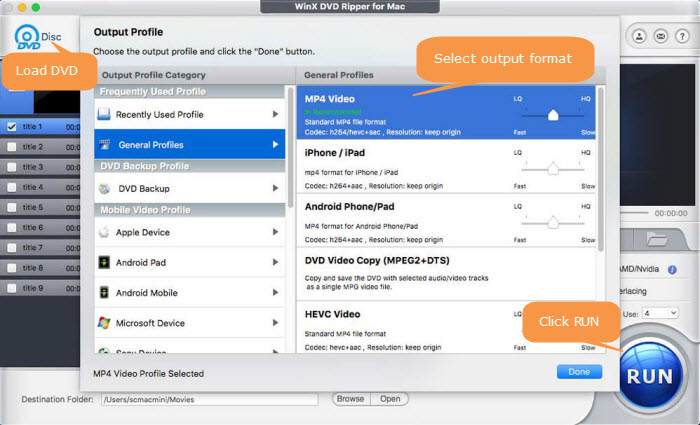
Step 2. Choose an iMovie profile.
After scanning DVD, this program will display the Output Profile window where you should select a format for your output file. To import DVD to iMovie, you can scroll down to "Apple Device", choose "to iMovie Video", and then choose a premade profile you like such as iMovie (H.264) or iMovie (MPEG4). Each profile uses MP4 as the container format. Certainly, you can also choose other iMovie compatible video formats such as MOV and AVI.
Step 3. Choose DVD title to convert.
By default, this Mac DVD ripper automatically checks the main movie title to rip. You can choose a different one or select more manually based on your own needs.
Step 4. Begin ripping DVD to iMovie format.
Choose a destination folder and hit "RUN" button to start ripping DVD for iMovie on Mac.
After that, open iMovie, import the converted DVD media to iMovie, and then start your editing in iMovie. You can choose File > Import Movies in iMovie to add the converted DVD videos or other movies. Alternatively, search for the location of the video in the Import window to import the file from DVD to iMovie.
Disclaimer: Digiarty Software does not advocate ripping copy-protected DVDs for any commercial purpose and suggests referring to the DVD copyright laws in your countries before doing so.
Part 4. FAQs about Importing DVDs to iMovie
1. How to import DVD to iMovie using Disk Utility?
Disk Utility can only create a image file from your DVD. You also need to convert the image file to iMovie supported format.
2. Can I rip DVD to iMovie with HandBrake?
Yes. You can rip non-protected DVDs to iMovie with HandBrake. HandBrake is free and easy to use, but when it comes to ripping DVD with copy protections to iMovie, like Disney copy protection, commercial DVD CSS encryption, Sony ARccOS, etc, it can't work as expected. Therefore, you need other DVD to iMovie ripping software like WinX DVD Ripper for Mac to help you out.
3. How to import homemade DVDs to iMovie?
There are a few ways to import a homemade DVD to iMovie.
- Method 1. use WinX DVD Ripper.
- Method 2. use HandBrake. Check how to rip DVD with HandBrake.
- Method 3. extract the VOB files from your DVD and then convert VOB files to a format that iMovie can read.
Now, I will explain the steps of method 3.
Step 1. Click on your DVD's icon on your desktop to open the DVD package. Then, you will see an AUDIO_TS folder and a VIDEO_TS folder.
Step 2. Open the VIDEO_TS folder and then you'll see a list of files with .VOB, .BUP, and .IFO extension like below.
Video_ts.bup
Video_ts.ifo
video_ts.vob
vts_01_0.bup
vts_01_0.ifo
vts_01_0.vob
vts_01_1.vob
Step 3. Copy (not move) all of the files with the extension .VOB to your desktop. VOB files contain the movie.
Step 4. Install a VOB converter and convert the VOB files to MP4 or MOV that iMovie can open. Once done, you can import them into iMovie and do whatever editing you want.
Related External Source from Wiki:
What is iMovie & What Can iMovie Do? iMovie is the official video editing app used on iPhone, iPad, and Mac. Modern versions of iMovie support high-definition and 4K video, handling a wide range of formats including HEVC (H.265), H.264, and various QuickTime-compatible files. User can use iMovie to edit video clips, add titles, music, and effects. It also provides essential tools for color correction and video enhancement tools and various transitions such as fades and slides.