How to Crop a Video in QuickTime Player?
Cropping is not equal to trimming. When googling "crop a video in QuickTime", you might be greeted with some top research results with trimming video guide indeed. Don't get deceived by the confusing title. Check result's title, as well as description to make sure its theme. Or instead, directly follow the below instructions to crop your video dimensions in QuickTime so as not to waste time and energy.
Cropping Feature in QuickTime Needs $30? Try 100% Free Solution
In fact, you need to upgrade to its QuickTime Pro version, or you can't use its Crop feature to resize your video. For budget-minded users, you are suggested to use QuickTime alternative – Winxvideo AI to 100% free crop a video by dragging the video edges to any scale.
Table of Contents
Part 1. How to Crop a Video in QuickTime Player?
The free version of QuickTime player having been already installed on your Mac doesn't feature the power to crop your video frame size. Instead, you need to upgrade to its Pro version for $30 to obtain its cropping knack. After upgrading, you can come to the main track - crop videos now:
Step 1. Capture a frame of your video. You're going to need a mask file to instruct QuickTime on how it oughts to resize your video dimensions. To create this mask file, open the video and go to Edit > Copy to copy the image of a frame using QuickTime Pro.
Step 2. Create a mask via Photoshop.
- Open Photoshop > New > tap the File option to create a new project.
- Paste the image you'd previously copied in Step 1.
- Activate the Rectangular Marquee Tool to select the area you wanna use > fill the selected area with black color.
- Save the file in GIF or TIFF format.
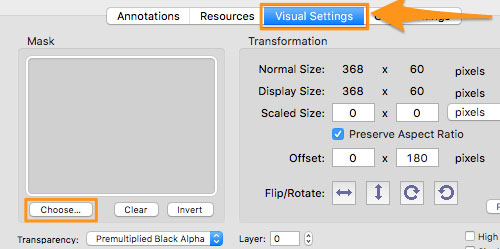
Step 3. Import your mask file. Launch QuickTime Pro > find Windows > Show Movie Properties > Visual Settings > move your mouse to the lower left corner of the panel to locate to Choose to import your mask file.
Step 4. Export your cropped video clip. Once the mask is applied to your video, only the selected area shows up. Go to File > Export to save the cropped video to your desired location.
Suggested Reading => How to Trim Videos Under/Longer than 10s for Snapchat
Part 2. The Disadvantages of QuickTime Cropping Video
QuickTime is excellent in video playback and simple video editing. Yet, there is scarely a man but has weak sides. And QuickTime is of no exception. It also has some weaknesses in video cropping.
1. You can't crop a video with QuickTime by simply dragging the video edges.
The only way to decide on which parts to keep is to enter specified pixels to crop from top/bottom/left/right sides by hand, which is quite time-consuming and inconvenient.
2. You can't preview during cropping.
You can see the video preview when you enter the values to decide which part to keep temporarily. However, when you do the last step to crop and save a video, you can't preview in QuickTime player.
3. QuickTime Error 2048 Couldn't Open the File
When you load your video footage, even the video file perfectly fits QuickTime in all parameters, it still ruins your mood with QuickTime error 2048 "couldn't open the file" message.
4. QuickTime Player won't save edited file
If the video is too long, video file size is large or the video resolution is high, VLC crashing error happens in high possibility. That’s because VLC is not a professional video editor and may be not compatible with some video codecs.
5. Quicktime Runtime Code 8961 Error
Runtime Code 8961 happens when Quicktime fails or crashes whilst it's running in video cropping. Generally, you're able to force exit QuickTime, re-launch QT and try it again to fix this error. Other effective solutions are still not founded.
6. QuickTime export without audio.
Notwithstanding QuickTime successfully exports your cropped video file, there's high likelihood that it gives you an incomplete video file. The common one is the export without audio, which is widely reflected on the varied types of forums.
Part 3. How to Free Crop a Video with Nary a Trouble?
QuickTime Pro is premium service and meanwhile comes along with annoying troubles. It's not the best tool for those who are budget-minded and have no enough experience or skills to deal with unexpected conditions. Instead, a 100% free yet trouble-free video editing software is more worthy a mention. WinX HD Video Converter is the very one! It helps you free crop any videos, as well as trim, merge, convert, compress, download videos without mandatory upgrade requirement. Check its simple guide if you have a gusto on it:
Step 1. Free download this all-in-one video converter & editor on your computer, install and launch it.
Step 2. Click the +Video button to load your video. Bulk video cropping is supported, too.
Optionally, choose an output format from the popup Output Profile window, varying from MP4, MOV, M4V, ProRes, iPhone iPad, iMovie to Android, PS4/5, Xbox, Microsoft, Google Pixel, etc. 420+ preset profiles.
Step 3. Click the Edit button to access the video cropping window.
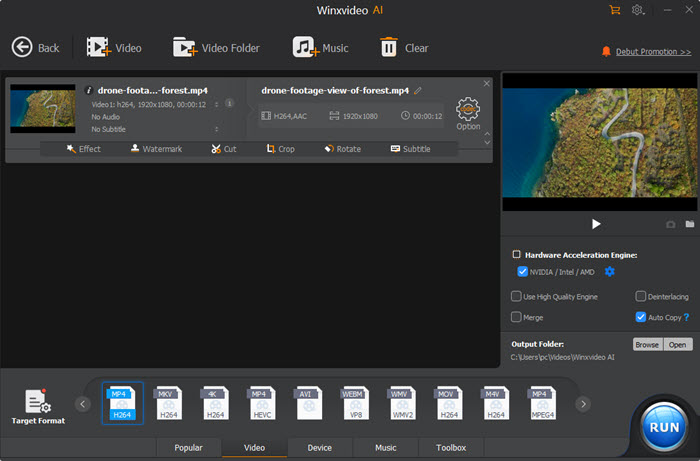
Step 4. Navigate to Crop & Expand section > check Enable Crop option > drag the video edge, input a value or select aspect ratio from the presets to decide which part to keep. After that, click Done.
Step 5. Now, hit RUN button to start cropping a video. Once done, the folder with the cropped video will pop up.