


How to Copy (Homemade & Copy-protected) DVDs to Hard Drive?
 Donna Peng
Updated on
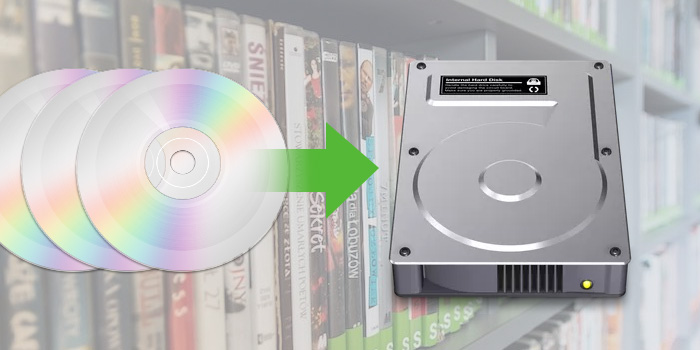
Still relying on physical DVDs to watch your favorite movies or store important content? It's time to make a smarter move. Copying DVD to hard drive allows for instant playback on your computer or big-screen TV—without the hassle of pulling out a dusty disc, loading it into a drive, or waiting for it to spin up.
By transferring DVD to hard drive, you can save physical storage space, protect your collection from scratches or aging, and create permanent backups that are easily accessible anytime. Plus, you’ll be able to take your favorite videos on the go by moving them to a laptop, smartphone, or tablet with ease.
In this updated 2026 guide, we’ll walk you through how to copy both homemade and copy-protected DVDs to your hard drive on Windows 10/11 or Mac, using fast, reliable, and user-friendly tools—no tech skills required.
Part 1. How to Transfer Non-Protected DVDs to Hard Drive
For burned and homemade DVDs that come without any copy protection, you can directly copy and paste audio_ts and video_ts from DVD to internal or external hard drive for backup purposes. The folder storing all the movie data can be played on Windows Media player, VLC, etc. without any problem.
Below are the steps:
Step 1. Insert the DVD into the disk drive.
Step 2. Double-click the DVD drive. Find and copy all of the DVD's contents and files like ISO image or DVD folder. In the ISO image or folder, you can see the actual movie files such as VTS_01_1, VTS_02_1, VTS_03_1, etc., each representing a Chapter.
Step 3. Open your hard drive, then copy and paste these DVD files to the hard drive.
However, this way is only workable for copying non-protected DVDs. Also, the digital copy may not be played on your computer or TV due to format compatibility issues.
Why can’t copy some DVDs to hard drive directly?
All commercial DVDs are copy-protected by specific DVD encryption methods to prevent us from accessing and copying the content directly. So, we find the DVD empty, the files corrupted, or unplayable. When we extract the video_ts folder from a copy-protected DVD to a hard drive, the file seems to end midway with an error message.
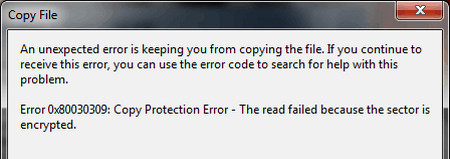
BTW, the failure to copy DVDs to hard drive can be attributed not only to DVD copy protection schemes, but also to firmware faults, mechanical malfunctions, and computer overheating.
So, how to copy DVDs especially copy protected DVDs to hard drive? The best way is to use a professional DVD ripper to not just copy but rip (copy-protected) DVDs to digital formats to save on a hard drive.

Copy burned & copy-protected DVDs to hard drive.
- Copy any homemade or commercial DVD.
- Rip region, 99 titles, CSS, Sony ARccOS, Disney, etc. DVDs.
- Copy all DVDs to hard drive SSD, HDD, NAS, USB, cloud, etc.
- Convert DVDs to MP4, ISO, VIDEO_TS, and more.
- 1:1 ratio quality. GPU-accelerated. 47X real-time fast.
 Free Download
 Free Download
Please DO Not use WinX DVD Ripper to rip rental DVDs.
Part 2. How to Rip Copy-Protected DVD to Hard Drive (2026)
As mentioned above, to copy DVD to a hard drive, especially encrypted ones, you can use ripping software to convert them to digital formats or copying DVD to save them as ISO files or folders. Both methods require a reliable DVD backup tool. In this article, we've picked four options to help you copy DVDs easily and quickly. Whichever method you choose, WinX DVD Ripper has you covered.
Best Tools to Copy DVD to Hard Drive (Free & Paid)
| WinX DVD Ripper 🎯 Editor's Choice |
HandBrake | VLC Media Player | MakeMKV | |
|---|---|---|---|---|
| Techradar Rating (Updated Feb 2026) |
4.7/5 | 4.0/5 | 4.3/5 | 4.5/5 |
| Decryption Capability (Commercial DVDs like Sony/Disney) | ✅ Full Protocol Support CSS/UOPs/ArccOS, etc. |
⚠️ Basic CSS Only | ⚠️ Basic CSS Only | ✅ Full Protocol Support |
| Supported output formats | 320+ Video/Audio Codecs | MP4(M4V), MKV, WebM | Popular digital formats | MKV |
| Conversion Speed (to 1080p digital) |
⏩ 5 minutes/disc GPU accel.(300-500FPS) |
⏳ 18 minutes/disc (110-130FPS) |
⏳ 20 minutes/disc (110-130FPS) |
⏩ 6 minutes/disc (300-500FPS) |
| Output Quality | Lossless Mode Or 98% MP4 Compression |
Visible Compression Artifacts | Dynamic Bitrate Fluctuation | Lossless Mode |
| User-Friendliness | One-Click Wizard (Built-in Preset Templates) |
Requires Technical Adjustment | Command Line Operation | Complex Parameters |
How we test the 4 DVD to hard drive methods?
1. We explored expert reviews and community forums. WinX DVD Ripper Platinum was the top paid choice recommended by authoritative media for ripping all DVD types. HandBrake and VLC were popular in user discussions, while MakeMKV stood out for copying DVDs into a single MKV file.
2. The 4 ways are selected depending on users’ specific needs and skill levels. WinX DVD Ripper is the best choice for ripping all copy-protected DVDs. HandBrake and VLC are open-source for free copying homemade and CSS-encrypted DVDs. MakeMKV is for converting DVDs to MKV format and dealing with Blu-ray discs.
3. We tested all tools under the same conditions: identical PC, DVD sources, and hardware acceleration settings. We compared speed, output quality, and file size, while also evaluating pros and cons, extra features, interface design, settings, and user-friendliness.
Method 1. Copy Protected DVD to Hard Drive with WinX DVD Ripper
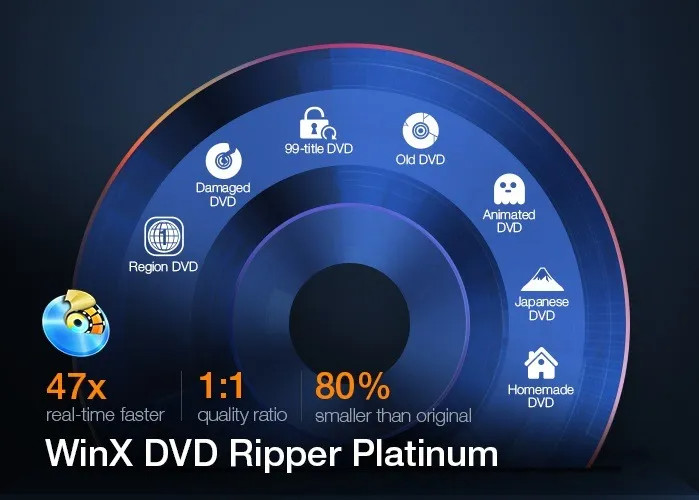
WinX DVD Ripper Platinum is a time-tested and reliable software that allows you to effortlessly copy DVDs to hard drive with just a few clicks. Both homemade and copy-protected DVDs are accepted. Whether you want to back up your entire DVD collection or extract the movie portion only, this tool has got you covered. With its powerful features and intuitive interface, WinX DVD Ripper Platinum makes the process fast, easy, and hassle-free.
What You Can achieve with WinX DVD Ripper Platinum:
- Universal DVD Backup: Flawlessly copy all DVDs (including region-locked and copy-protected discs) to HDD, SSD, NAS, USB, cloud, and more, without quality loss.
- Versatile Format Conversion: Convert DVD content to MP4, AVI, WMV, MOV, MP3, and other popular media formats for playback on various devices.
- Perfect Digitalization & Device Compatibility: Digitize your DVDs for seamless playback on any device, including iPhone, iPad, Android phones, and gaming consoles.
- Lightning-Fast & Customized Ripping: Leverage hardware acceleration (Intel QSV, NVIDIA NVENC, AMD) for rapid processing, with options to select specific titles, audio tracks, subtitles, trim clips, and more.
- Professional 1:1 Cloning: Create perfect 1:1 DVD backups as ISO images or DVD Folders.
- User-friendly interface and easy-to-use.
- Fast ripping speed and high-quality output.
- Supports various output formats.
- Allows customization of output settings.
- Can bypass all copy protections on DVDs.
- Isn’t compatible with Linux.
- The free version is limited to 5-minute exports.
Steps to use WinX DVD Ripper Platinum to copy DVD to hard drive:
Step 1. Download & Install WinX DVD Ripper Platinum
Free download WinX DVD Ripper Platinum and install it on computer.
Step 2. Activate Your License
After launching, enter the license code, which you can get for free on this DVD to MP4 converter page. This removes watermarks, time limits, and unlocks all functions.
Note: Please DO Not use WinX DVD Ripper to rip rental DVDs.
Step 3. Insert Your DVD
Insert the DVD you want to copy into your computer's DVD drive. If your computer lacks a built-in drive, you can find the most suitable external DVD drive here.
Step 4. Load the DVD into Software
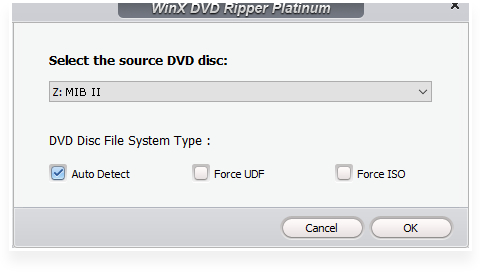
Click the "DVD Disc" button on WinX DVD Ripper Platinum's main interface to load your inserted DVD. Confirm the detected DVD is correct under "Select the source DVD disc", then click "OK" to begin loading. This usually takes a few seconds.
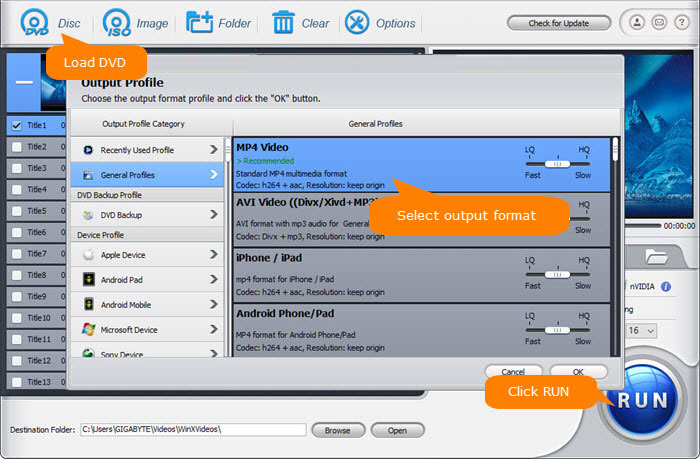
Step 5. Choose Output Format for Hard Drive Storage
On the "Output Profile" panel, browse over 350 profiles. Select a format compatible with your hard drive storage needs.
1. For Digital Formats (High Quality in Main Title):
For a space-saving and mainstream format, navigate to "General Profiles" and choose "MP4 Video", or opt for WMV, AVI, MOV, etc.
Make sure your hard drive has sufficient free space to store DVD copies since a DVD usually contains 5-8 GB of files[1]. If you choose to copy only the movie portion of the DVD to your hard drive, you can save a significant amount of space.
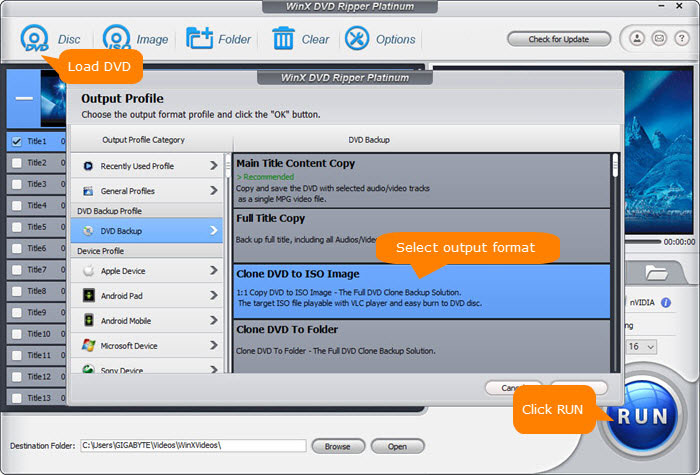
2. For 1:1 DVD Backups (Full Quality & Structure):
For 1:1 DVD Backups (Full Quality & Structure): To copy an entire DVD to your hard drive without quality loss or re-encoding, select the "DVD Backup" option and choose either "Clone DVD to ISO image" or "Clone DVD to Folder." This is ideal for archiving your movie library, especially with today's affordable, large-capacity SSDs.
WinX DVD Ripper Platinum's DVD backup mode neither degrades video quality nor reduces file size (movie size stays almost the same as original 4.7GB or 8.5GB). If you have some portable hard drives that are formatted in FAT32, with restrictive 4GB file size limit[2], it's suggested to rip DVD to MP4 H.264, for it strikes a perfect balance between file size (around 1-1.2GB) and output quality.
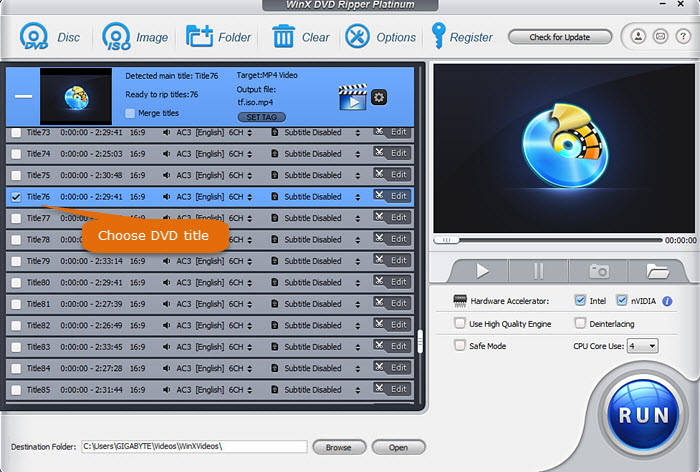
Step 6. Choose the DVD content you want to copy.
WinX DVD Ripper Platinum will auto select the main movie title for you after loading DVD, but you can also choose a different one manually or choose more titles to convert.
A DVD-Video can contain up to 99 (1–99) titles[3], but not all titles are what you want. Some are director's cuts, deleted scenes, interviews, special features, and so on.
Step 7. Choose where you want to save the DVD copy file.
Click the "Browse" button at the bottom to specify the destination folder. If you want to copy DVD to external hard drive to watch on TV, connect the external HDD to your computer and choose it as the destination.
Step 8. Start copying DVD to hard drive.
Just click the "RUN" button to begin converting DVD to hard drive. The ripping time depends on your settings and computer performance.
As the only DVD ripper with Level-3 Hardware Acceleration, WinX DVD Ripper Platinum rips and backs up DVDs to your hard drive at lightning speeds (300-500fps). Easily sort your digital movie/TV show copies on your computer, or transfer them to Android, iOS, or external SSDs (like Samsung T5, SanDisk Extreme) for seamless streaming to laptops, PCs, or TVs.
Disclaimer: Digiarty Software does not advocate ripping copy-protected DVDs for any commercial purpose and suggests referring to the DVD copyright laws in your countries before doing so.
Method 2. Rip DVD to Hard Drive for Free with HandBrake
HandBrake is a free open-source video transcoder for Windows, Mac, and Linux. It can not only transcode videos, but also convert DVD and Bluray discs and files to MP4, MKV, and WebM for backup on a hard drive. However, it doesn't allow you to output files in other formats such as ISO and VIDEO_TS folder.
And before we walk you through the steps to convert DVD to hard drive with free HandBrake, there are a few things that you need to be aware of. Firstly, HandBrake doesn't have a DVD copy feature and HandBrake's native DVD transcoding results in quality degrading. So you cannot rely on HandBrake to make a lossless DVD backup. Secondly, HandBrake only makes digital copy of DVD collection when the media files are non-protected[4]. Only when HandBrake grabs a copy of libdvdcss.dll can it cope with the CSS-encrypted and regional DVD flawlessly.
- Free and open-source software.
- Available for multiple platforms.
- Offers advanced customization options.
- Overwhelming user interface for beginners.
- DVD ripping process is quite slow.
- Requires installation of libdvdcss.dll to rip CSS-encrypted DVDs.
Steps to use HandBrake to convert DVDs to hard drive:
Step 1. Free download and install HandBrake on your computer.
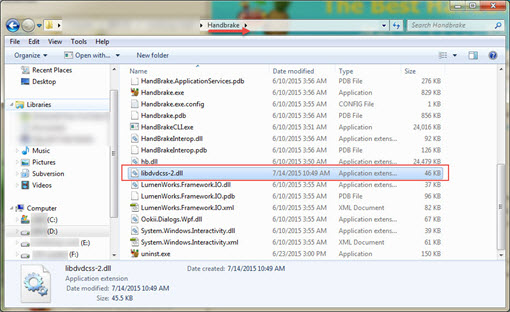
Step 2. Download libdvdcss.dll 32-bit/64-bit version for HandBrake through the VLC website. Next, you need to move the libdvdcss.dll into the installation folder of HandBrake. This is a prerequisite to rip CSS-protected DVD using HandBrake.
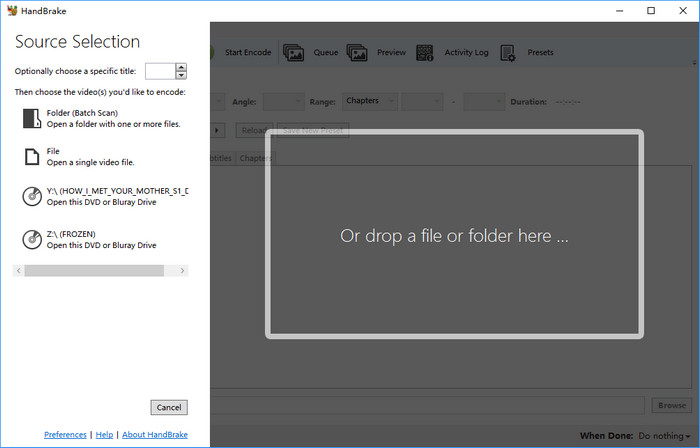
Step 3. Open HandBrake, load the DVD from the Source Selection. It will take some time to scan the DVD titles.
If the DVD you try to copy to hard drive has 99 titles or is protected with RCE, Disney X-project DRM or Sony ARccOS, you are likely to get an error message like "No valid source or titles found". In this case, I'm afraid that you'll have to resort to another professional DVD copy tool for help.
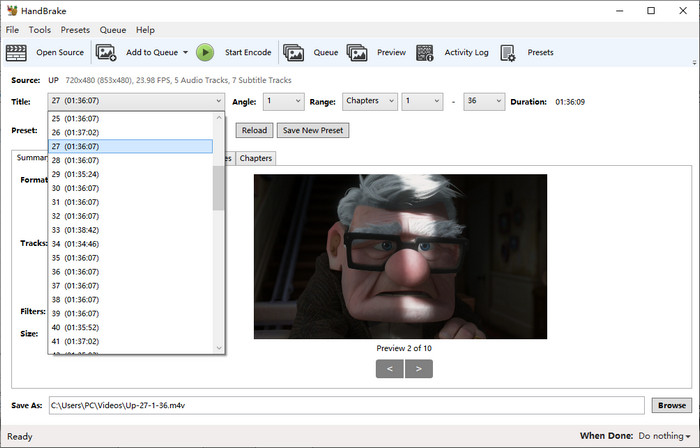
Step 4. Choose the title you want to convert and copy to hard drive and adjust the angel and chapters you want to retain. The auto-selected title may be not the movie title. You'd better check it before ripping.
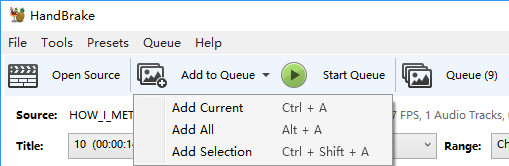
If you need to rip DVD with 99 titles, you can click the drop-down arrow beside "Add to Queue" and choose "Add current", "Add all", or "Add selection".
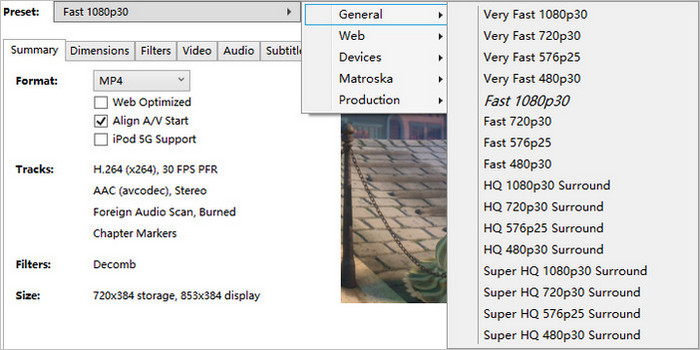
Step 5. In the drop-down box of Preset, choose a preset as per your needs. Remember higher quality results in slow DVD converting speed and more space occupation of your hard drive.
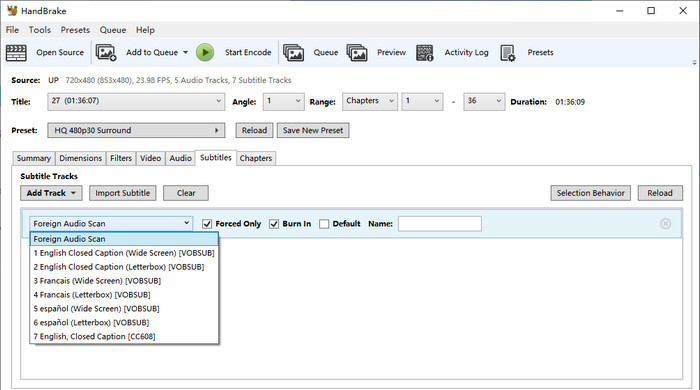
Step 6. Choose audio and subtitle track.
Under Preset, you'll find seven tabs, namely Summary, Dimensions, Filters, Video, Audio, Subtitles, and Chapters. You can click on each tab and check if everything is set up exactly as you would like. You can click the Dimensions tab to change resolution, click Filters to turn on or turn off deinterlace, denoise, and more, click Video to specify video codec, bitrate, and framerate, click Audio to choose audio language and codec, and click Subtitles to specify subtitle language and whether you want to burn the subtitle into the DVD rip file or leave it as a standalone subtitle file.
Step 7. Start copying DVD to hard drive with HandBrake.
Click the "Browse" button to choose a folder of your hard drive as the destination and click "Start Encode" to begin ripping DVD to hard drive. During our test, it runs at speeds of 110-130fps.
In short, HandBrake works for unprotected discs. For all-region, commercial DVDs, we recommend WinX DVD Ripper for full support.
Method 3. Convert DVDs to Hard Drive for Free with VLC
It is well-known that VLC is a free media player capable of playing most multimedia files as well as DVDs, Audio CDs, VCDs, and various streaming protocols. But a few users know that it can also convert DVDs to digital files for storing on a hard drive or other storage devices. Although its output formats cannot compare to those of WinX DVD Ripper Platinum, it supports formats more than HandBrake. It covers MP4, WebM, TS, MKV, AVI, WMV, MP3, and so on. But sadly it cannot export ISO image or VIDEO_TS folder.
Kindly remind, VLC doesn't rip all commercial DVDs to hard drive. It supports ripping CSS-protected DVDs with the installation of libdvdcss.dll.
- Free and open-source software.
- Available for multiple platforms (Windows, Mac, Linux, etc.).
- Supports a variety of multimedia formats.
- Slow ripping speed.
- Need installation of libdvdcss.dll to rip CSS-protected DVDs.
Steps to save DVDs to hard drive with VLC:
Step 1. Download and install VLC on your computer, no matter what system you use, Windows, Mac, or Linux.
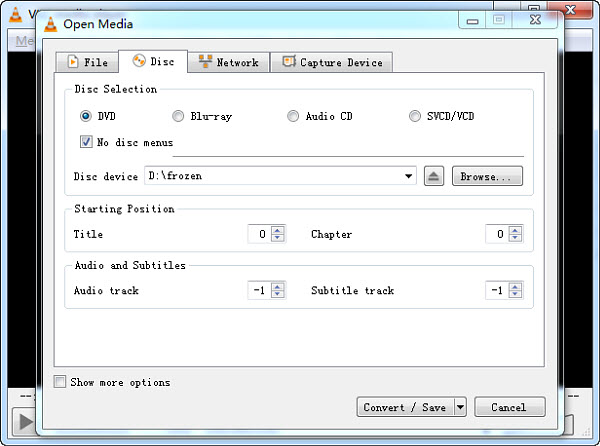
Step 2. Launch VLC, click "Media" > "Convert / Save …" > Click "Disc" tab from the "Open Media" window, and make sure you see the DVD you want to copy beside Disc device.
Step 3. Here you also need to choose title, audio and subtitle. Since there is no preview window, you may need to do some trial and error to figure out which track is the one you want. Then, tap "Convert / Save" button.
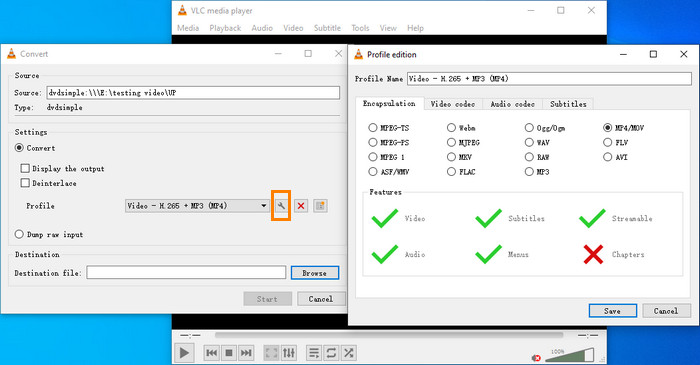
Step 4. Choose a profile.
If you need to edit the selected profile, you can click the "wrench" icon. You can click the "Encapsulation" to change container format; click "Video codec" to change encoding format, bitrate, quality, frame rate, resolution, and filter; click "Audio codec" to change audio encoding format, bitrate, channels, and sample rate; and click "Subtitles" to choose codec and specify whether you want to overlay subtitles on the video. When you finish the settings, don't forget to click the "Save" button to save your settings.
Step 5. In the Destination section, click the "Browse" button to select your hard drive as the destination path for saving.
Step 6. Begin copying DVD to hard drive with VLC by clicking the "Start" button. Once the ripping process is complete, VLC will save the ripped DVD files to the location you specified on your hard drive.
While VLC can handle basic DVD conversions, it's not ideal for copy-protected or commercial DVDs. For a faster, more reliable solution that supports all-region DVDs, we recommend using WinX DVD Ripper Platinum. It can easily bypass encryption and convert your discs to MP4, ISO, or other formats in just a few minutes — download it here and try it for free.
Method 4. Transfer DVDs to Hard Drive for Free with MakeMKV
MakeMKV can create a MKV copy of your DVD and save it to your hard drive. There isn't any quality loss because MakeMKV will not transcode video during the ripping process. But it's also a double-edged sword, because it means that the output file will be very large. But that's not a huge problem if you have enough storage space on your hard drive.
MakeMKV has now been upgraded to version 1.17.6. With MakeMKV, you can not only convert DVDs but also Blu-ray discs. It can even handle some encrypted discs. From its update history, we can also see that its developers have made great efforts to help this tool cope with disc copy protections.
- Free to use.
- Simple and intuitive interface.
- Fast DVD ripping speed.
- Can preserve all video and audio tracks, including multiple subtitles and languages.
- Supports copying encrypted DVDs.
- Can only rip DVD to MKV format.
- Limited customization options for output.
- Sometimes can't recognize newer DVD releases.
How to copy DVDs to hard drive with MakeMKV?
Step 1. Download and install MakeMKV on your computer. MakeMKV is compatible with Windows, Mac, and Linux.
Step 2. Insert the DVD you want to copy to hard drive with MakeMKV into the DVD drive of your computer.
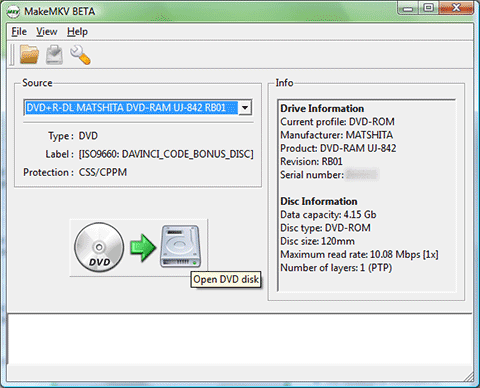
Step 3. Open MakeMKV and make sure the source DVD is the disc you want to copy. Then, click the "Open DVD disk" button which is a picture with a DVD icon, an arrow, and a hard drive.
Step 4. After you click the "Open DVD disk" button, MakeMKV will display the DVD contents as a tree structure. Now, you need to select the title, audio, and subtitle tracks you want to copy.

Step 5. Select your hard drive as the output folder to save the digital copy of your DVD.
Step 6. Just press the "Make MKV" button and wait for conversion. It will show two progress bars, elapsed time and remaining time.
MakeMKV is great for creating full-quality MKV backups, but it only outputs in one format and may struggle with newer or heavily encrypted DVDs. If you need more output options, faster ripping speed, or better compatibility with devices like phones, TVs, and game consoles, we recommend WinX DVD Ripper Platinum. It lets you rip any DVD to MP4, ISO, and more —download it free here.
Part 3. Tips for Copying DVD to Hard Drive
1. Check if your DVD is copy-protected before ripping.
Generally, instead of "copy DVD", we say "rip DVD to hard drive". Why? Almost all DVD movies and TV shows are armed with one or more copy protection schemes. These schemes are stored in the normally inaccessible lead-in area of the disc, as a move to prevent the files from being copied directly. Here are some of commonly used DVD encryption technologies, which hold you back from backup DVD smoothly.
- Content Scramble System (CSS): Create scrambled DVD content to protect the DVDs information from piracy and the Region Protectionenforce region-based viewing restrictions.[5]
- Sony ARccOS Protection: It is designed as an additional layer and is used in conjunction with CSS. This system deliberately creates corrupted sectors on DVD disc, which cause a majority of regular DVD copy software to produce bad sector errors.[6]
- Disney DVD Copy Protection: It is encoded in the latest released DVDs. It disordered the DVD content such that users can hardly locate the right title which contains the main part of the movie. Even though you trudged out to copy full DVD content, you will get about a whopping 40GB output file size and the out-of-order videos that are totally useless.
So, if your DVD is copy-ptotected by one of the DVD encryption methods, you should choose a tool that can handle these methods to rip DVD to hard drive successfully.
2. Choosing the Right Digital Format for Your DVDs:
When converting your DVDs to digital files, the best format depends on your intended use. Here's a breakdown to help you decide:
-
For 1:1 Quality Backup & Archiving:
-
ISO or Video_TS Folder: These formats preserve the complete DVD structure, including menus, chapters, and extras, ensuring no quality loss. Ideal for archiving or re-burning.
- Pros: Perfect 1:1 backup, retains all DVD features.
- Cons: Large file size, limited device compatibility.
-
ISO or Video_TS Folder: These formats preserve the complete DVD structure, including menus, chapters, and extras, ensuring no quality loss. Ideal for archiving or re-burning.
-
For General Playback on Multiple Devices:
-
MP4 (H.264): The most versatile format, offering excellent compatibility and a good balance between quality and file size.
- Pros: Widely supported, decent quality, manageable file size.
- Cons: Some quality loss compared to the original DVD.
-
MP4 (H.264): The most versatile format, offering excellent compatibility and a good balance between quality and file size.
-
For Space-Saving and Storage Efficiency:
-
MP4 or AVI (Compressed): These formats compress the video to reduce file size, making them ideal for storage.
- Pros: Smaller file size, reasonable quality.
- Cons: Quality may degrade during compression.
- Tip: Ripping to MP4 H.264 strikes a good balance between size (around 1-1.2GB) and quality.
-
MP4 or AVI (Compressed): These formats compress the video to reduce file size, making them ideal for storage.
-
For Future Editing or Conversion:
-
MOV: Offers high quality and flexibility for editing, compatible with most editing software.
- Pros: High quality for editing, wide editing tool compatibility.
- Cons: Larger file size, may require conversion for some devices.
-
MOV: Offers high quality and flexibility for editing, compatible with most editing software.
-
For DVD Re-burning:
-
MPEG-2: Maintains the original DVD format, ensuring compatibility when re-burning discs.
- Pros: Preserve the original DVD structure.
- Cons: Large file size.
-
MPEG-2: Maintains the original DVD format, ensuring compatibility when re-burning discs.
3. How Much DVD Data Can You Store on a Hard Drive?
By April 2022, the largest HDD on the market today clocks in at a massive 20 terabytes, and 24TB for external HDDs[7]. So, you can store 3000 - 4800 copyies of DVD discs in the largest hard drive.
 FAQs about Copying DVD to Hard Drive
Use a DVD ripper like WinX DVD Ripper Platinum. Simply insert the DVD, select a TV-compatible format like MP4, set the external hard drive as output, and click RUN. Once done, connect the hard drive to your TV via USB for playback.
Yes, but only for unprotected or homemade DVDs. If you want to copy commercial, store-bought movies or convert the DVD into a standard video file (like an MP4), you will absolutely need extra software, such as HandBrake, MakeMKV, or a dedicated premium ripper like WinX DVD Ripper.
If your DVD has no copy protection, you can use your Mac's built-in tools to create an exact digital clone. Insert your DVD. Open Applications > Utilities > Disk Utility. Look at the left sidebar under the "External" header and select your DVD drive. Click File > New Image > DVD/CD master to create an ISO.
If you are ripping a DVD to a large external hard drive or a NAS, an ISO image or a VIDEO_TS folder is ideal for 1:1 archival backups with full DVD structure. If you are building a dedicated media server to stream high-quality movies to your TV, MKV is widely considered the best choice. For playback on most devices, MP4 (H.264) offers a great balance of size and quality.
Yes — but only with specialized tools. Most free rippers can't handle encryption like CSS, Sony ARccOS, or Disney DRM. Use a ripper like WinX DVD Ripper that supports copy-protected DVDs for personal backup.
With a fast ripper like WinX DVD Ripper and hardware acceleration, a standard DVD can be ripped in 5–10 minutes. Slower tools like HandBrake may take over an hour.
Conclusion
Storing physical DVDs takes up space and leaves them vulnerable to damage, scratches, and playback issues. By copying DVDs to your hard drive, you preserve the original quality, make sharing easier, and enjoy the flexibility of watching your content on any device—anytime, anywhere.
While all four tools we reviewed are solid choices, WinX DVD Ripper Platinum stands out for its superior speed, quality, and ability to handle copy-protected discs—something HandBrake and VLC struggle with.
👉 Want the fastest, easiest way to copy DVDs with high quality? Try WinX DVD Ripper Platinum now.
Disclaimer: Digiarty Software does not advocate ripping copy-protected DVDs for any commercial purpose and suggests referring to the DVD copyright laws in your countries before doing so.
References
- "DVD capacity limits for all types of DVDs". CD Baby
- "What is FAT32 maximum file size limit?". WinAbility Software
- "DVD-Video". Wikipedia
- "HandBrake features". HandBrake
- "Content Scramble System". Wikipedia.
- "ARccOS protection". Wikipedia
- "What's the largest hard drive you can buy?". Alphr. June 15, 2023.
- "When Is DVD Ripping Illegal?". Toptenreviews


