


How to Build a Home Media Server for DVDs, Movies, and 4K Streaming
 Donna Peng
Updated on
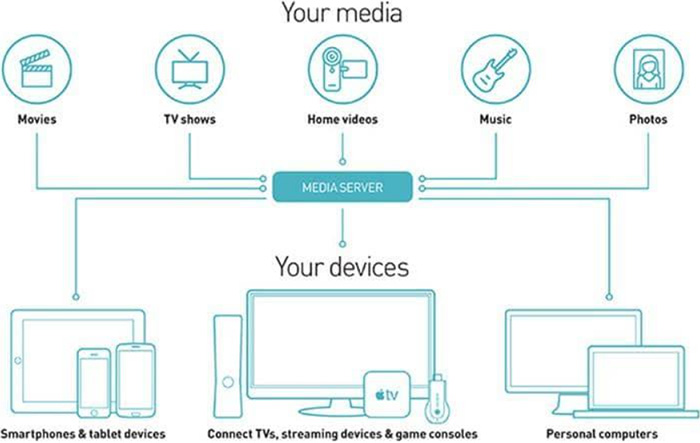
Many people eventually get tired of juggling streaming apps or discovering that movies they liked are suddenly gone. A home media server gives you a simple way to keep everything in one place, your DVDs, Blu-rays, and digital files, and stream them whenever you want. You can turn an old PC or a NAS into your own media hub, and tools like Plex or Jellyfin make it easy to watch your library on any TV or device without relying on subscription platforms.
What You Need Before Building a Home Media Server
Before you start planning how to build home media server, it helps to understand what actually matters in a real setup. Most beginners don’t need anything complicated at the start. The goal is simply to store your movies, DVDs, and TV shows in one place and stream them smoothly to your TV or phone without buffering or constant app switching.
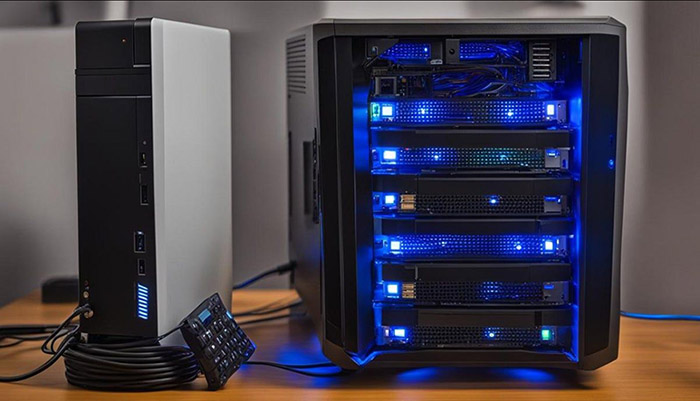
1. A Computer, Mini PC, or NAS
This is the core of your setup—the machine that runs everything. When people how to make home media server, they usually begin with something they already have or something small and affordable.
- Old PC: Cheapest way to start, often enough for basic streaming and DVD libraries.
- Mini PC: Compact, quiet, and efficient—popular for 24/7 Plex or Jellyfin use.
- NAS: Best for larger libraries and long-term storage with multiple drives.
In practice, many users start with an old desktop and later upgrade once their library grows.
2. Storage Drives
Storage is usually the part people underestimate when they build home media server from an old PC. Video files vary a lot in size, especially if you are ripping physical discs or storing 4K content.
- DVD rips: around 4GB–8GB per movie
- Blu-rays: roughly 20GB–60GB each
- 4K movies: often 50GB–100GB+ depending on quality
A small collection can quickly grow into several terabytes, so planning storage early avoids constant upgrades later.
3. Media Server Software
This is what turns simple storage into a real streaming system. If you want to how to build a home streaming media server, this layer is what makes everything accessible on your TV or phone.
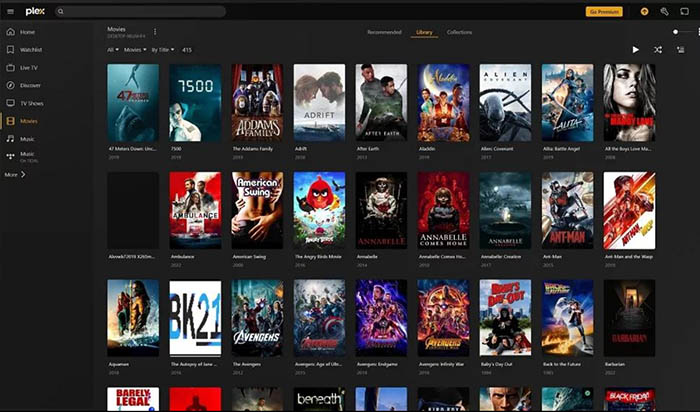
- Plex: Most beginner-friendly, widely supported on TVs and mobile devices.
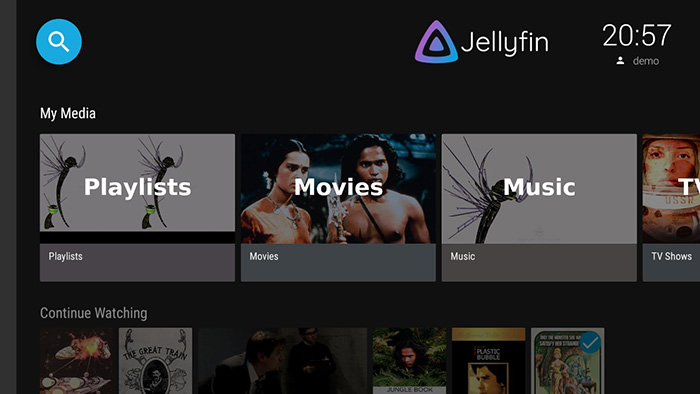
- Jellyfin: Fully free and open-source, preferred by privacy-focused users.
- Emby: A middle ground with a mix of free and paid features.
4. A Fast and Stable Network
Even a powerful server will struggle if your network is weak. Smooth playback—especially for 4K—depends heavily on connection quality.
- Gigabit Ethernet: Best option for stable streaming without buffering.
- Wi-Fi 6: Works well for 4K if wired connection is not possible.
5. Optional DVD / Blu-ray Drive
If your goal is to convert a physical DVD collection, an external optical drive becomes useful. Many people start their server journey because they want to preserve or centralize DVDs and Blu-rays instead of keeping them scattered across shelves.
Once ripped, these discs can be added to your server and streamed just like any downloaded movie, making your collection far more flexible and accessible.
Step-by-Step: How to Build a Home Media Server
This section breaks down the full setup process in a practical way. If you are figuring out how to build a home media server, the goal is not just installing software, but building a working system that can store your DVDs, Blu-rays, and digital movies, organize them properly, and stream them smoothly to any device in your home without buffering or compatibility issues.
Step 1. Set Up Your Server Hardware
The first step is preparing the machine that will act as your always-on media server. This can be an old PC, an Intel mini PC, or a NAS device. At this stage, you are not optimizing performance yet—you are simply making sure the system is stable, properly powered, and ready to run continuously. Check basic system health, ensure storage ports are available, and confirm the operating system is installed and updated before moving forward.
- Choose an Intel mini PC, old office PC, or NAS as your base system.
- Install or verify Windows, Linux, or NAS operating system is working correctly.
- Ensure the system can run continuously without overheating or random shutdowns.
- Check available USB, SATA, or network ports for future storage expansion.
- If using Intel hardware, confirm Quick Sync support for later Plex transcoding performance.
Step 2. Install Media Server Software
Once the hardware is stable, the next step is installing the software that turns it into a real media streaming system. This software is responsible for organizing your library, generating metadata, and enabling playback across devices. At this stage, focus on getting the system running and accessible through a browser before adding any media files or making advanced configuration changes.
- Download and install Plex or Jellyfin on your server system.
- Create a Plex account or configure Jellyfin admin credentials.
- Launch the web dashboard and confirm the server is accessible locally.
- Check basic settings such as language, time zone, and network access.
- Verify that the server interface loads correctly from another device on the same network.
Step 3. Add Your Storage Drives
After the software is running, the next step is connecting storage where all your media files will live. This is one of the most important parts of the setup because storage determines how large your library can grow over time. The goal here is to create a clean and scalable folder structure so that your system can easily organize and retrieve content later without confusion or duplication.
- Connect internal HDDs, external USB drives, or NAS storage volumes.
- Initialize and format drives if they are new or unrecognized by the system.
- Create structured folders such as Movies, TV Shows, and Music.
- Assign clear drive labels to avoid confusion when expanding storage later.
- Confirm the operating system and media server detect all available storage space.
Step 4. Add Media Files (Ripped or Downloaded)
This step is where your media server starts becoming useful. You begin transferring or ripping your actual content into the system, whether it comes from DVDs, Blu-rays, or digital downloads. The key here is consistency, and organize files directly affects whether Plex or Jellyfin can automatically recognize titles, fetch posters, and build a clean library without manual corrections.
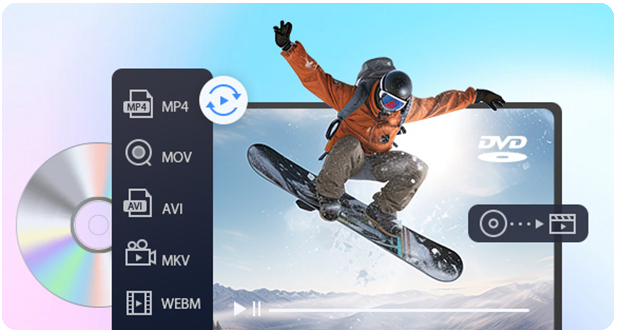
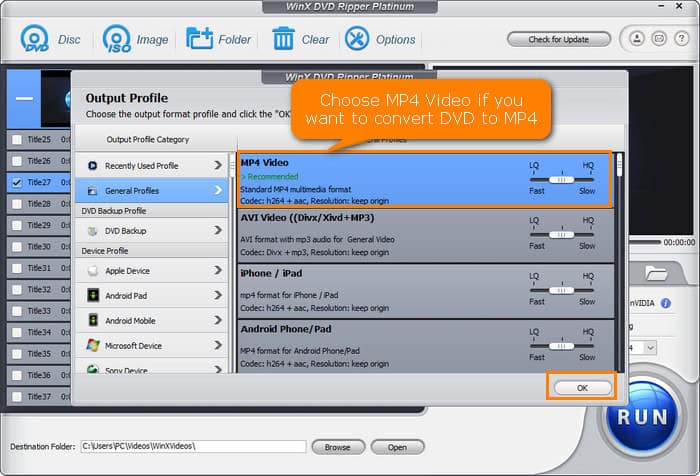
- Rip DVDs or Blu-rays using WinX DVD Ripper, MakeMKV for full-quality backups.
- Optionally compress files using HandBrake to save storage space.
- Move media files into the correct folder structure on your server.
- Rename files using a consistent format such as Movie Name (Year).
- Separate movies, TV shows, and special content into different directories.
Step 5. Scan and Organize Your Library
Once your files are in place, the next step is connecting them to the media server so it can build your library automatically. This process involves scanning folders, matching files with online databases, and generating metadata such as posters, descriptions, and episode structures. Proper setup here ensures your library looks organized and behaves like a professional streaming platform.
- Add your media folders inside Plex or Jellyfin library settings.
- Trigger a full library scan to index all available content.
- Wait for metadata such as posters, titles, and descriptions to download.
- Manually fix incorrect matches if any movies or shows are misidentified.
- Verify that TV show seasons and episodes are structured correctly.
Step 6. Connect Your Devices for Playback
The final step is making your media server accessible across all your devices. This is where the setup becomes practical for everyday use. You install apps on your TV, phone, or streaming devices and connect them to your server. The goal is to ensure smooth playback, subtitle support, and reliable performance even for high-resolution 4K content.
- Install Plex or Jellyfin app on smart TV, phone, or streaming devices.
- Log in and connect the app to your home media server.
- Browse your library and verify all content appears correctly.
- Test playback with different formats including subtitles and 4K video.
- Check for smooth Direct Play performance without unnecessary buffering.
At this point, your system is fully functional and behaves like a private streaming platform that you control entirely, running on your own hardware and tailored to your media collection.
Hardware & Software Tips for a Stable Home Media Server
This part brings together the most important decisions you’ll face when planning how to build home media server. Most problems users run into later—slow playback, wasted storage, or poor device compatibility—usually come from choosing the wrong hardware or misunderstanding how Plex, Jellyfin, and storage actually behave under real usage conditions.
Hardware Choice: Old PC vs Mini PC vs NAS
Choosing the right base system is one of the first real decisions when planning how to build home media server. Most users start with whatever is cheapest or already available, but each option behaves very differently once you actually start streaming movies, especially when 4K or multiple devices are involved.
| Setup | Best For | Real-World Trade-off |
|---|---|---|
| Old PC | Cheapest way to start a media server | Higher power use, but surprisingly capable for basic streaming and DVD libraries |
| Mini PC | Most beginners building a quiet 24/7 Plex/Jellyfin setup | Limited internal storage expansion, but very energy efficient and stable |
| NAS | Large media libraries and long-term storage planning | Higher upfront cost, but best for scalability and drive management |
A common mistake when users build home media server from an old PC is overestimating hardware requirements. In most cases, smooth playback depends more on network quality and video codec compatibility than raw CPU performance. However, once you move into 4K streaming or multiple simultaneous users, Intel Quick Sync becomes important because it handles Plex transcoding more efficiently and reduces system load significantly.
Storage Reality: What Most Beginners Underestimate
Storage planning is often where setups start to break down. A few movies may seem small at first, but once you add Blu-rays and 4K files, storage usage grows much faster than expected. This is especially important when learning how to make home media server, because storage limits directly affect how long your system stays usable without upgrades.
- DVD rip: 4GB–8GB per movie depending on quality and encoding.
- Blu-ray: 20GB–60GB per title with full video and audio tracks.
- 4K remux: 50GB–100GB+ for high-bitrate, near-original quality playback.
These numbers explain why many users quickly move from a single drive to multi-terabyte setups or NAS systems once their library starts growing.
Plex, Jellyfin, and Emby: Real-World Trade-offs
Software choice is another key factor when planning how to build a home streaming media server. Plex is usually the easiest entry point because it handles setup, metadata, and device compatibility automatically. Jellyfin is preferred by users who want full control and no subscription layers, but it may require more manual configuration. Emby sits in between, offering a mix of convenience and customization depending on how it is deployed.
| Feature | Plex | Jellyfin | Emby |
|---|---|---|---|
| Beginner-friendly | Better | Moderate | Good |
| Free features | Limited | Fully free | Partially free |
| Remote streaming | Easiest setup | More setup required | Moderate |
| Privacy | Mixed | Better (self-hosted) | Moderate |
| Smart TV apps | Most stable | Inconsistent on some devices | Generally stable |
In real user discussions, the same issues appear repeatedly: Plex is easier but more restricted, Jellyfin is flexible but less polished on some devices, and Emby depends heavily on setup quality. Playback issues such as buffering, missing subtitles, or TV compatibility problems are usually not software bugs but are related to transcoding behavior.
Direct Play vs Transcoding (Critical Concept)
One of the most important concepts in any media server setup is understanding how video is delivered to your device. Direct Play means the file is sent as-is to your TV or phone, resulting in the smoothest playback and lowest system load. Transcoding means the server converts the video in real time to match device compatibility, which can heavily use CPU resources and lead to lag if the hardware is weak.
This is why even a powerful server can struggle if transcoding is constantly triggered. A properly configured setup aims to use Direct Play whenever possible, reducing unnecessary processing and keeping playback stable across all devices.
 FAQs about Home Media Server Problems
This is one of the most common issues discussed in Plex forums. Even with fast internet, buffering often happens because the server is transcoding instead of using Direct Play. High-bitrate 4K files, subtitle rendering, or unsupported audio codecs can force real-time conversion, which overloads weaker CPUs. Users often report that switching to wired Ethernet or enabling hardware acceleration reduces buffering significantly.
4K playback issues are frequently discussed across Reddit home server communities. Even users with strong hardware report micro-stuttering or pauses every few seconds. The main causes are weak Wi-Fi, heavy bitrate remux files, or forced transcoding. Some LG and Samsung TV apps also struggle with high-bitrate HEVC streams, which makes Direct Play support inconsistent depending on the device.
This is usually caused by incorrect folder paths or permission issues. Many users building a home media server for the first time forget that Jellyfin needs direct read access to media directories. If the folder structure is not properly mapped or mounted, the server simply won’t scan anything, even if files are present. Fixing permissions or re-adding the library usually resolves the issue.
Subtitle issues are widely reported on Plex and Jellyfin forums. External subtitles like SRT or PGS can trigger transcoding, which increases CPU load and may lead to buffering, especially on 4K content. In some cases, subtitles appear delayed, fail to load, or break during playback. Many users solve this by embedding subtitles during ripping or switching subtitle settings to avoid forced burn-in.
This is a very common surprise for beginners building a home media server. A single Blu-ray can take 20–60GB, while 4K remux files can exceed 100GB each. Users often underestimate how quickly storage grows when adding TV series or backup collections. Within a few months, even large drives can fill up faster than expected, especially when digitizing DVDs and Blu-rays together.
This concept is central to how any home media server works. Direct Play means the file is streamed directly to your device without changes, which gives the best performance and no extra CPU load. Transcoding converts the video in real time to match device compatibility, but it can heavily stress your server and cause buffering. Most performance problems users report in Plex or Jellyfin are actually caused by unwanted transcoding.


 Free Download
 Free Download