


What Is Handbrake Anamorphic? How to Use the Feature?
Anamorphic is an unnoticeable feature stored under the Dimensions tab. Many Handbrake users have problem understanding anamorphic feature. What is anamorphic? Loose vs automatic vs none vs custom, what's the difference? When and how to use the anamorphic feature?
Table of Contents
Part 1. What Is Handbrake Anamorphic
Anamorphic feature in Handbrake means "encoding that distorted image stored on the DVD, but telling the video player how to stretch it out when you watch it." It keeps the same aspect ratio as the source video during playback. In the latest version of Handbrake, there are four options under the Anamorphic menu, None, Automatic, Loose, and Custom. What should you choose? Anamorphic loose or automatic, or none? Does it change the aspect ratio?
HandBrake Anamorphic: None, Automatic, Loose, and Custom
Click the Dimensions tab, you should see the Anamorphic option, click the drop-down icon, and it displays four modes, None, Automatic, Loose, and Custom. The strict anamorphic mode was removed from HandBrakeCLI nightly on October 1 and replaced by Automatic option. Look at the introduction below to get a better understanding and when to use them.
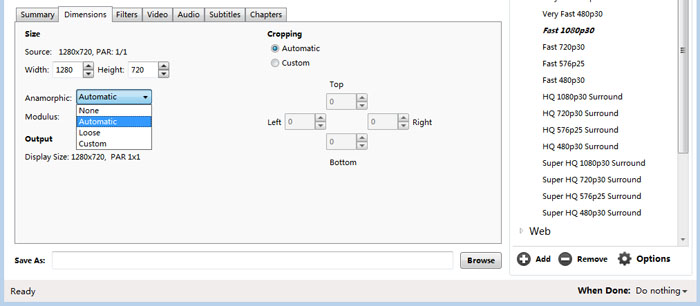
None: Turn off anamorphic. Display size and aspect ratio remain unchanged.
Automatic: It gives the maximum resolution with the original aspect ratio reserved.
Loose: Loose anamorphic enables you to scale the width of the frame, while the aspect ratio keeps the same. For example, the source size is 1280x720, you scale down the width of 1280 to 720, Handbrake auto scales down the height to 406. The final display aspect ratio is the same as the original one.
Custom: This allows you to set parameters including height and width manually. The aspect ratio may change in this mode.
What you may also interested in: Complete guide on how to use Handbrake >>
Part 2. Anamorphic Settings Are too Complicated? Here's An Easier Way to Adjust Video Size
Forget about anamorphic loose or automatic if you'd like to get a specific video size. Winxvideo AI offers an easy way to change width and height with aspect ratio you want, 16:9, 4:3, or 1:1. It helps avoid squishing or stretching the image when setting width and height with wrong aspect ratio.
Working as an alternative to Handbrake, the tool enables you to trim video with/without re-encoding, crop, add subtitles/watermarks, adjust video audio parameters, merge separate clips, and to do some basic video audio editing. Besides, it transcodes videos with 420+ presets profiles in a 5x faster speed than Handbrake does.
Guide to Adjusting Video Width and Height with Correct Aspect Ratio
Step 1: Free download and install the easy program on your computer, and launch it. Click "+Video" button and select a source video you'd like to process from the window.
Step 2: Choose output format from the popping up Output Profile window after the source video is loaded. You won't go wrong with MP4 format that is widely accepted by iPhone, iPad, Android phones & tablets, TVs, Xbox, PS4, etc. Click the OK button to close the window.
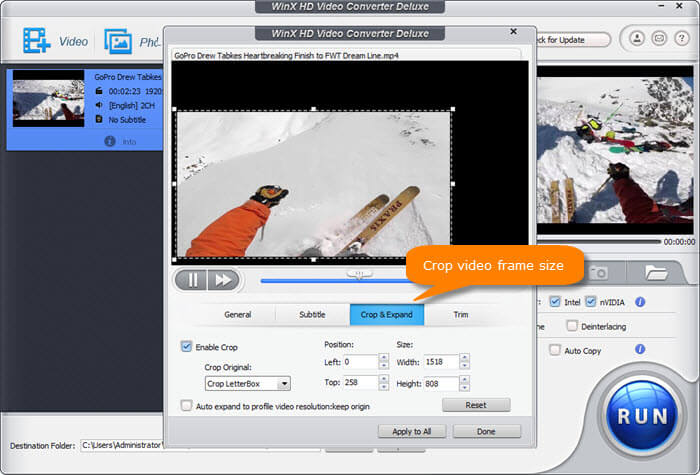
Step 3: Click on the Edit icon, click the Crop & Expand tab, and select Enable Crop. Click the Crop Letterbox and select a mode. It offers Free, Crop Letterbox, 16:9, 4:3, and 1:1. After you've set, click the Done button to save the changes.
Step 4: Click the RUN button to start processing videos.

