






How to Compress Video with HandBrake and Keep Good Quality
Large 4K and HD videos can quickly consume storage space and become difficult to share or upload. HandBrake can significantly reduce video file size by changing the resolution, video encoder, quality setting, bitrate, and other encoding parameters.
But there is no single best HandBrake setting for every video. The right configuration depends on whether you prioritize smaller file size, better visual quality, faster encoding, or wider playback compatibility.
Quick answer: For most users, start with a HandBrake preset and use Constant Quality rather than Average Bitrate. Keep the original frame rate unless you have a reason to change it, use H.264 for maximum compatibility or H.265/HEVC for better compression, and reduce the resolution if you need a substantially smaller file. HandBrake also supports AV1 and hardware encoders on compatible systems.
Quick HandBrake Compression Settings
Your Goal |
Recommended Starting Point |
Best overall balance |
H.264 + Constant Quality |
Smaller file at similar visual quality |
H.265/HEVC + Constant Quality |
Maximum compatibility |
H.264 + MP4 |
Modern codec with high compression efficiency |
AV1 + Constant Quality |
Compress 4K substantially |
Downscale 4K to 1080p |
Keep the original resolution |
Constant Quality + adjust RF |
Target a specific file size |
Average Bitrate + 2-pass |
Faster encoding |
Hardware H.264/H.265/AV1 encoder |
Preserve original audio |
Audio Passthru when supported |
Compress for online sharing |
Use a social or platform-specific preset |
HandBrake's current official presets include software and hardware-based options, including H.264, H.265/HEVC, and AV1 presets depending on the platform and available hardware.
How to Compress Video Files with HandBrake?
Step 1. Download and Install HandBrake App.
Visit Handbrake official site to download a copy according to your platform. There are multiple versions, incl. Windows, Mac, and Linux. Install it by following the wizards. Please note that Handbrake 1.5.0 or above on Windows requires .NET desktop runtime 6.0.x. You'd better have 6GB or more free memory for compressing big 4K video.
Step 2. Import the Video You Want to Compress.
Browse and select an oversized video you want to compress by clicking File or Open Source button on the top, or directly drag and drop the video file into Handbrake interface. Handbrake supports a wide range of common video sources, so you can use the same basic workflow for movies, screen recordings, phone videos, downloaded videos, and other personal media.
Step 3. Choose a Handbrake Preset.
After loading your video, select a preset that is close to your intended output. If you are not sure which preset to use, Fast 1080p30 remains a reasonable starting point for general-purpose computer playback and compatibility. HandBrake's documentation specifically recommends it as a good default when no specific device or output requirement applies.
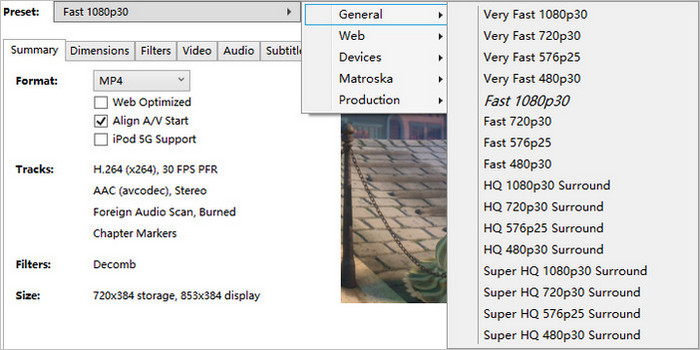
However, you do not necessarily need to use Fast 1080p30 for every video. For example:
- 1080p general-purpose video: Start with a 1080p preset.
- 4K video: Choose an appropriate 4K preset or customize the output.
- Smaller file for online sharing: Consider a Social or platform-oriented preset.
- Modern devices: H.265/HEVC or AV1 can be worth considering.
- Maximum compatibility: H.264 remains the safer choice.
Think of a preset as a starting point rather than a final answer. You can adjust the video settings afterward to achieve the file size and quality you want.
Step 4. Choose the Right Video Encoder.
The video codec has a major effect on both the final file size and playback compatibility. For most HandBrake users, the main choices to consider are H.264, H.265/HEVC, and AV1.
Codec |
Compression Efficiency |
Encoding Speed |
Compatibility |
Best For |
H.264 |
Good |
Fast |
Excellent |
General use and broad device compatibility. |
H.265/HEVC |
Better |
Slower |
Good |
4K video and saving storage space. |
AV1 |
Very good |
Can be slower |
More limited |
Modern devices and efficient video compression. |
H.264
H.264/AVC is one of the safest choices when compatibility matters. It offers a good balance of quality, file size, encoding speed, and device support.
Choose H.264 if you plan to:
- Play the video on many different devices
- Share the video with other people
- Use older media players
- Avoid potential HEVC/AV1 compatibility issues
H.265/HEVC
H.265/HEVC is designed to provide better compression efficiency than H.264, making it particularly useful for HD and 4K video. In practice, the actual size reduction depends on the source video and encoding settings, so do not assume that switching from H.264 to H.265 will always cut the file size by exactly 50%.HEVC is a good choice when smaller files matter more than maximum compatibility.
AV1
AV1 is another modern video codec designed for efficient compression. HandBrake's current official presets include AV1 options on supported systems, including hardware-based AV1 encoding on compatible Intel hardware. AV1 can be attractive when file size and compression efficiency are priorities, but compatibility and encoding performance should be considered before using it as your default codec.
To change video codec, head to Video tab, drop down the Video codec menu, where you can convert H.264 to HEVC for 50% file size reduction without quality loss, if your computer is powerful enough to encode HEVC for compression.
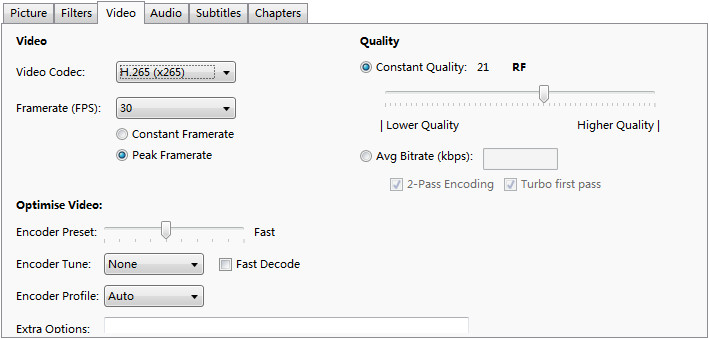
Click More for Handbrake video quality settings >>
Step 5. Choose Constant Quality or Average Bitrate.
One of the most important HandBrake settings is the video quality mode. HandBrake primarily gives you two approaches:
- Constant Quality: This is generally the better choice when your main goal is to make the file smaller while keeping consistent visual quality. It avoids the need for 2-pass encoding. HandBrake's documentation recommends Constant Quality for most situations because it can allocate more bitrate to complex scenes and less to simple scenes, resulting in efficient use of the available bitrate.
- Average Bitrate: You can use it when you have a specific file-size requirement, such as: The video must fit under a particular upload limit. You need a predictable target bitrate. You are preparing multiple videos with a controlled bitrate. You can also use 2-pass encoding when appropriate. The trade-off is longer encoding time.
Step 6. Adjust the RF Quality Setting
When using Constant Quality with encoders such as x264 or x265, HandBrake uses an RF value to control quality. The basic rule is:
- Lower RF = higher quality + larger file
- Higher RF = lower quality + smaller file
For x264, HandBrake's documentation gives an RF value around 20 ± 1 for standard-definition video and 22 ± 1 for HD video as general starting points. However, these are not universal settings for every source. A practical starting guide is:
Source |
Starting RF Range |
SD / 480p |
Around 20 |
720p |
Around 20–22 |
1080p |
Around 21–23 |
4K |
Start around 22–24 and test |
Note: These values are starting points rather than fixed rules. The appropriate value varies with the encoder, source quality, motion, film grain, animation, and your personal tolerance for quality loss. If the output is still too large:
- Increase the RF value slightly.
- Test a short section. Compare it with the original.
- Stop increasing RF once quality degradation becomes noticeable.
- If the output quality is too low, reduce the RF value.
Don't Expect RF to Predict File Size
One of the biggest misunderstandings about Constant Quality is expecting a particular RF value to produce a predictable file size. It does not. A 10-minute grainy movie and a 10-minute talking-head video can produce very different file sizes at the same RF because complex footage requires more bitrate to maintain the selected quality. HandBrake specifically notes that Constant Quality output sizes are inherently unpredictable and can vary considerably between sources.
Step 7. Reduce the Video Resolution if You Need a Much Smaller File
Changing resolution is often more effective than aggressively lowering quality. If you don't expect that high resolution, you can downscale it by typing smaller pixels of width and height proportionally, for example, in order to compress 4K UHD to 1080p, you can open the Dimensions tab, set Resolution Limit to 1080p HD from the drop-down list, the scaled size will be changed from 3840x2160p down to 1920x1080p automatically. This will make video substantially smaller compared with the original 4K 2160p. If your video contains black bars, you can keep the aspect ratio and preview the result before encoding.
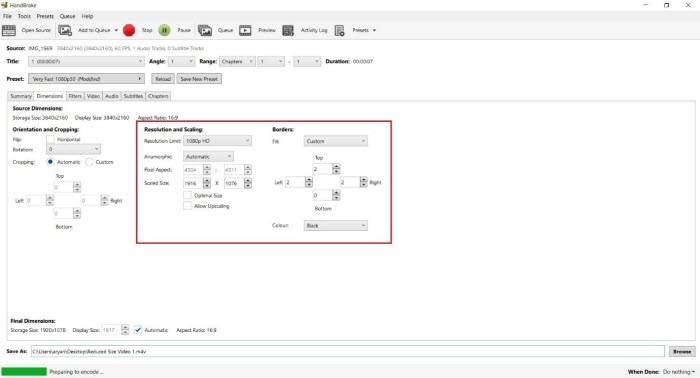
Step 8. Keep the Original Frame Rate when Possible and Optimize the Audio
In this section, you're able to change the video framerate to reduce file size, depending on your source video. Generally, 24fps is used for film, 25 for PAL, and 29.95 for NTSC. A good general rule is to keep the same frame rate as the source unless you have a specific reason to change it.
Then go to the Audio tab, choose audio settings based on the source and your needs. For example, you can keep stereo audio if the source is stereo. Avoid uncessary extra audio tracks. Use a reasonable AAC bitrate when re-encoding is appropriate. Consider Audio Passthru when preserving the original audio is more important than reducing its size.
HandBrake supports passthrough for several common audio formats. Audio Passthru copies the supported source audio without re-encoding it, preserving the original audio quality, although large lossless or high-bitrate audio tracks can increase the final file size. If your priority is the smallest possible file, re-encoding the audio may save additional space.
Step 9. Start Encoding and Check the Result.
After adjusting your settings, you can select the output folder under Destination, give the resulting file a name and click Browse button to specify the output folder path. Then click the green Start Encode button to finish Handbrake video compression.

In our test, Handbrake compressed a 16s 1920x1080p video at 24fps from originally 32.4MB to 3.67MB h.264 video with the fast 1080p30 profile.
Best HandBrake Settings for Video Compression
If you want a quick starting point rather than adjusting every option manually, use the following guidelines.
Setting |
Recommended Starting Point |
Container |
MP4 for broad compatibility; MKV when you need its supported features. |
Codec |
H.264 for compatibility; H.265/HEVC for smaller files. |
Quality Mode |
Constant Quality |
RF |
Start around the encoder/source recommendations and test. |
Resolution |
Keep the source resolution unless you need a major size reduction. |
Frame Rate |
Same as source |
Audio |
AAC at a reasonable bitrate or Passthru when appropriate. |
Hardware Encoding |
Use when encoding speed is more important than maximum compression efficiency. |
Filters |
Leave disabled unless a specific filter is needed. |
For most users, Constant Quality is the easiest place to start. If the resulting file is too large, try increasing RF slightly. If you need a much smaller file, reducing the resolution can have a greater impact than continuously increasing RF.
Prefer a video tutorial? If you'd rather follow the compression process visually, watch our step-by-step HandBrake tutorial below. It walks you through the key settings for reducing video size, including resolution, H.264/H.265, Constant Quality (RF), and hardware encoding.
Why Is My HandBrake File Bigger Than the Original?
Sometimes a video processed in HandBrake can end up larger than the original file. This does not necessarily mean HandBrake failed. The most common reasons are:
- The source is already highly compressed. Re-encoding an efficient H.265 or AV1 video to H.264 can make the output larger.
- The RF value is too low. Lower RF prioritizes higher quality and can produce a larger file.
- The output codec is less efficient. H.264 generally requires more data than H.265/HEVC for similar visual quality.
- The audio takes up more space. High-bitrate or multiple audio tracks can increase the final file size.
- The source contains complex footage. Film grain, noise, fast motion, and detailed textures can require more bitrate.
If your HandBrake output is larger than expected, try a slightly higher RF value, a more efficient codec such as H.265/HEVC, or a lower output resolution. More importantly, don't judge compression only by whether the output is smaller. Compare the file size, visual quality, resolution, compatibility, and encoding time together.
Best Handbrake Alternative for Easier Video Compression
HandBrake gives you detailed control over codecs, quality, resolution, bitrate, frame rate, audio, and other encoding parameters. That flexibility is useful, but it can also make video compression more complicated for beginners. If you just want to make this video smaller without spending time adjusting encoding parameters, Winxvideo AI is a good choice as it provides a dedicated video compressor that delivers a more visual workflow for reducing video size. With it you can:
- Specify the file size easily and reduce video size by up to 90% without the necessity to adjust video settings.
- Flexible options to change video resolution, bitrate, frame rate, aspect ratio and other parameters.
- Convert 4K/HD video format or codec like MKV, MOV, MP4, HEVC, AV1, H.264, etc for small video size.
- Transcode videos at 47X real-time faster with Intel QSV/NVIDIA/AMD Hardware acceleration enabled.
- All-in-one toolkit: Record, download, edit, and enhance videos with AI.
How to Compress 4K/HD Videos with Winxvideo AI
Step 1. Free download this Handbrake alternative and install it on your computer, launch it. Kick off the Compressor module to launch the Video Compressor. Then click "+Video" button or directly drag and drop to load the video to be compressed. Batch video compression is available when you loaded multiple videos at once.
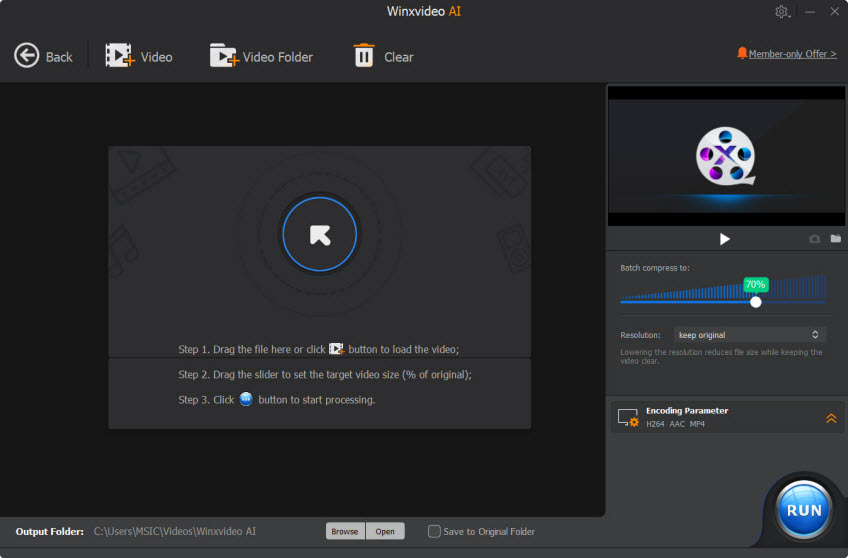
Step 2. Drag the slider to the left to shrink the video file size. It allows to reduce video file size by up to 90% smaller with high quality kept.
Step 3. You can also change the video resolution, encoding codec, and format as you like.

Step 4. Tap the bule RUN button on the main interface to start compressing your video right now.
It can be a convenient option if you need to process multiple videos or prefer a simpler interface instead of manually adjusting HandBrake's encoding settings.
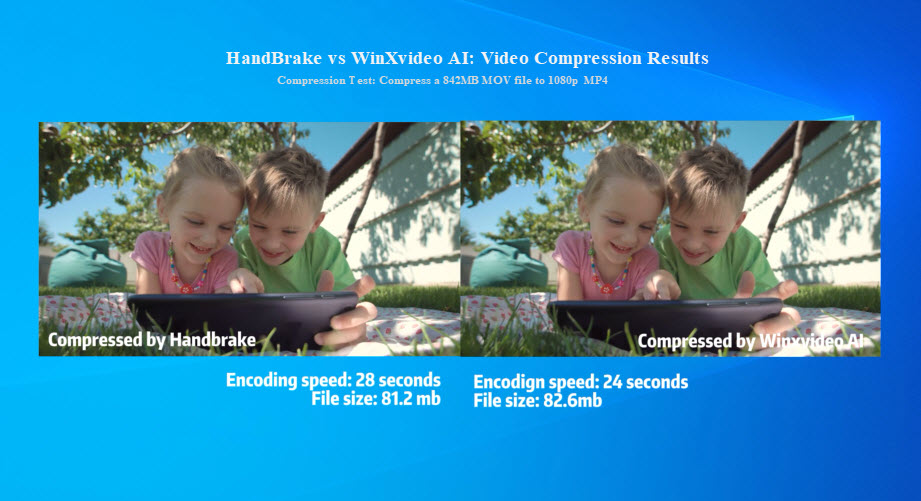
In our test, we compressed an 842MB MOV file to 1080p MOV using both HandBrake and Winxvideo AI. HandBrake took 28 seconds and produced an 81.2MB file, while Winxvideo AI finished in 24 seconds with an 82.6MB output. Both results maintained high visual quality with only a small difference in file size. The main advantage of Winxvideo AI is its simpler workflow—you can adjust the target file size by simply dragging the slider instead of manually configuring multiple compression settings. Below is a side-by-side comparison results between Handbrake and Winxvideo AI.
Want more options? See our best video compression software review to compare different tools for reducing video size, including their compression quality, speed, supported formats, and ease of use.
FAQs about Handbrake Video Compression
Can HandBrake Compress Video Without Losing Quality?
Not if you mean literally zero quality loss. Significant video compression normally requires some form of lossy encoding. The practical goal is to create a much smaller file while keeping any quality reduction difficult to notice.
HandBrake does support lossless encoding in certain workflows, but lossless output can be much larger than normally compressed video. For everyday video compression, focus on finding a good balance between file size and visual quality.
What RF Should I Use in HandBrake?
For x264, HandBrake's documentation suggests around RF 20 ± 1 for SD video and RF 22 ± 1 for HD video as general starting points. The right value depends on your source and desired result.
- Lower RF: Higher quality and larger file.
- Higher RF: More compression and smaller file.
There is no universal RF value that guarantees a particular file size. Different videos can produce very different results at the same RF.
Is H.264 or H.265 Better for Compressing Video?
H.265/HEVC is generally better when your priority is a smaller file, while H.264 is better when compatibility is the priority. H.264 is supported by a wider range of devices and players. H.265 can provide better compression efficiency, which makes it particularly useful for 4K and other high-resolution video.
- Choose H.264 for broader compatibility.
- Choose H.265/HEVC when saving storage space is more important.
Should I Use Constant Quality or Average Bitrate?
Use Constant Quality for most video compression tasks. Constant Quality allows HandBrake to adjust bitrate according to the complexity of different scenes, while Average Bitrate is more useful when you need a predictable bitrate or target file size.
- Quality priority: Constant Quality
- Specific file-size priority: Average Bitrate
Why Is My HandBrake File Bigger Than the Original?
Your source may already use a highly efficient codec, your RF may be too low, or your output settings may require more data than the original. For example, converting an H.265 video to H.264 can produce a larger file even if the visual quality appears similar. If your output is unexpectedly large, try the following:
- Use H.265/HEVC instead of H.264 when your devices support it.
- Increase the RF value slightly.
- Reduce the output resolution if you do not need the original resolution.
- Remove unnecessary audio tracks or reduce high audio bitrates.
Can HandBrake Compress 4K Video to 1080p?
Yes. Open the Dimensions settings and change the output resolution from 3840 × 2160 to 1920 × 1080.
This can significantly reduce the amount of video data when you do not need 4K resolution. For a good starting point, combine 4K-to-1080p downscaling with H.265/HEVC and Constant Quality, then adjust RF based on the resulting quality and file size.
Does HandBrake Use GPU Acceleration?
Yes. HandBrake supports hardware video encoding on compatible systems, including technologies such as Intel Quick Sync Video, NVIDIA NVENC, AMD VCN, and Apple VideoToolbox.
Hardware encoding can make compression much faster, but faster encoding does not necessarily mean a smaller output file. If maximum compression efficiency is your priority, compare hardware and software encoding with the same source and quality target.
What Is the Fastest Way to Compress a Video in HandBrake?
For faster processing, use a supported hardware encoder, select a faster encoder preset, and avoid unnecessary filters. Keep in mind that faster settings may trade some compression efficiency for speed. If you are compressing many videos, however, the time saved can be more valuable than achieving the absolute smallest file size.
Sum up
That’s all about how to compress video files using Handbrake. It is of a learning curve to get used to the interface. With a little experimentation, you can compress video and get incredible compression quality. If you cannot get used to it, try the alternative mentioned above.