


How to Burn DVD on Windows 11/10 for Free [with Pictures]
Want to create a recordable DVD for safe backup or data transfer of your videos, music, or data? You'll need a DVD burner to manage the burning process on Windows 11/10. Did you know that Windows 11 comes with built-in Burn to Disc features? If you weren't aware, allow us to introduce you to three free DVD burning tools for Windows 11/10. These tools will assist you in burning software, games, movies, and various other types of media to DVD on your Windows 11 PC without any cost.
Get the Tools
To burn DVDs on Windows 11 PCs, you need the following tools:
1. Files ready to be written to disc. You may need to make your videos or files smaller based on the DVD you're going to use for burning.
2. A CD or DVD recorder drive. If your computer doesn't have a built-in drive, get an external DVD player.
3. A blank disc. Not all the DVD types can be used to burn data or video. You need to get a blank and recordable CD or DVD (if your files are smaller than 4.7 GB, you can opt for DVD5. However, if your files exceed 4.7 GB or you want to store higher-quality video content, consider burn videos to DVD9. Note that not all DVD burners and players support dual-layer DVDs):
- CD-R, DVD-R discs: this disc type allows data or music to be burned for a single time and cannot be erased.
- CD-RW, DVD-RW discs: this disc type allows data or music to be burned and erased for many times.
4. DVD burning Software for Windows 11/10. Below are the best free DVD burners on Windows 11/10 for different burning purposes:
Windows 11 DVD Burner |
Price |
Best for |
Details |
Windows Media Player |
Free |
Burn data, music, picture, and video to data CDs or data DVDs on Windows 11. |
|
File Explorer |
Free |
Create disc backups of files, folders, and software installers on Windows 11/10. |
|
WinX DVD Author |
Free |
Free burn any videos to a video DVD for playback on all standard DVD players. |
|
BurnAware |
Free, $29.95 |
Burn audio CD, video DVD, bootable disc, Blu-ray DVD on Windows 11. |
Best Free DVD Burner for Windows 11/10
WinX DVD Author [100% FREE & No Limits] The best free DVD burner for Windows 11 to easily create DVD-video from MP4, VOB, ISO, AVI, MOV, etc. on Windows 11, 10, and lower. Rich features are available to create titles, menus, add subtitles, add music, adjust settings, etc. It supports burning files to DVD±R/±RW, DVD DL+R, and DVD DL±RW.
Method 1. Burn DVD on Windows 11 with Windows Media Player
Windows Media Player on Windows 11/10 offers the DVD burning feature. It can burn audio CDs, data CDs as well as data DVDs. A data DVD has about 4.7 GB capacity and can store music, pictures, and videos. It can be played on PCs and some DVD players that support the file types you import to the DVD disc.
Windows Media Player is included with Windows operating system. If it is missing on your Windows 11 system, you can install it manually. Once installed, just follow the steps below to burn a data DVD on Windows 11 using Windows Media Player.
Step 1. Type wmp into the search bar to find and open Windows Media Player. If the Player is currently open and in Now Playing mode, click the Switch to Library button in the upper-right corner of the Player to enter the Player Library.
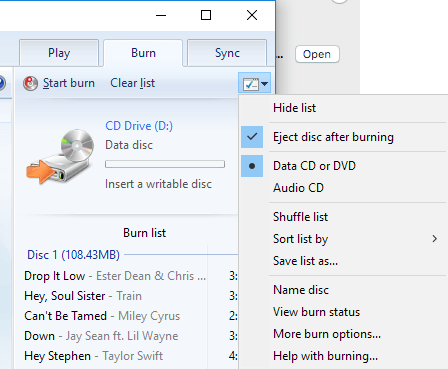
Step 2. In the Player Library of the free Windows 11 DVD burner, click the Burn tab at the top right corner, select the Burn options button, and then choose Data CD or DVD if you want to burn videos, audio, or images to a DVD.
Step 3. Insert a blank DVD into your DVD-ROM drive and close "Autoplay" if it appears. The drive will be recognized by the free Windows 11 DVD burner with the free disc space listed.
Step 4. Open the folder that contains the files you want to burn to DVD, and drag and drop them to the Burn list of Windows Media Player. In the Burn list, you can drag the item and change the order, right-click on an item to delete it, and add multiple files until the disc is full.
Step 5. After you have added all target files and put them in a desired order, simply click Start burn to begin burning DVD on Windows 11/10.
Note: This free DVD burner for Windows 11/10 can only burn or copy music, video, and pictures onto blank, writable audio CDs, data CDs, and data DVDs. You need to know that a data DVD is usually used by computers and can't be played by most DVD players even if it is a video file. If you need to burn your videos to a DVD-Video disc with proper file structure and format for a DVD player, try another Windows 11 DVD burner in the list.
Method 2. Burn DVD on Windows 11/10 Using File Explorer
If you simply need to burn a data DVD, you can perform DVD burning on Windows 11/10 without third-party DVD burner as Windows 11 has a DVD burning tool - File Explorer. Here is how to burn a DVD on Windows 11 with File Explorer.
Step 1. Insert a blank DVD disc into your DVD burner.
Step 2. Open the file folder which cover all the files you want to burn to DVD.
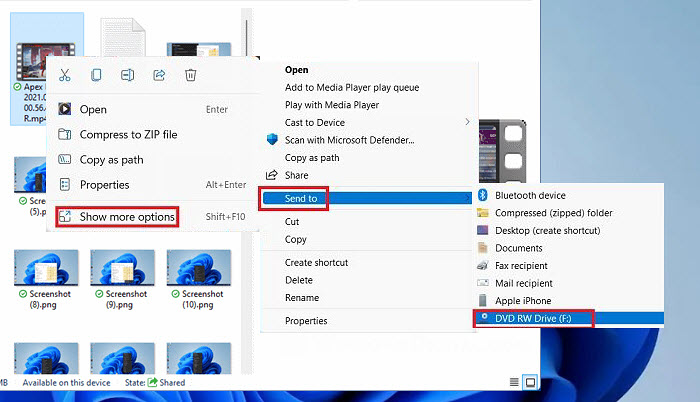
Step 3. Select the files or folder you want to burn to a DVD, click on the right mouse button, and choose Send to -> DVD drive option.
Step 4. When Burn a Disc window pops up, you should enter a disc title and choose how you want Windows 11 to use this disc, like a USB flash drive or with a CD/DVD player. If you select to use your disc "Like a USB flash drive", then the disc will work as a USB and you can simply drag and drop all you files into it.
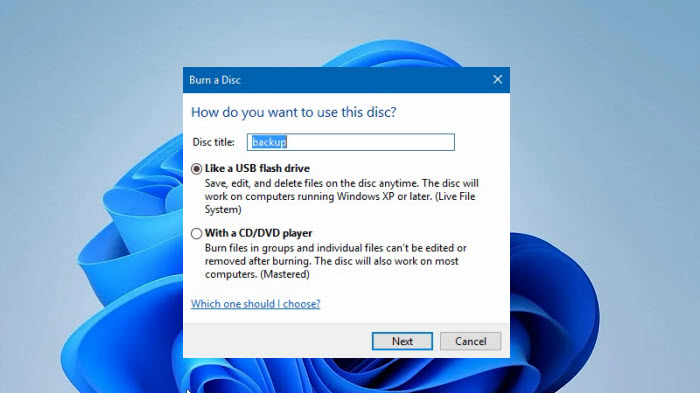
If you want to master a disc, choose "With a CD/DVD player". Then the File Explorer window appears with a header labeled "Files Ready to Be Written to the Disc".
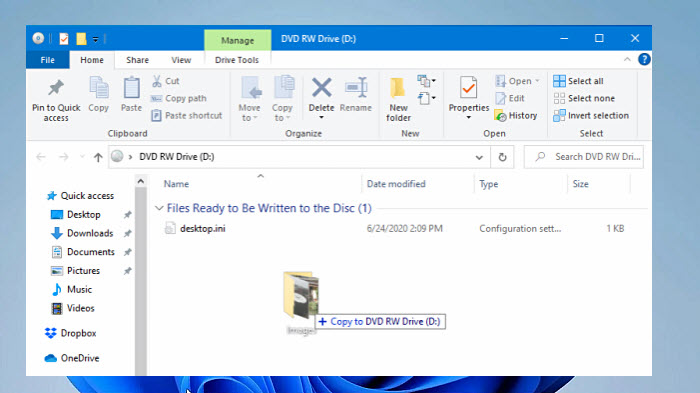
Step 5. Drag and drop the all files you want to burn to the Windows 11 DVD burner below "Files Ready to Be Written to the Disc".
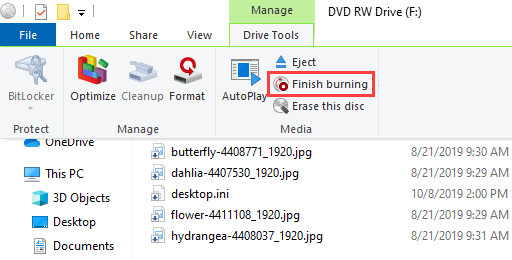
Step 6. Click Drive Tools in the toolbar menu and click Finish Burning.
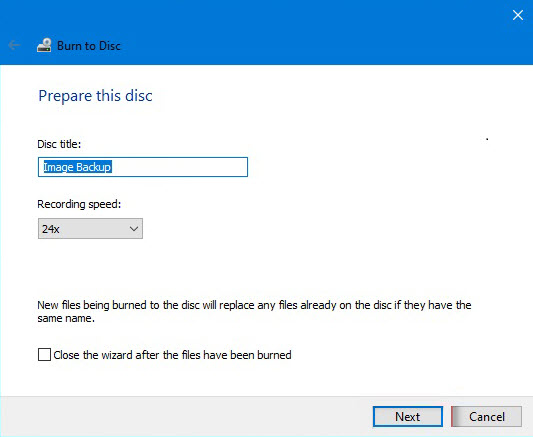
Step 7. At the pop-up Burn to Disc window, enter disc title and select recording speed. The Windows 11 DVD burner allows you to choose a recording speed from 4x to 48x. A higher burning speed means less time it takes to finish the burning and greater chance of data loss or lower quality. Then, click Next, and it will begin burning DVD on Windows 11.
That's it! You have successfully burned a DVD on Windows 11.
[Video Tutorial] How to Burn a CD or DVD on Windows 11/10
If anything in the above guide is not clear enough, you can also follow the steps in the video to burn a CD or DVD on a Windows 11 laptop or computer.
Method 3. Burn DVD on Windows 11 with A Free DVD Burner
How to burn videos to a DVD in Windows 11 for playback on a DVD player? You can't rely on the CD/DVD burning features built in Windows 11. Try the third-party free DVD burning software for Windows 11/10 - WinX DVD Author.
It is a clean and 100% free DVD burner that can burn MP4, VOB, ISO, AVI, MOV, and videos in any format to a video DVD on Windows 11, 10, and lower. It allows users to create titles, menus, add subtitles, add music, and do more settings to create a professional-look DVD. Now, let's download and install it on our computer and follow the steps below to burn a DVD on Windows 11/10.
Step 1. Put a blank DVD into your DVD burner.
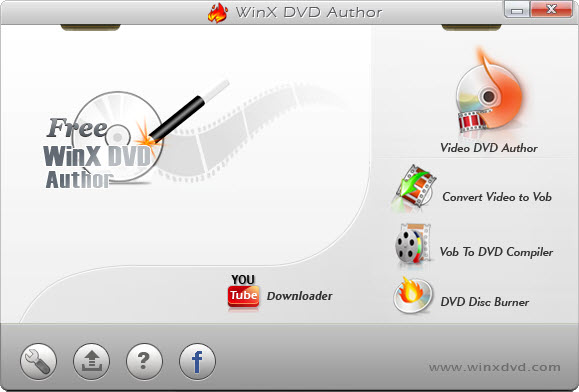
Step 2. Download, install, and open the free Windows 11 DVD burner. Then choose Video DVD Author.
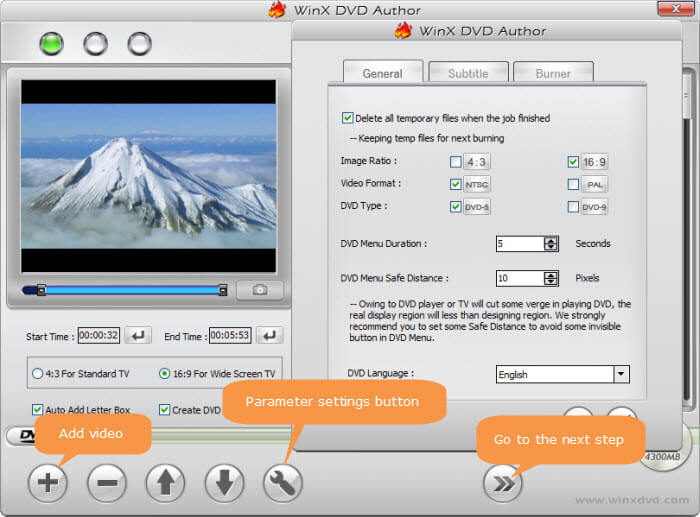
Step 3. Click + button to browse and add the videos you want to burn to DVD.
Once all the videos are loaded into the free DVD burner for Windows 11/10, you can arrange the file order by right clicking on a file and selecting "Move Up" or "Move Down". There are also options to trim video by setting start time and end time, choose aspect ratio 16:9 or 4:3, set subtitle, add external subtitle, and more.
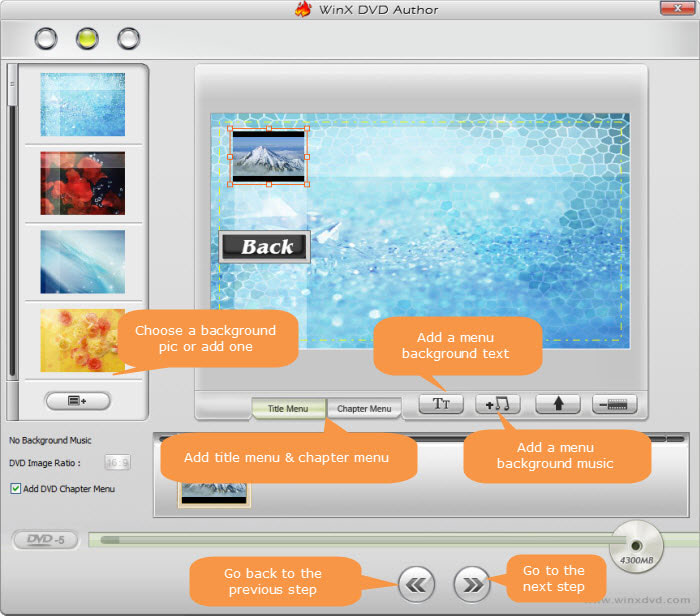
Step 4. Click >> to move to the next step. If you have Create DVD Menu option checked, then you will be directed to DVD menu creating panel. Once done, click >> to move on.
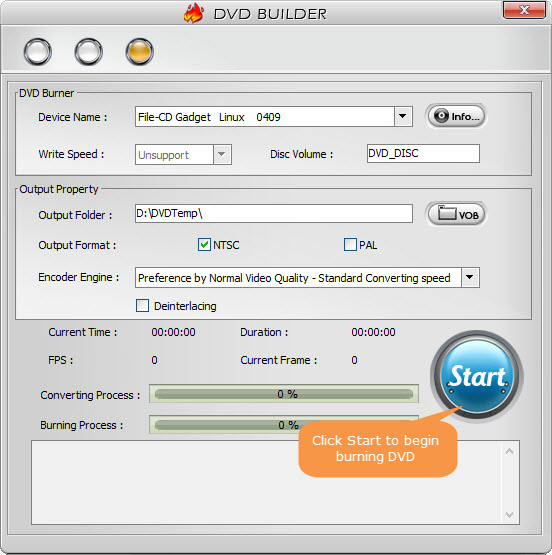
Step 5. On the DVD BUILDER panel, make sure the blank DVD is detected, choose output folder, output format NTSC or PAL, and encoder engine. At last, click the Start button to begin burning DVD on Windows 11/10.
Method 4. Burn DVD on Windows 11/10 with BurnAware
BurnAware is a useful app for Windows 11/10 to burn CDs, DVDs, and Blu-ray discs. You can create bootable data discs, audio CDs, video DVDs, and more. It's easy to use and more importantly, some features are offered for free, including burning data, boot, audio and video discs on Windows 11/10. Here are the detailed steps for using BurnAware to burn a DVD on Windows 11/10:
Step 1: Download and install BurnAware on your Windows 11 computer. You can download BurnAware from their website: https://www.burnaware.com/download.html
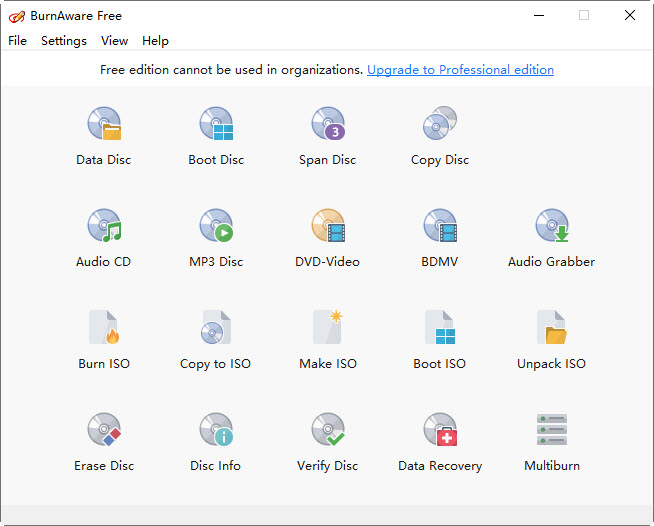
Step 2: Launch this free DVD burner on Windows 11 by double-clicking the desktop icon. Insert a blank DVD into your DVD burner. In BurnAware, select the "DVD-Video" option from the main menu. You can also choose to burn a CD or bootable DVD on Windows 11.
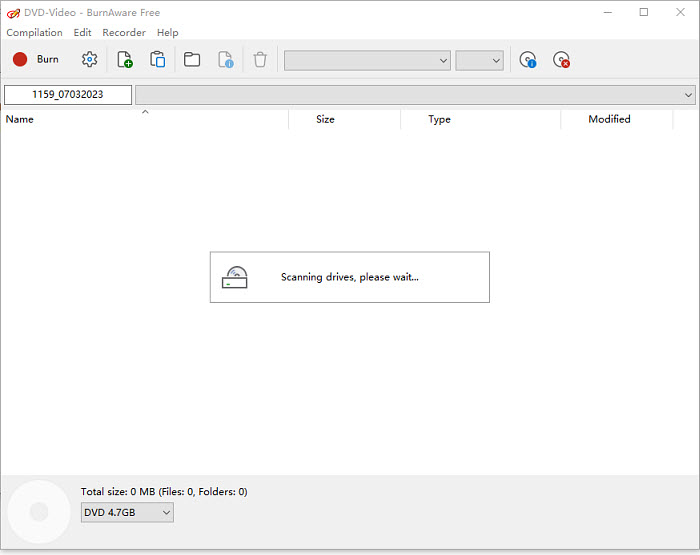
Step 3: It will start to scan the blank disc. Wait for it to finish. Then it will show a blank window ask you to drag the files ready to be written to the disc. You can also click on the "Add" button to add video files to the project.
Step 4: Browse to the location of the video files you want to burn and select them. Click the "Open" button to add the files to the project.
Step 5: Once you have added all the video files you want to burn, click the "Burn" button. In the Burn Settings dialog box, select your DVD burner from the "Target" drop-down list.
Step 6: Choose the burning speed you prefer, or leave it at the default setting. Click the "Burn" button to start burning the DVD/CD on Windows 11/10.
Wait for BurnAware to finish burning the DVD on Windows 11. The progress will be shown on the screen. Once the burning process is complete, the DVD will eject automatically. Remove the DVD from the burner and label it appropriately.
That's it! You have successfully burned a DVD/CD on Windows 11/10.
Conclusion
If you just want to burn a data DVD for backup or burn a CD, Windows 11's built-in DVD burning software File Explorer or Windows Media Player can handle the CD and DVD burning tasks. But data DVDs are used for backup purposes and can't be opened by a standard DVD player. If you want to burn a professional-look movie DVD and play it on a standard DVD player, you need to use the free Windows 11 DVD burner WinX DVD Author. Best of all, it is free to use with no limitations.
Well, above are the 3 methods to burn DVDs on Windows 11/10. If you like this tutorial, please share it with your friends.
FAQ
1. Does Windows 11 have DVD burning software?
Yes. Windows 11 has two free DVD burner built-in, namely Windows Media Player and File Explorer.
2. What Windows program burns ISO to DVD?
You can use Windows Disc Image Burner (built-in) to burn an ISO file to DVD on Windows 11. Windows has a built-in tool for burning ISO files to DVDs. To use it, follow these steps:
- Insert a blank DVD into your DVD drive.
- Right-click on the ISO file and select "Burn disc image."
- In the Windows Disc Image Burner dialog, select your DVD drive and click "Burn."
3. Is there any free CD burning software for Windows 11?
If you need to burn music to a CD on Windows 11, below are some of the most popular free CD burners for Windows 11 system:
- CDBurnerXP: a popular and free CD/DVD/Blu-ray burning application that supports various disc formats and can handle data, audio, and video CDs/DVDs.
- Ashampoo Burning Studio Free: a user-friendly burning software with advanced audio CD burning features.
- ImgBurn: a lightweight and versatile CD/DVD/Blu-ray burning software for Windows 11 that works with various disc formats.
- BurnAware Free: a free CD/DVD/Blu-ray burning software for Windows 11 with a straightforward interface. It supports various types of discs and offers basic burning functions.
- AnyBurn: burn audio CD from various audio formats on Windows 11.
4. Can I use VLC to burn a DVD on Windows 11?
No, VLC cannot burn DVDs. It is primarily a media player that supports a wide range of audio and video formats. You may use it to rip DVDs to video formats or even record videos. However, it doesn't contain the ability to burn videos to a DVD. So you can try other free DVD burners for Windows 11, just like WinX DVD Author.


