Hardware Acceleration in Windows 10: Everything You Should Know
Gain Insight into Hardware Acceleration in Windows 10
Hardware acceleration is not an uncommon term in computing, which is applied to a wide range of fields boosting greater performance to run (3D) games, stream/transcode videos and so on. In Windows 10, we are allowed to turn on hardware acceleration to fulfill certain tasks faster while turning off if hardware acceleration actually works unstably. In this article, we would like to discuss hardware acceleration in Windows 10, including its definition, why and how to enable/disable it in Windows 10, and hardware-accelerated video transcoder which can greatly speed up video encoding/decoding speed.
No.1 Fast Hardware-accelerated Video Transcoder
Winxvideo AI - Making full use of hardware acceleration plus inbuilt Super Encode Engine, Hyper-threading Tech, it can transcode HD/4K/SD videos to HEVC/H.265, H.264, MP4, MKV, AVI, WMV, MOV, FLV, 3GP etc, at an ultimately fast speed.
What Is Hardware Acceleration?
Hardware acceleration features using computer hardware to handle a job with higher efficiency than software algorithms. The hardware able to perform acceleration process is called hardware accelerators. GPU is an example of hardware accelerator which can offload the task from CPU to lead a faster and steadier playback of videos and games. Sound card is another example to deliver higher-quality sound playback and recording. Instead of handling anything with CPU, hardware accelerators take over specific tasks with greatly improved execution.
Why and How to Enable/Disable Hardware Acceleration in Windows 10?
To utilize hardware acceleration, the performance of an application can be significantly improved if you have a strong GPU. In addition, video encoding/decoding, editing/rendering will be greatly speeded up on a computer with CPU including Intel QSV or graphic card featuring Nvidia NVENC.
On the other hand, hardware acceleration turns to be inactive when the computer is armed with a powerful processor but weak components. Also, some problems may happen due to the use of hardware acceleration. For example, you'd better disable hardware acceleration in Chrome to fix black screen issue when playing a video.
In the following, we will lead you to enable/disable hardware acceleration in Windows 10.
1. Search Control Panel or press Windows key + X to access to Control Panel.
2. Select View by: Large icons. Find Display and click on it.
3. Click Change Display Settings in the left side.
4. Click on Advanced display settings.
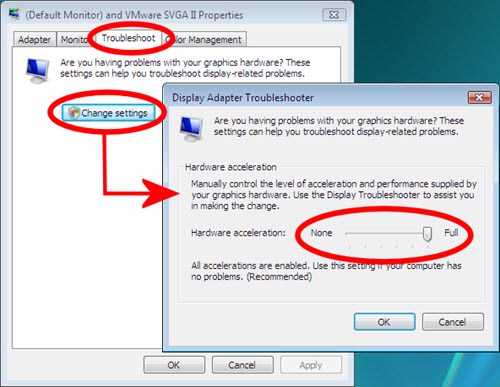
5. Now, it opens a new dialogue box. Select Troubleshoot tab and click on Change settings.
6. Go to Hardware acceleration panel and move the pointer to Full for enabling hardware acceleration or None for disabling hardware acceleration in Windows 10. Click OK.
Notice:
1. Change settings button under Troubleshoot tab may be greyed out because your current display drive doesn't allow you to change settings.
2. If you get a greyed out hardware acceleration option, check if the hardware permits it and try to update drives.
What Is the Best Hardware-accelerated Video Transcoder for Windows 10?
Hardware acceleration is supported by a lot of programs and browsers producing smoother video playback and editing process. Therefore, many video transcoders utilizes hardware acceleration in order to quicken video decoding and encoding.
Winxvideo AI is a highly-acclaimed video converter for Windows (10) featuring hardware acceleration option. It takes full advantage of Intel QSV, AMD and Nvidia NEVNC to greatly accelerate video transcoding speed, especially for HEVC decoding/encoding. It is able to convert video in any format, like MKV to MP4, H.265 to H.264, MP4 to AVI and so on, as well as convert videos to 420+ devices, iPhone, iPad, Apple TV, Android, Windows Mobile, Xbox, Sony PlayStation, Chromecast etc. Thanks to High Quality Engine and De-interlacing Engine, this best hardware-accelerated video transcoder for Windows 10 can output superior quality.
How to enable hardware acceleration in Winxvideo AI for speeding up video conversion? Check the guide below:
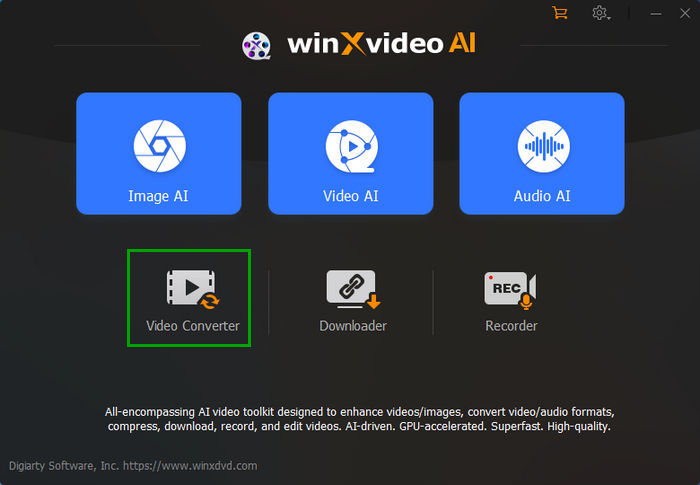
1. Download and install Winxvideo AI on Windows 10.
2. Launch it, click + Video button to import the source video.
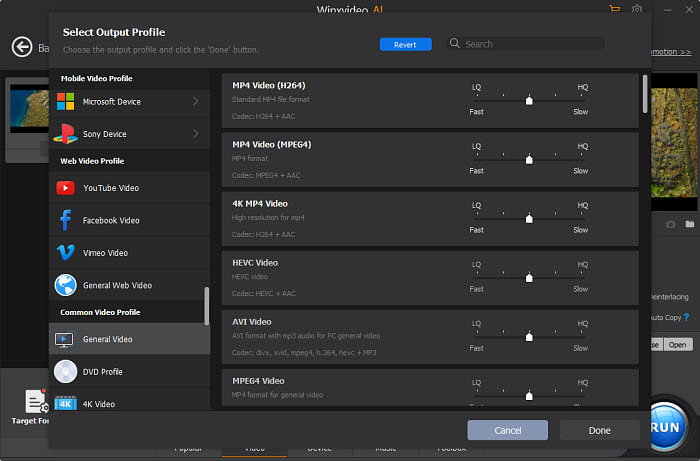
3. Select one format as the output format, for example Video > MP4 H264.
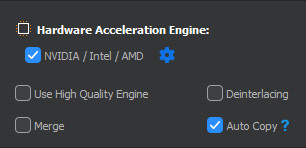
4. Under the preview window, you should Hardware Acceleration Engine: Nvidia/Intel/AMD. Check the box to enable it.
Related: Fast Intel Quick Sync Encoder, NVIDIA HEVC Encoder
5. Click Browse to set a new folder as destination folder if necessary. Then, click RUN button to start convert videos with this hardware-accelerated video transcoder for Windows 10.
In an extremely fast speed, the process will be finished and destination folder storing the converted video will pop up. Play or edit the video immediately, upload online or transfer to devices for later movable playback as you like.