


How to Free Convert AVI to DVD with No Watermark?
Do you have a treasure trove of AVI videos collecting dust on your computer? Maybe you've got home movies from years ago or downloaded content you want to preserve on a more physical format. Whatever the reason, converting your AVI files to DVD is a fantastic way to enjoy them on your TV or share them with others. Here, we'll explore 5 easy and effective methods to transform your digital AVIs into playable DVDs!
Recommended AVI to DVD Converter – Free WinX DVD Author
WinX DVD Author is a 100% clean and free DVD burner for Windows 11, 10, 8, 8.1, and 7. It can facilitate you to convert any AVI videos to DVD with ease and without watermark. Additionally, it also supports converting other video formats such as MP4 and MKV to DVD easily.
5 Ways to Convert AVI to DVD
Way 1. Convert & Burn AVI to DVD on Windows (10) with WinX DVD Author
To put normal videos like AVI videos to DVD, you need professional DVD burner to convert and burn videos to DVD. Ease of use, features and price are three things you should care about when convert videos to DVD. If an AVI to DVD converter program is so complex and difficult that you will never learn it well enough to actually produce anything useful. Whatever you choose must, at minimum, have the critical features you need for your AVI to DVD process.
So, WinX DVD Author is the top choice for beginners. As its name indicates, it is an all-in-one DVD burner which can convert and burn AVI, WMV, DivX, MPEG, XviD, RMVB, ASF, MP4, MKV, and other files to DVD with fast speed and high quality. You can easily edit video by clipping and creating DVD menu & chapter menu. It also supports to add background music and pictures. It is an easy-to-use free program which possesses all necessary features to create vivid DVDs.
Pros:
- Free and clean. No watermark.
- It doesn't set limit on the source file size.
- Support creating menu and adding external subtitles.
- Allow trimming video.
- Fast burning speed and high quality.
Cons:
- Limited background templates.
How to convert AVI to DVD with WinX DVD Author
Step 1. Download and install WinX DVD Author. It is fully compatible with Windows 11, Windows 10, Windows 8/8.1, and Windows 7.
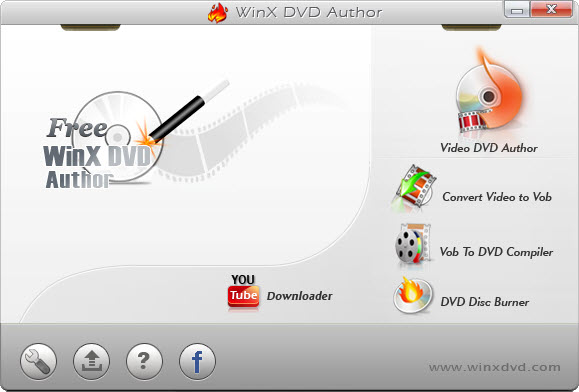
Step 2. Run WinX DVD Author and click Video DVD Author button on the main interface.
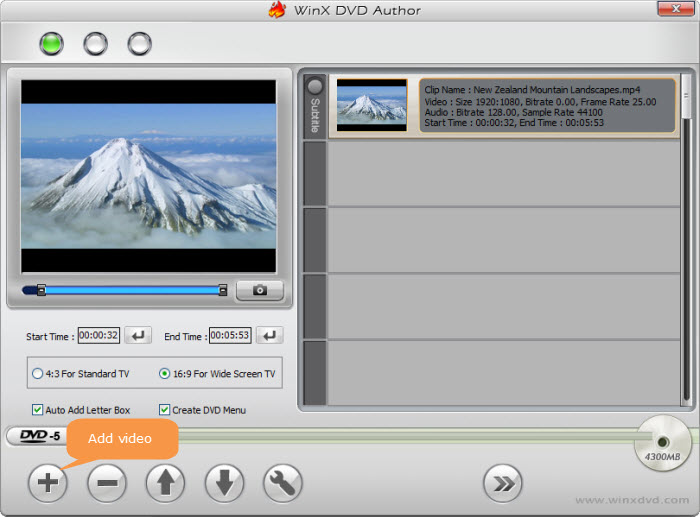
Step 3. Set up source AVI video files.
- Click Add Files (+) button to add AVI videos into source list. You can add more than one AVI video at one time if you need.
- Right click the source clip and you can find the options to move up/down, delete source video, add subtitle file, etc in the list.
- Then click Next step button (>>).
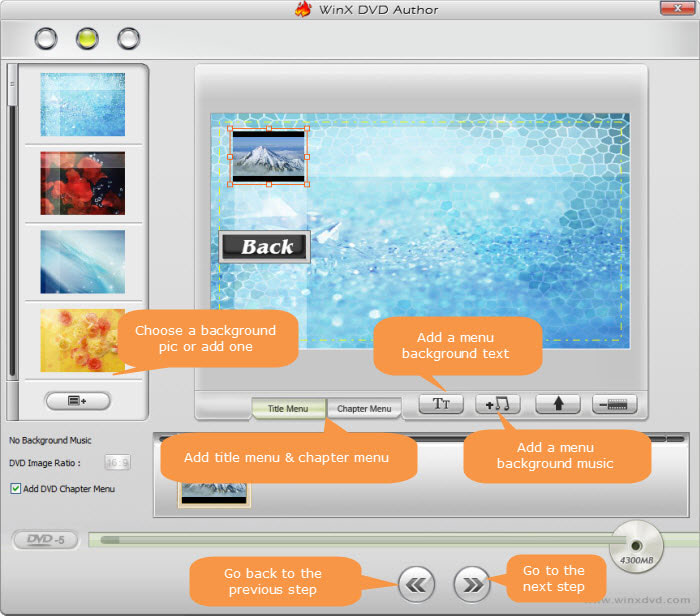
Step 4. Create DVD menu for fast and convenient navigation.
- You can choose background picture in the list or use your own picture to personalize your DVD background by clicking

- Create title menu: Double click "Title Menu" then you can change the picture of title menu. Click
 to add text for title menu then double click to edit.
 - Create chapter menu: Click "Chapter Menu" to create chapter menu for selected clip in preview area. Click
 to add text for chapter menu then double click text to edit it.
 - Add background music by clicking.
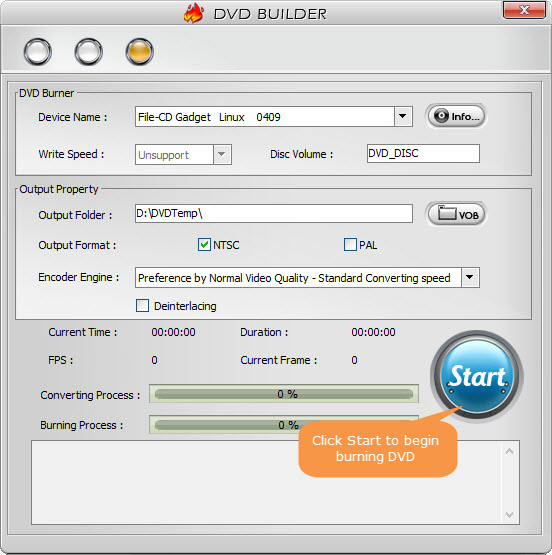
Step 5. Start burning AVI to DVD.
- Insert a blank DVD into your DVD drive.
- Choose an output folder to store file temporarily.
- Select the output DVD format, NTSC or PAL.
- Select desired Encoder Engine.
- Click "Start" button to begin the AVI to DVD conversion and burning task.
Only several simple steps, Free WinX DVD Author could help you convert and burn AVI video to DVD fast and easily.
Way 2. Convert AVI to DVD on Mac with Finder
Mac users can burn AVI to DVD without any installation. If your Mac computer has a built-in optical drive or if it is connected to an external DVD drive (for example, an Apple USB SuperDrive), you can directly use Finder to burn AVI files to DVD or CD for sharing or backup.
Pros:
- Free to use.
- It is built in Mac so users don't need to perform installation work.
Cons:
- It burns data DVDs only.
- It doesn't offer any option for DVD template or customization.
- It doesn't provide editing features.
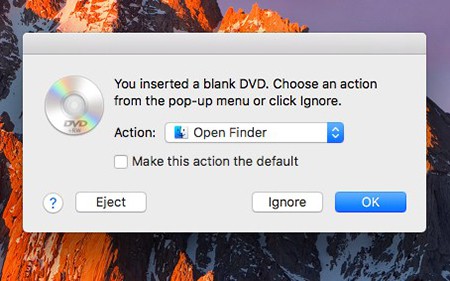
Step 1. Insert a blank disc into the optical drive.
Step 2. When there is a pop-up menu dialog, choose Open Finder.
Step 3. Double-click the disc to open its window, then drag and drop the AVI file to the window.
Step 4. Enter a name in the Disc Name field and tap Burn to start converting AVI to DVD on Mac.
Way 3. Burn AVI to DVD Online for Free with Zamar
Zamar is a famous online video converter that is not only used to convert between diverse file formats, but also applied to burn video files to DVD, say AVI to DVD, MP4 to DVD, MOV to DVD, WMV to DVD, etc. Simply drag and drop your AVI files to it, and it will do the following jobs for you. However, you should note that it processes your files in the cloud so that privacy leak may be inevitable.
Pros:
- It is a web-based tool. No downloads needed.
Cons:
- The maximum file size is 50MB.
- It takes longer time to finish conversion than desktop-based tool.
- It just converts AVI to a MPG file. You need additional tool to burn the MPG file to DVD.
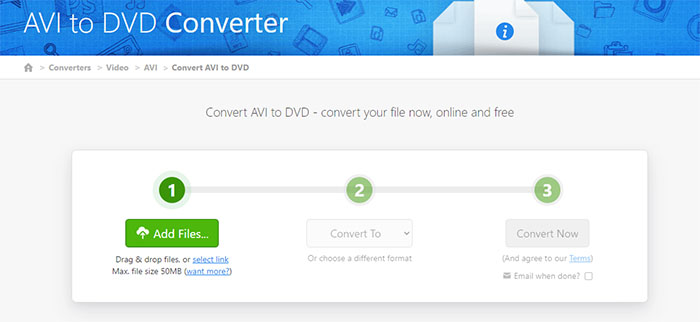
Step 1. Go to Zamar AVI to DVD converter page: https://www.zamzar.com/
Step 2. Click Choose Files button to add the AVI video you want to convert to DVD.
Step 3. Click the drop-down menu next to Convert To, scroll down to Video presets, and then choose DVD as the output format.
Step 4. Click the Convert Now button to begin converting AVI file to DVD format. It needs time to process your file. After that, simply download the file to your computer.
Way 4. Burn AVI to DVD with Freemake Video Converter
Freemake Video Converter, as its name suggests, is primarily designed to change video file format. However, it also has some other functions built in, one of which is burning DVD. It can burn all kinds of videos to DVD, such as AVI to DVD and MP4 to DVD.
Pros:
- It has a simple and straightforward interface.
- It can also rip DVD and convert video.
Cons:
- It crashes frequently.
- Slow conversion.
- Ad-supported. It tries very hard to persude you to pay.
- It will plant a Freemake watermark on the output files.
Now let me show you how to burn AVI to DVD with Freemake Video Converter.
Step 1. Download and install Freemake Video Converter on your computer. It is compatible with Windows 11, 10, 8, 8.1, 7, and Vista.
Step 2. Run this program and click the blue "+Video" button at the top left corner of the main window to add all AVI files you want to convert to DVD.
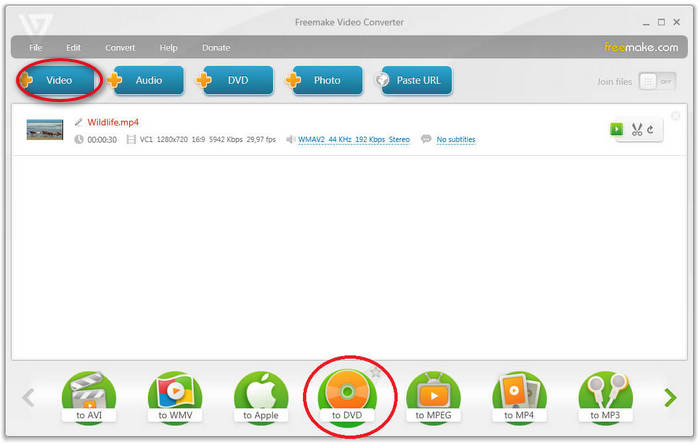
Step 3. Click the "to DVD" button at the bottom.
Step 4. Insert a blank DVD disc to your CD/DVD burning drive.
Step 5. Select your DVD drive as the output destination. You can either use the default settings or change aspect ratio, title, menu type and video system. Once you have done the settings, click the "Burn" button to begin burning AVI files to DVD.

Way 5. Burn AVI to DVD with AVS Video Converter
This is another video converter software that can burn AVI to DVD. It can merge multiple AVI files, create chapters, create DVD menu, and burn the result onto a DVD disc.
Pros:
- It allows creating chapters and menu.
Cons:
- Slow conversion.
- Poor output quality.
- The free version overlays a watermark on the converted videos.
- Video editing feature is available in full version only.
Follow the steps below to burn AVI to DVD with AVS Video Converter.
Step 1. Download and install AVS Video Converter on PC. It is compatible with Windows 11, 10, 8, 7, Vista, and XP.
Step 2. Run AVS Video Converter and click the Browse... button next to the Input File Name field to open the AVI file you want to convert to DVD.
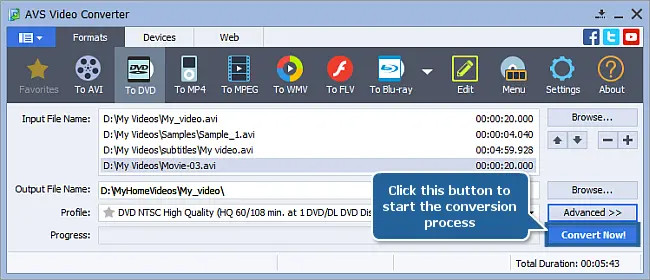
Step 3. Click the Formats tab and then choose To DVD.
Step 4. Select the needed disc type from the Profile list.
Step 5. Click the Advanced >> button, select the Conversion Options tab and Aspect Correction, and then set up the output parameters based on your own needs.
Step 6. Click the Browse... button next to the Output File Name field and select a location for the output video file.
Step 7. Click the Edit button on the Main Toolbar to access the tools to create chapters, make DVD menu, and apply video audio effects.
Step 8. Click the Convert Now! button to start the conversion process.
Step 9. When you see the message “Conversion is completed!”, click the Burn to Disc option.
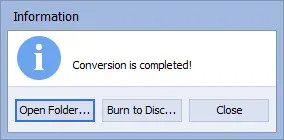
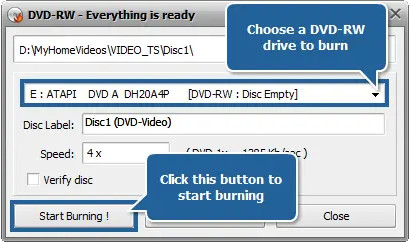
Next, insert a blank DVD and click the Start Burning! button to begin burning AVI file to DVD.
In Conclusion
With these five methods at your disposal, converting your AVI files to playable DVDs is a breeze! Whether you prefer a free and simple solution or a feature-rich program with advanced customization options, there's a perfect choice for every need. So, dust off those old AVI files, pick your preferred method, and get ready to relive your memories or share your creations on the big screen!


