[Solved] How to Fix WiFi Not Working on iPhone
Unable to connect iPhone with WiFi at home or somewhere else? Top 10 fixes can help you out!
Nowadays, WiFi means a lot to us. WiFi brings mobile users a big convenience on surfing the internet, watching videos, making phone data backup, transferring files between phone and computer, etc. However, we sometimes will come across WiFi not connecting problem, although we use a reputable iPhone. When iPhone is not connecting to WiFi, the biggest inconvenience lands on iPhone data transfer and backup. It becomes impossible to transfer iPhone files to computer via WiFi, and also difficult to backup iPhone files to iCloud. In light of that, we compile top 10 useful solutions to fix iPhone not connecting to WiFi problems. This article is written for users of iPhone.
Your Must-have iPhone File Transfer Tool [No iTunes and WiFi Required]
WinX MediaTrans - transfer between iPhone & PC
- Use USB cable to transfer pics, music, videos, etc between iPhone & PC.
- Remove DRM from music & audio books purchased from iTunes.
- Encrypt your photos and videos with unbreakable encryptions.
- Fast transfer and decoding speed. No Data or quality loss.
Even if iPhone WiFi not working problem is still there, you don't need to worry about iPhone file transfer and backup. With WinX MediaTrans, you can backup iPhone photos, videos, music, ringtone, ebooks, voice memos, iTunes U and podcast to computer, as well as transfer files from computer to iPhone effortlessly. All you need is a USB cable. WiFi is not in demand. Moreover, this tool can help remove DRM from music and audio books purchased from iTunes Store for flexible playback. Free Get Trial License of WinX MediaTrans >>
Table of Content
- #1. Check if iPhone WiFi and router turn on
- #2 Toggle Wi-Fi or Airplane Mode
- #3 Reboot iPhone
- #4 Reboot modem and router
- #5 Turn off WiFi Assist
- #6 Forget Wi-Fi network
- #7 Reset Network Settings
- #8 Disable Wi-Fi Networking under Location Services
- #9 Switch to OpenDNS or Google DNS
- #10 Restore and setup as new iPhone
How to Fix iPhone Not Connecting to WiFi? 10 Fixes Are Ready for You!
Here, we will gather all possible solutions to troubleshoot iPhone no WiFi problem, from the simple to the complicated. You are supposed to check if your iPhone can connect to WiFi or not after trying each method.
1. Check if iPhone WiFi and router turn on.
The first thing you should do when you find iPhone is unable to connect to WiFi is to check if Wi-Fi/WLAN is set to ON position and whether wireless router is connected to the modem and turned on. Besides, you should type in correct password and stay within range. Your iPhone won't receive a signal if too far from the router.
To turn on iPhone WiFi, you can try one of the method here:
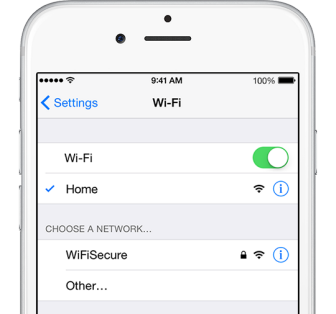
- a. Go to Settings -> tap WLAN or Wi-Fi -> turn on WiFi.
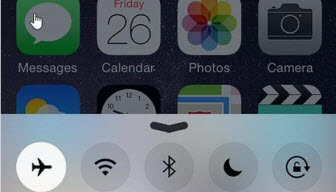
- b. Swipe up from the bottom of your iPhone screen -> turn on WiFi
If iPhone WiFi won't turn on because the setting is grayed out or dim, try solutions below:
- a. Update to latest iOS.
- b. Reset network settings: tap Settings -> General -> Reset -> Reset Network Settings. Warning: this operation will reset all network settings, including Wi-Fi passwords, VPN, and APN settings.
2. Toggle Wi-Fi or Airplane Mode
Turn off WiFi and turn it back on, and then see if the connectivity problem is fixed. If not, turn the Airplane mode on, and a few seconds later turn it back off. Then, check again.
3. Reboot iPhone
In some cases, iPhone not connecting to WiFi problem can be easily fixed by restarting iPhone.
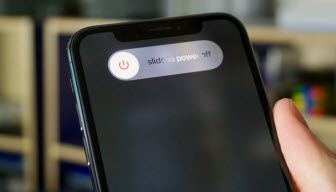
Press Sleep/Wake button until you see "slide to power off", and then slide to the right. Once completely off, press the Sleep/Wake again until Apple logo appears.
4. Reboot modem and router
If your iPhone still cannot connect to WiFi after restarting iPhone, you can try to reboot modem and router. It works sometimes.

5. Turn off WiFi Assist
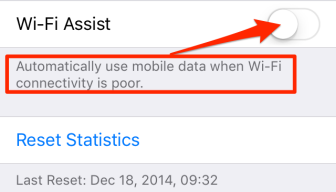
If your iPhone suddenly switches from WiFi to Cellular data, this may owe to WiFi Assist which will enable Cellular automatically when the WiFi connection is weak.
To turn off WiFi Assist to fix iPhone WiFi not working error, tap Settings -> Cellular -> find Wi-Fi Assist and turn off it.
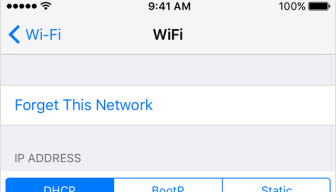
6. Forget Wi-Fi network
If you are being prompted to re-enter the password and can't connect to WiFi despite you've entered the correct password, just try Forget Wi-Fi Network and rejoin it again. This is also an easy-to-operate solution to correct iPhone WiFi.
Press Settings -> tap on Wi-Fi/WLAN option. Next, tap on the (i) button right next to the name of your network. Then, tap Forget this Network, and click Forget in the pop up window. Now back to WiFi, select your WiFi network, and enter the password to rejoin and see if the iPhone WiFi connectivity error is fixed.
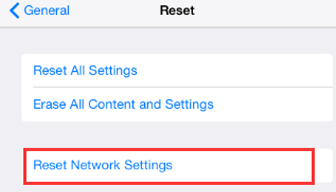
7. Reset Network Settings
This solution can also solve iPhone not connecting to WiFi in most cases. You can perform it follow: Settings -> General -> scroll download and hit Reset -> tap Reset Network Settings -> enter passcode and confirm. After processing Reset Network Settings, memory caches and DHCP settings will be cleared. And it will reset the network settings with factory recommended settings.
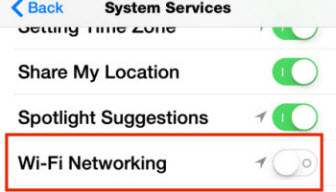
8. Disable Wi-Fi Networking under Location Services
Some users also report that they have managed to fix iPhone WiFi not working issue by simply disabling location detecting services for their WiFi network. Here is how to conduct it.
Go to Settings, navigate to Privacy, tap on Location Services, scroll download and tap on System Services, and then disable Wi-Fi Networking. This action will never affect your WiFi functionality.
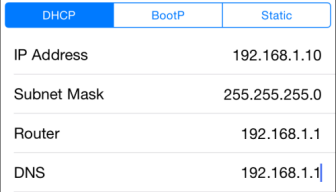
9. Switch to OpenDNS or Google DNS
Another possible reason for iPhone not connecting to WiFi issue maybe due to faulty DNS servers from your internet service provider. So, you can try to go for OpenDNS or Google DNS to see if this problem can be fixed.
Tap on Settings, go to WiFi, locate your WiFi connection and tap on it. Then, locate DNS and tap on numbers to the right under DHCP. You can type Google DNS in Primary DNS and Secondary DNS separated by comma (8.8.8.8, 8.8.4.4), or use OpenDNS, 208.67.222.123, 208.67.220.123.
10. Restore and setup as new iPhone
If all above solutions are not helpful in fixing iPhone won't connect to WiFi problem, you can try to restore your iPhone to factory default settings via iTunes: Firstly, connect iPhone to computer via original USB cable. Secondly, choose your iPhone once it is detected in iTunes. Thirdly, Go to the Summary panel and hit the Restore button. Finally, click Restore again to confirm the action. Note: Restoring your iOS device will erase all user data and content, before going back to factory settings. So, you'd better backup iPhone photos, music and videos to computer before any further in case data loss.

If your iPhone still can't find WiFi or can't connect to WiFi after taking all these actions, you are suggested to contact Apple Support Services to seek help.