How to Backup iPhone Photos: Easier Ways than iTunes/iCloud Backup
Differing from other smartphones, Apple iPhone doesn't allow inserting a microSD card to expand storage. As a consequence, we are easy to run out of the space of iPhone, especially for the camera-optimized iPhone with negligible 64GB. Then, what we should do to free up iPhone? Clearing cache seems can't do much favor. Delete files? It is not a wise policy. Actually, the best method is to backup iPhone photos which always take up the majority space to computer or somewhere else first and then delete them off iPhone.
So, how to backup iPhone photos? According to manufacturer Apple's suggestion, we can make iPhone backup via iTunes and iCloud. But considering that some people may have trouble with iTunes/iCloud, we'd like to show you an alternative way - backup iPhone photos to PC/Mac, external hard drive, flash drive or other storage devices via an easy-to-use iPhone photo backup app.
Top 5 Ways to Back up iPhone Photos Safely
Way 1. Back up iPhone Photos with WinX MediaTrans (Full Quality)
WinX MediaTrans is a piece of professional photo transfer software, specially designed to transfer photos from iPhone to PC/Mac computer and add photos from computer to iPhone with support for AV1 Image File Format (AVIF) images. Thus, you can backup photos from iPhone to computer, be it powered by Windows (11, 10, 8.1, 8, 7, Vista) or by Mac OS X. Moreover, you're allowed to type in a password to encrypt these photos to get rid of prying eyes. And it is worth noting that this tool features super fast transfer speed. If you select 100 4K pictures, it will take you 8 seconds only for backup to computer, while other software needs 30 seconds or more.
Besides iPhone photo backup, WinX MediaTrans can backup iPhone music (purchased or non-purchased), and iPhone videos (including TV shows and movies). That is to say, it enables you to transfer music from iPhone to Mac/PC computer, and transfer videos, movies, TV series from iPhone to computer for safe storage or for media playback on large screen device. What's more, it can remove DRM from movies, music, and audio books purchased from iTunes, make ringtone for iPhone, transfer voice memos from iPhone to PC, transfer eBooks, iTunes U and podcast between iPhone and PC, and make your iPhone work as a flash drive to store all kinds of file types for free, such as PDF, PowerPoint, DOC.
How to Backup iPhone Photos/Pictures: Step-by-step Guide
Preparation: 1. the iPhone that stores the pictures you want to backup; 2. a cable that can connect your iPhone with your computer; 3. download WinX MediaTrans and install it onto your computer.
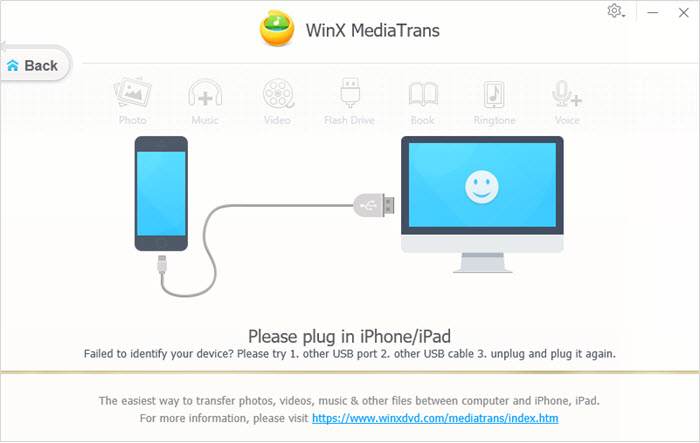
Step 1. Launch WinX MediaTrans and then plug in your iPhone to computer via a USB cable. (Tip: Backup can be finished even if your iPhone can't connect to WiFi.)
Step 2. When you get access to MediaTrans main interface, you will notice that there are eight modules in the center, including Photo Transfer, Music Manager, Video Manager, Encrypt File, Book, Voice & Ringtone, Flash Drive and Remove DRM. To backup iPhone photos, please click "Photo Transfer".
Step 3. Then, it will direct you to a new panel where all your photo albums are well organized in the left column, and all your iPhone photos are loaded for backup. Plus, you can see how many items you have selected to backup to computer at the bottom left corner. You can group images by day, by month, or by year for convenient view and selection. And, you can display the pictures via large or small icon. Futhermore, you can double click target photo to preview before choosing and backup.
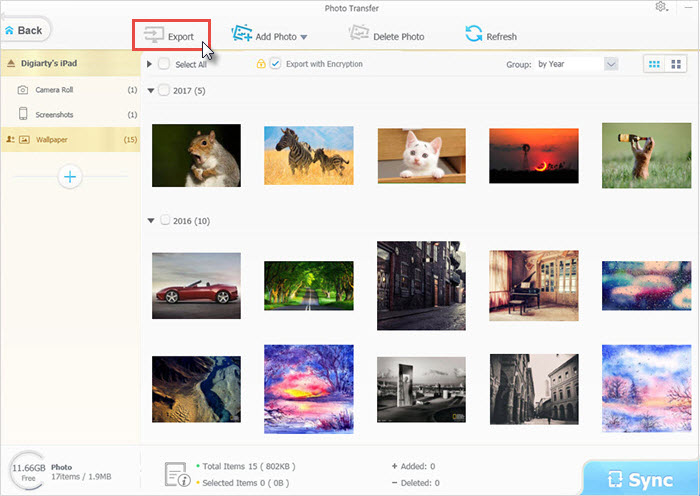
When everything is ready, select one or more or tick "Select All" button to choose all iPhone photos, and then drag and drop them to a folder of computer, external hard drive, or flash drive directly, or hit "Export" button at the top to backup iPhone photos to PC/Mac computer. But if you want to encrypt iPhone photos, make sure to check "Export with Encryption" before clicking "Export". WinX MediaTrans is also a HEIC converter that helps convert HEIC to JPG. To change image file format, simply choose "Export HEIC to JPG" option.
Then, it will begin getting photos off iPhone to computer in no time. As we mentioned, it will process photo transfer at a lightning speed. Once finished, it will open the folder where the photos are stored for you automatically.
Way 2. Use iCloud to Transfer Photos from Windows Computer to iPhone
iCloud is the most popular way to back up iPhone photos, as well as videos, music, and other files. With iCloud turned on, iPhone photos are automatically backed up to iCloud and are accessible on iPhone, iPad, and iPod. Every Apple ID has 5GB of free storage space. A 5-minutes 4K video at 30fps takes up more than 1.7GB, the iCloud 5GB free storage is not enough to back up other iPhone photos. To get more storage, you need to upgrade to iCloud+, 50GB for $0.99/month, 200GB for $2.99/month, 2TB for $9.99/month.
How to backup iPhone photos using iCloud
It's quite easy. Turn iCloud Photos on, and all your pictures and videos in your iPhone Photo app will sync and back up to iCloud.
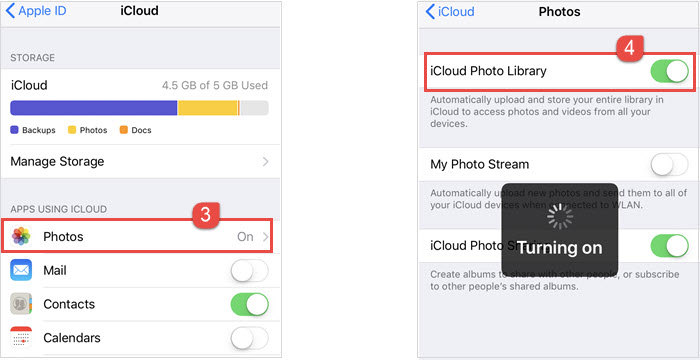
- On your iPhone, tap Settings.
- Tap your name > iCloud, then tap Photos.
- Turn iCloud Photos on. Now your iCloud starts backing up your iPhone photos and videos.
Way 3. Back up iPhone Photos to Windows/Mac Computer
It's a good idea to back up your iPhone photos to your computer hard drive. You can access, share, and edit your iPhone pictures on your computer easily. As long as your compute works fine, your iPhone photos will be kept. You have many different ways to transfer back up your iPhone pictures to a Windows PC or a Mac computer. We list a few of them here.
How to store iPhone photos to computer
On Windows or macOS, we have the following commonly used tools or ways to import and back up iPhone photos to a Windows PC or to a Mac computer,
- WinX/MacX MediaTrans, iTunes, or other similar iPhone photo transfer apps.
- Email attachment ways, such as Gmail, Hotmail, Outlook, etc.
- Social media platform ways, like Twitter (max 5MB photos), Whatsapp, Snapchat, etc.
- For more detailed guides, check how to transfer iPhone photos to Windows PC.
Way 4. Back up iPhone Pictures in Amazon Photos (5GB for free)
Amazon Photos, just like Google Photos, is a well-know cloud services designed for photos backup. You can back up your iPhone photos to Amazon Photos with full quality. The iPhone photo backup app supports a wide range photo format, JPEG, PNG, GIF, BMP, TIFF, HEIF, HEVC, and some RAW photo format files. You get 5GB of free storage and have to pay for upgrade. 100GB plan is $19.99/year, $1.66/month. If you prefer Amazon Photos backup method, use the following steps to get started.
- Open Amazon Photos on your iPhone.
- Tap the Smile icon, tap Settings > Upload photos manually.
- Choose the pictures on your iPhone you'd like to back up.
- Tap Upload on the top right corner of the screen and the photos will start uploading to Amazon Photos.
Way 5. Back up iPhone Pictures to External Drive
iCloud and Amazon Photo services offer 5GB of storage for free, however, it may be far from enough for iPhone data backup. In fact, you can also store your iPhone photos to external drive if you don't want to pay for a cloud subscription. It's easy to access your iPhone photo backup when they backed up on external drive. Here we walk you through the steps to back up iPhone photo to an external hard drive or flash drive on Windows or Mac.
How to back up iPhone photos to external drive on Mac
- Connect your drive, iPhone to your Mac using a cable.
- Open finder, find your device, press "Command + Space bar", type Image Capture.
- Choose the photos you want to back up, choose the "Import To" folder, click on Other and choose your hard drive as the location to store your iPhone photos.
- Click Download or Download All to start backing up your iPhone photos to external hard drive.
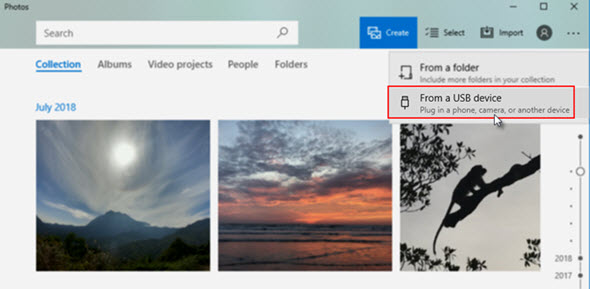
How to back up iPhone photos to external drive on Windows
- Connect your drive, iPhone to your Windows PC using a cable.
- Open File Explorer > This PC > click on your iPhone, open the DCIM folder.
- Choose your iPhone pictures from the folder and click Copy.
- Choose the external hard drive from the File Explorer and choose Paste to move and back up the iPhone photos to external drive.