Transfer Photos from iPhone to Flash Drive with/without Computer
One of the universal activities people use iPhone for is taking digital photos full of memories from a memorable birthday party to high school prom. However, those pictures can be accidentally deleted or lost. They may even consume your limited storage space especially when your iPhone has insufficient memory. At this point, you will undoubtedly want to transfer iPhone photos to a flash drive for storage/sharing.
It seems to be a daunting task to do the task since Apple offers no easy way for iPhone users to save iPhone photos onto USB flash drive. Fortunately, you can follow the easy-to-email guides below to get pictures from your iPhone to your flash drive and make sure your digital memories will be saved and no longer use up your iPhone's storage space.
Hot topic: iPhone Periscope Camera >>
Table of Contents
Part 1. How to Transfer Photos from iPhone to Flash Drive with Computer
- Way 1. With WinX MediaTrans Fastest [8 secs to sync 100 4K photos]
- Way 2. With Photos App
- Way 3. With Windows Explorer
- Way 4. With iCloud
- Way 5. With Image Capture
- Way 6. With iExplorer
Part 2. How to Transfer Photos from iPhone to USB Stick without Computer
Part 1. How to Transfer Photos from iPhone to USB Flash Drive with Computer?
Way 1. WinX MediaTrans
Supported OS: Windows and Mac
WinX MediaTrans helps you bulk transfer 4K HDR photo, ProRaw picture, app photo, burst photo, live photo, and more in whatever format, be it HEIC, RAW, JPG, or PNG from iPhone to USB drive at GPU hardware accelerated speed, 100 pieces of 4k photos in 8 seconds.
It also lets you convert HEIC to JPG/PNG while syncing, manage/delete photos, password protect your photos videos with unbreakable encryptions (256-bit AES, 1024-bit RSA, PBKDF2, Argon2), export AVIF/WebP photos, mount your iPhone as USB drive and bulk sync other files (iTunes purchases, videos, movies, music, iBooks, podcasts, etc.) from iPhone to USB drive.
How to Bulk Transfer Photos from iPhone to USB Flash Drive on Windows/Mac at No.1 Fast Speed?
Step 1. Connect your iPhone to computer first. Trust your computer when prompted.
Step 2. Then launch WinX MediaTrans. Go to Photo Transfer.
Step 3. In the sidebar, check out the type of photos you want to transfer. For instance, you can browse through all your selfies, screenshots. Pick the photos on iPhone you want to transfer to computer.
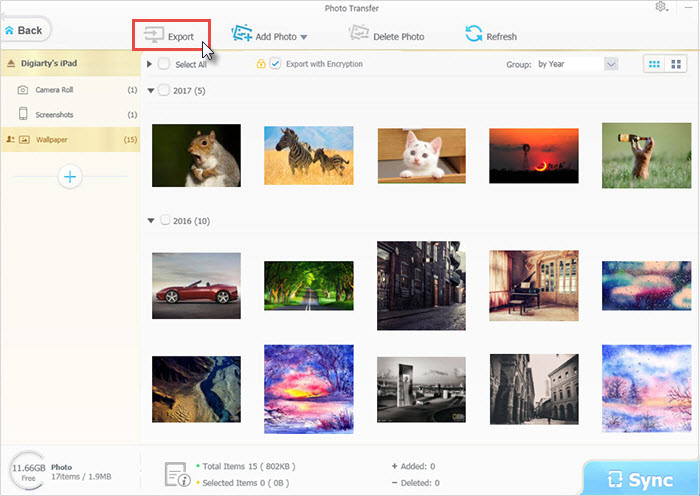
Step 4. Next click Export. It just takes a few seconds to move all the photos.
Step 5. Then you can choose your flash drive to be export and click Save to start moving iPhone photos to your thumb drive.
Check here if you need to encrypt your photos on USB drive or computer for privacy protection after iPhone images transferring.
Way 2. with Photos app
Supported OS: Mac
If you are hunting for software to go about getting photos from your iPhone to flash drive on your Mac computer, Apple’s Photos is probably the easiest way to do the job. It is the default app installed on your Mac and is pretty easy to use. You can export photos from iPhone to flash drive on your Mac without a hassle. However, Photos just enables you to transfer Camera Roll photos from iPhone to Mac. If you are willing to backup other photos like iCloud sharing photos, synced ones, live photos or more, please resort to other photo transfer tool.
One thing need to be mentioned that the process of exporting pictures from iPhone to Mac can be different, based on your macOS. Here we take transferring photos from iPhone to macOS Ventura and then saving them to your flash drive.
How to Get Photos off iPhone to Mac in macOS Ventura?
Step 1. Plug your iPhone into your Mac computer or laptop using a USB cable, unlock your iPhone.
Step 2. Kick off the Photos app on your Mac. Your iPhone is selected by default on the left side. If not, please select your iPhone.
Step 3. Select the photos you want to save from your iPhone into your flash drive.
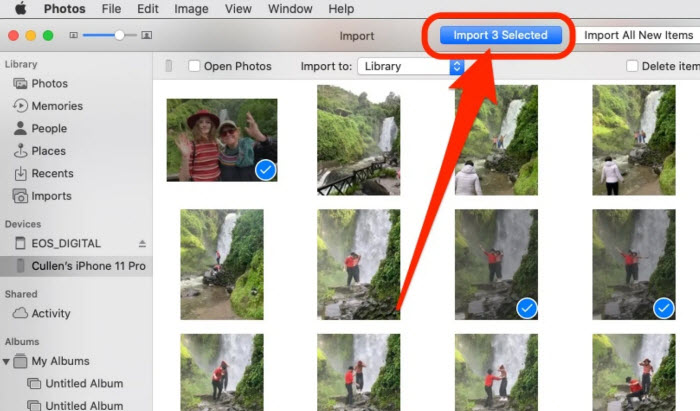
Step 4. Click Import button at the top.
Step 5. Then you can transfer the iPhone photos from Mac to flash drive. Just plug in your flash drive to the Mac. Find your external drive from the Finder. Open another Finder window, find and open Pictures, drag the library to the external flash drive.
Step 6. That's all. You can also take advantages of AirDrop or iCloud to transfer iPhone photos if you’d like to move photos to flash drive without a cable.
Way 3. With Windows Explorer
Supported OS: Windows
Windows File Explorer is a built-in feature of a Windows PC, with which you can view and manage files including your pictures in your devices and drives. Now, you can follow the steps below and transfer pictures from iPhone to a thumb drive easily.
How to Manually Copy and Transfer Images from iPhone to USB Drive in Explorer?
Step 1. To do this, please make sure your iPhone is connected to your computer with a lightning-to-USB cable.
Step 2. If you are asked to trust your computer or allow access to your photos and videos, please tap "Trust" or "Allow" to give your computer access to your photos in iPhone. Please make sure have your iPhone unlocked.
Step 3. Check if your iPhone appears as a new device under "This PC" in File Explorer on Windows 10 or "Computer" in Windows Explorer on Windows 7. If yes, double-click it. If you cannot see the iPhone, unplug and plug your unlocked iPhone again.
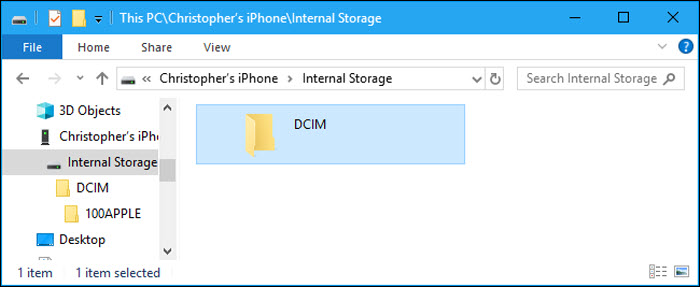
Step 4. Double-click the "DCIM" folder inside your iPhone. Here you can see your photos and videos stored in a 100APPLE folder, 101APPLE, 102APPLE, etc if you are taking photos with your camera roll, or 100Cloud, 101Cloud, etc if you are using iCloud to store photos.
Warning: You cannot access any other photos rather than camera roll photos on your iPhone here.
Way 4. with iCloud
Supported OS: Mac/Windows PC
The iPhone built-in iCloud service can also render you a simple yet fast way to easily sync photos from iPhone to USB flash drive on Windows PC or macOS. Certainly, you need to upload iPhone photos to iCloud service first and then log into iCloud account on Windows 10/11 or macOS to download iPhone photos from iCloud to USB drive. Check the detailed steps if you have no idea on how to make this happen:
How to Transfer Photos from iPhone to USB Drive using iCloud?
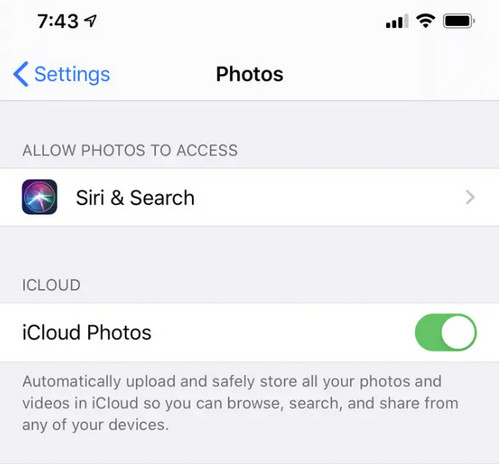
Step 1. Navigate to the settings tab on your iPhone > tap on "iCloud" > click the photo tab.
Step 2. Toggle the iCloud Photo Library widget to automatically upload your iPhone photos to the cloud. This might take a while, depending on the quantity and size of your pictures. As for those who have a large number of photos on iPhone, you're suggested to pay for additional space for iCloud storage, since the free space is only 5GB for each Apple ID.
Step 3. Log into your iCloud account on your Windows 10/11 or macOS once your photos have successfully synced into iCloud.
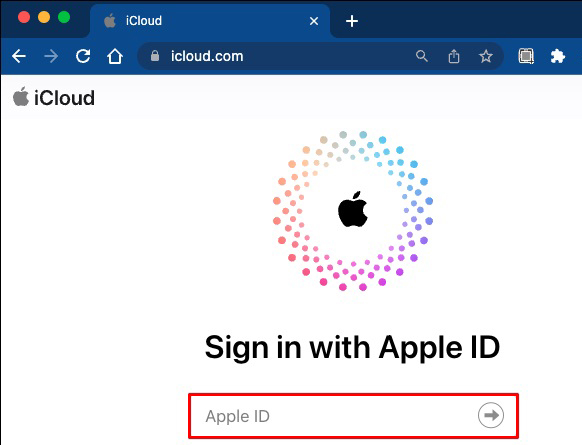
Step 4. Plug in a USB flash drive and navigate to the photos section of Apple's service. Select all the photos you wish to transfer to your USB flash drive and click the download button.
Step 5. Select your desired location on the USB stick. You may want to verify that the photos have transferred correctly before deleting the images from the cloud.
Way 5. with Image Capture
Supported OS: Mac
Image Capture is a built-in application on Mac computers that allows you to import photos and videos from various devices, such as digital cameras, iPhones, and iPads. When importing photos, Image Capture provides an expansive selection of options to customize the import process. You can choose the destination folder where the files will be saved, create subfolders based on dates or other criteria, and select file formats for imported images (JPEG, TIFF, PNG, etc.). Additionally, you can enable options to automatically delete pictures from iPhone after importing, rotate images based on their orientation, or preserve the folder hierarchy.
How to Copy iPhone Photos to USB Flash Drive using Image Capture?
Step 1. Connect your iPhone to your Mac using the USB cable > launch the "Image Capture" application on your MacBook, iMac or Mac Studio. You can find it in the Applications folder or by using Spotlight search.
Step 2. Your iPhone should appear as a connected device in the left-hand sidebar of the Image Capture window > choose your iPhone from the list. On the right-hand side of the Image Capture window, you'll see a list of options for importing images. Choose the destination folder where you want to save the photos on your Mac. Create a new folder if needed.
Step 3. Here shows a drop-down menu with various options for how to cope with the imported photos. Choose the appropriate settings based on your preference. For instance, choose to delete photos from your iPhone after importing them.
Step 4. Navigate through your iPhone's folders on the left-hand sidebar > select the specific photos you want to sync to the USB drive. You can hold down the Command key and click on multiple photos to select them.
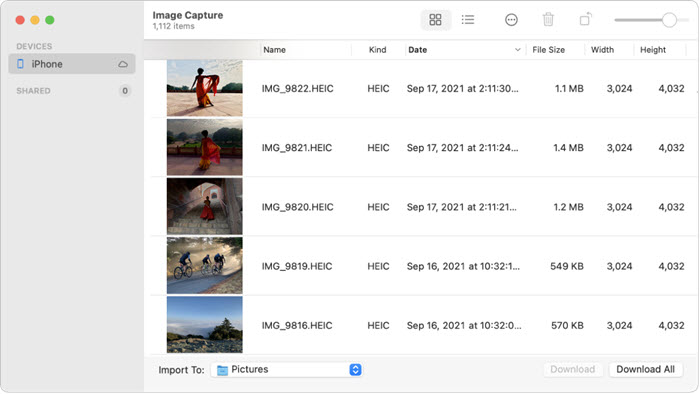
Step 5. Once you've selected the desired photos, click on the "Import" button in the bottom-right corner of the Image Capture window. This will initiate the iOS pictures transfer process, and the selected photos will be copied to the designated folder on your Mac.
Step 6. After the photos have been imported to your Mac, disconnect your iPhone from the USB cable. Connect your USB drive to your Mac using an available USB port.
Step 7. Open the folder where you saved the photos on your Mac > opt for the desired photos > drag and drop them onto the USB drive icon on your Mac or in the Finder sidebar. Alternatively, you can right-click on the selected photos, choose "Copy," navigate to your USB drive, right-click inside the USB drive folder, and choose "Paste."
Step 8. Wait for the transfer to complete, and once it's done, you can safely eject the USB drive from your Mac.
Way 6. with iExplorer
Supported OS: Mac & Windows PC
iExplorer provides access to varied types of data on your iPhone, including photos, videos, music, messages, contacts, notes, call history, voicemails, and more. You can take advantage of iExplorer to transfer photos from iPhone to your computer and then sync to your USB flash drive, including individual photos or entire albums. More photo management options are available, including select specific photos, rename pictures, organize your photo library, etc. It works as a multimedia manager for your messages, call history, conversations, app data, file system, etc. Certainly, you can give it a try before you make decision on toolkit payment.
How to Transfer iPhone Photos to USB Flash Drive using iExplorer?
Step 1. Download and install iPhone photo transfer software iExplorer on your computer from the official website (https://macroplant.com/iexplorer).
Step 2. Connect your iPhone to your Windows 10/11 or macOS using a USB cable.
Step 3. Launch iExplorer. In iExplorer, you ought to see your iPhone listed under "Devices" or "Browse iTunes Backups." Click on your iPhone. Navigate to the "Photos" or "Camera Roll" section within iExplorer to view your iPhone's photos.
Step 4. Choose your desired photos. You can hold down the Ctrl key (Windows) or Command key (Mac) to select multiple photos.
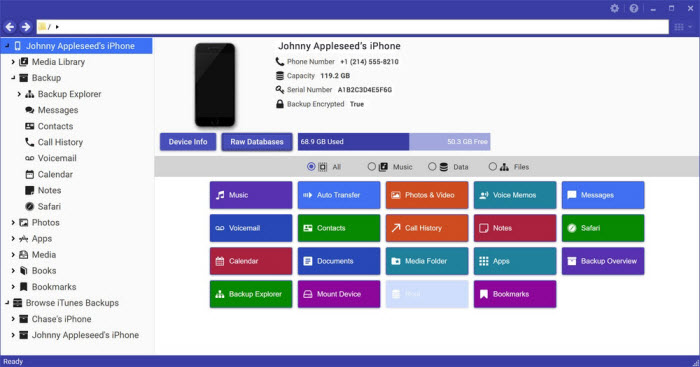
Step 5. Click on the "Export" button in iExplorer and choose the destination folder on your laptop where you want to save the exported images.
Step 6. Wait for the export process to complete. The selected photos will be saved to the designated folder on your computer.
Step 7. Disconnect your iPhone from MacBook/iMac or Windows PC. Connect your USB drive to your computer. Locate the exported photos on your computer and copy them.
Step 8. Open the folder for your USB drive and paste the copied photos into the desired location.
![]() Important Notice:
Important Notice:
USB flash drive is generally formatted with FAT32 file system. If you are transferring a file or folder larger than 4GB, you may get a "file too large" error. But don't worry, follow the troubleshooting steps to fix file too large for the destination file system error.
Part 2. How to Transfer Photos from iPhone to Flash Drive without Computer?
Way 7. with USB stick
If you’re looking to back up your iPhone photos onto a flash drive and then save some space, having a flash drive working with your iPhone is a wise choice. With it you can directly transfer your iPhone photos to USB stick without computer. There are numerous flash drives online, here we just list top 3 flash drives to get photos off iPhone directly.
No.1 iDiskk 128GB Photo Stick (Price: $39.79)
The photo stick offers a huge space of up to 128GB of external storage. It offers easy and speedy way to transfer photos from iPhone to USB stick without computer in just 20 seconds. You can even take and store photos directly into the flash drive by using the iDiskk Max app each time you connect the device to the App camera. It also supports video formats like MKV, WMV, MP3, etc and makes viewing photos and watching videos directly from the photo stick no longer a hassle.
No.2 SanDisk iXpand Flash Drive (Price: $40)
iXand is a good iPhone accessory that is compact and speedy, adding up to 128GB of storage to your iPhone. You can back up data including photos and videos from your iPhone to flash drive and view them well. However, some people complain that it cannot hold files larger than 4GB, maybe due to the FAT32 format. So if your video file is larger than 4GB, please split and compress it first.
No.3 Sttarluk photo Stick USB 3.0 Pen Drive for iPhone (Price: $28.98)
Sttarluk offers 1TB storage space you can use to store iPhone photos, videos, audios, documents, etc in various formats. Due to the up to 80mb/s reading speed and 40 mb/s writing speed, you can transfer photos from iphone to memory stick without a computer fast each time you plug in the USB flash drive. Then you don’t worry about losing photos.
Way 8. via Email
Another way to transfer photos from iPhone to USB flash drive without computer is via Email. Email is widely used for backing up and transferring iPhone files like photos, videos, music, etc, which is especially helpful when there is something wrong with the iPhone-to-computer connection, or you don’t have a lightning-to-USB cable.
As long as you don’t go over the size limit, mostly 25MB, your photos will be attached to emails using iPhone and then transferred and saved to your USB drive when connected to your computer. So if you don’t need to transfer a large number of iPhone photos to flash drive, Email will be a good option.
How to Save iPhone Photos to USB Stick without a Computer?
Step 1. Open the Photos app on your iPhone and choose the photos you want to transfer.
Step 2. Tap Share > Mail and log into your email account. Send the email.
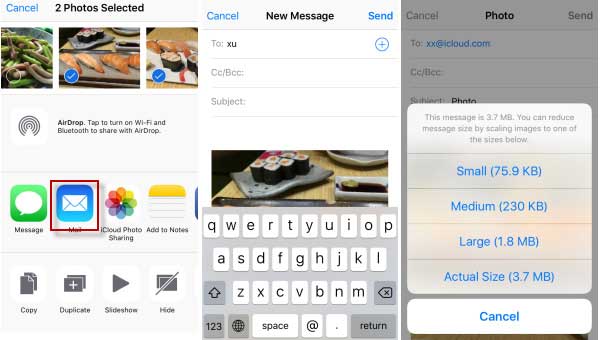
Step 3. Enter the same email account on your computer, find the email and download the attached photos to your computer.
Step 4. Connect the flash drive to the computer and transfer the downloaded photos to it.
Sum up
All the above-mentioned methods are feasible to transfer pictures from iPhone to flash drive easily and successfully on your Windows or Mac, or even without a computer. If you don’t want to install anything on your computer, use Windows or Mac’s default feature or app like File Explorer or Photo. If you want to try backup iPhone photos without a computer, get a USB stick instead. But if you are willing to move photos from iPhone to flash drive and get the hang of more professional features without too much effort, WinX MediaTrans is absolutely the best choice.