


How to Rip DVDs to iTunes and Import DVD Movies to iTunes Library
Summary: If you're looking for the easiest way to copy/import/add your DVDs to iTunes library so that you can watch them on your iPhone iPad or iPod, you've come to the right place.
Hello, I really want to put DVDs that I have onto my iTunes but I don't know how. Is there anything that I have to download for it?
I was wondering what is the easiest way to copy my personal DVDs to my iTunes library so I can watch them on my iPod touch. I have purchased iFxxx Media Converter but I am having a lot of trouble with it and it is painfully slow.
iTunes won't support DVDs directly, but you can rip DVDs to iTunes supported formats and then import the digital copies of your DVDs to iTunes. Now let's just follow the steps below to finish DVD to iTunes importing easily and fast.
How to Transfer DVDs to iTunes:
Step 1. Rip DVDs to iTunes Compatible Digital Format
Before we import a DVD into iTunes library, you need to convert the disc to a digital format that iTunes supports. To do this, we need to download a DVD to iTunes converter. If the DVDs you need to convert are homemade or old releases, you can try your luck with HandBrake. But if you need to convert commercial discs with copy protection, WinX DVD Ripper will be the best choice.
Best Software to Rip DVD to iTunes - WinX DVD Ripper Platinum
- Circumvent any copy protections from DVDs, be it region codes 1-6, CSS, RCE, UOPs, Sony ARccOS, Disney X-project DRM.
- Convert DVD to iTunes profile with iTunes best parameter settings.
- In addition to iTunes, it can also convert DVD to MP4, MOV, ISO, MP3, iPhone, iPad, Apple TV, Android, etc.
- Custom-oriented output profile and interface to cater for any users.
Let's free download and install this DVD to iTunes ripper to have a try!
How to Rip a DVD to iTunes
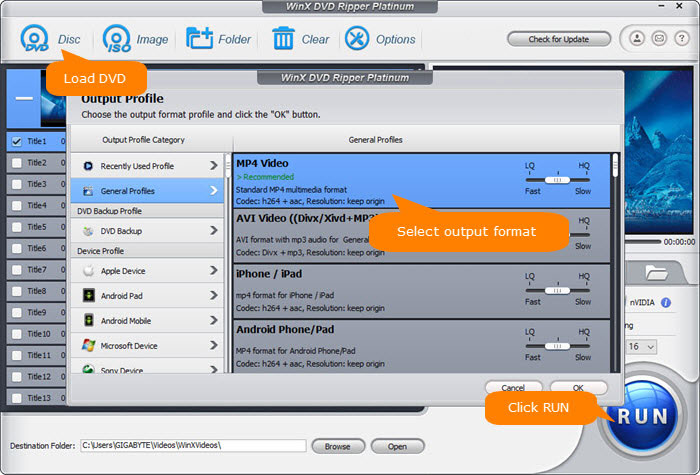
Step 1. Import DVD.
Insert the target DVD into DVD drive and then click the "DVD Disc" button on WinX DVD Ripper to select and open the DVD you want to import to iTunes. Then it will load the information and auto check the main title. DVD copy protection will be detected and bypassed by WinX DVD Ripper Platinum automatically.
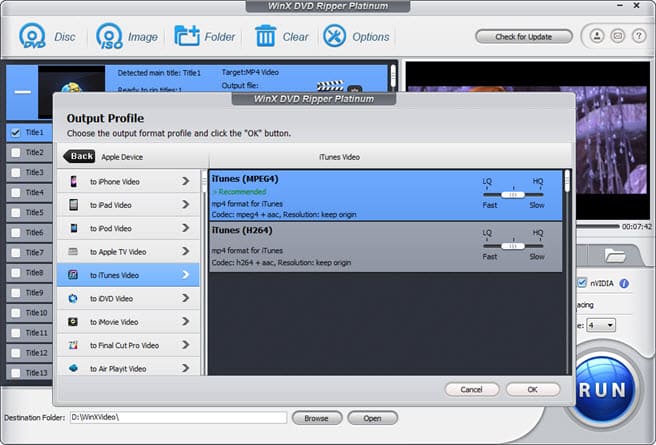
Step 2. Choose an iTunes preset.
Once the DVD is loaded, a smaller window named Output Profile will pop up. Scroll down to "Apple Device" under "Device profile", choose "to iTunes Video", and then you'll find two iTunes presets are available to choose, namely iTunes (H264) and iTunes (MPEG4). You can choose anyone you like. You can slide the quality to LQ or HQ. The higher video quality is, the bigger output file size would be, and longer it will take to rip.
Alternatively, simply click "General Profiles" and select "MP4 Video". This is because iTunes supports any video compatible with the QuickTime, including MPEG-4 and H.264 videos in .mov, .mp4 or .m4v file extensions. The supported audio formats include MP3, AAC, and AIFF.
Generally, the default setting is "Same as source" preset to keep the video quality intact. Keep in mind that the highest DVD resolution is 720x480 for NTSC discs and 720x576 pixels for the PAL ones. If necessary, you're able to adjust the specific parameters (bitrate, frame rate, aspect ratio, audio and video codecs) to fit your other mobile devices like iPhone iPad, Android, Xbox, PS4/5, etc.
Step 3. Choose save path.
At the bottom of the main interface, click "Browse" and set an output folder on the computer to save the converted DVD video.
To ensure the whole DVD ripping process stable, it's recommended to check "Safe Mode" option when you are trying to rip a DVD with strong protection.
Step 4. Ripping DVD to iTunes compatible format.
Click the "RUN" button to start converting DVD to iTunes compatible video. Generally, it will take about 5-10 minutes to finish a full movie DVD ripping. Of course the higher your computer configuration is, the faster speed you will get. Once done, you can see the DVD rip file in your selected folder.
Disclaimer: Digiarty Software does not advocate ripping copy-protected DVDs for any commercial purpose and suggests referring to the DVD copyright laws in your countries before doing so.
Step 2. Import DVD Rip File into iTunes
After the DVDs are converted to iTunes supported MP4, MOV, or M4V on Windows or Mac, you can transfer DVD video into iTunes. This step is actually the way to import video from computer to iTunes library.
Requirements:
- iTunes (the latest version iTunes 12.10 is recommended);
- iTunes Store account;
- Internet access (if necessary)
On Windows, press Alt on the keyboard to open the menu bar. Then click File on the top menu and select "Add File to Library" or "Add Folder to Library" if all the DVD movies are stored in a single folder. Then browse the DVDs videos on your computer and select them. Alternatively, you can drag the DVD video file or folder into iTunes' Movies window.
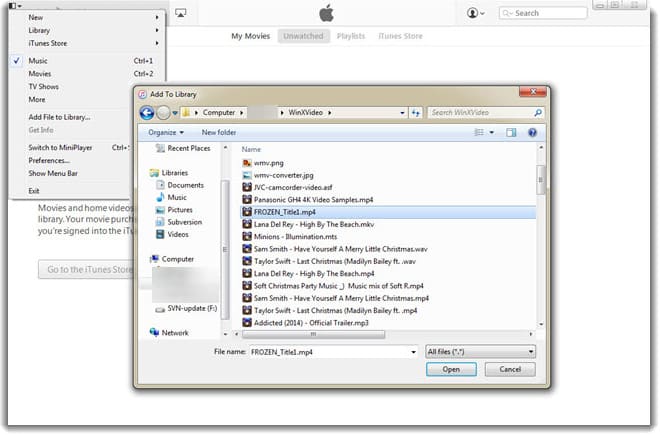
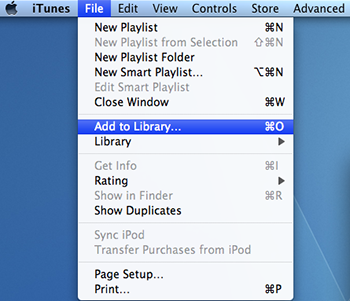
On MacOS, click "Add to Library" under "File" and browse and add the converted DVD video to your iTunes library. iTunes 12 will auto classify it in Movies category. On both Windows and macOS, you can import the DVD movies to iTunes by drag and drop.
Here you go, you can find the movie video under "Home Videos" channel and sync the DVD movie video onto your iPhone iPad or iPod over Wi-Fi or via a USB cable in a breeze. Click to see the official guide on sync media between iPhone/iPad/iPod and iTunes on PC/Mac.
iTunes Troublesome in File Transferring? Well, WinX MediaTrans helps!
iTunes' unfriendly interface usually makes user feel at sea, and takes much time to figure out how iTunes works even after reading related Apple Support posts. That's why so many iOS users hate managing the iPhone/iPad/iPod media files, of course including transferring (DVD or other media) files between computer and iOS devices, with iTunes.
Transferring DVD to iTunes and then syncing DVD to iPhone is really time-wasting. Why not choose an alternative? WinX MediaTrans, a rising star of iOS file manager software, offers the easiest and fastest way to add and backup media files on iPhone iPad iPod.
With straightforward UI, even green hands can handle it with facility. What deserves to be mentioned here is that WinX MediaTrans outshines with its incomparable file syncing speed: it only takes minutes to export/transfer a 2-hour 720p video to iPhone and less than 10 seconds to transfer 100 4K photos from iOS devices to a computer, which is hardly beat by any similar tools.
Below are steps of transferring DVD video to iPhone with iTunes alternative - WinX MediaTrans:
- Connect iPhone to computer with a USB cable and open WinX MediaTrans;
- Click "Video" option on the main interface to jump to video managing screen;
- Click "Add Video" on the top bar to select the DVD movie video to put on iPhone;
- Hit "Sync" button to start transferring DVD movie video to iPhone.
If you think the post useful, please kindly share it!
If you still have problems about transferring/importing DVDs to iTunes, feel free to Email us >>