


How To Repair Damaged/Corrupt Picture Frame [Easy Tricks]
 Mike Rule
Updated on
The passage of time and everyday wear and tear can wreak havoc on our precious photographs. Faded colors, scratches, tears, and even minor creases can steal the vibrancy from these cherished memories. But how to repair damaged photo?
With a little know-how and the right tools, you can breathe new life into your damaged photos. This guide will walk you through common types of photo damage and offer you effective ways to restore them, whether you're a seasoned photo editor or just starting out. From basic online fixes to advanced software solutions like Photoshop, we'll unveil the secrets to bringing your treasured moments back to their former glory. So, dust off those old photo albums and get ready to learn how to repair corrupt photo.
How to Repair Damaged Photos (Software Ways)
How to Repair Damaged Photo Picture Frame with Winxvideo AI
Forget complex tools and settings – its clean interface lets you repair photos with minimal effort. Plus, Winxvideo AI tackles multiple photos at once through batch processing, saving you tons of time. No file size limits mean you can repair even your largest photos without a hitch. And the real time-saver? Winxvideo AI leverages your computer's hardware to zip through repairs significantly faster than most online tools.
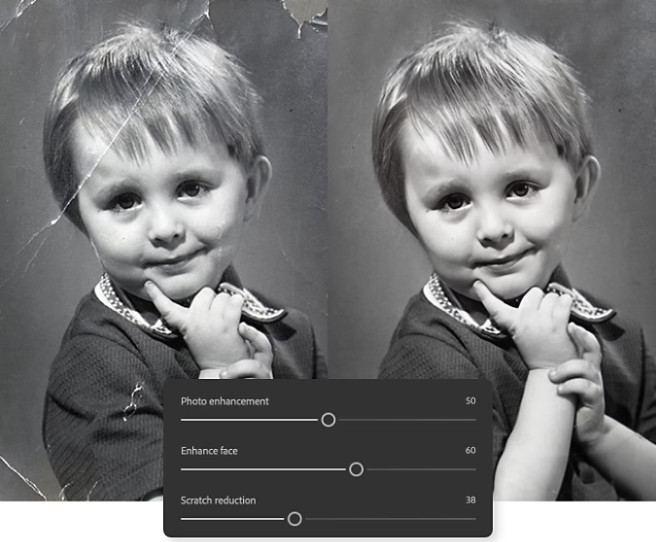
The image tool repair and restore old damaged photos to 4K, 8K, and even 10K. While the photo restoration software excels at common repairs like dust and scratches, it might not handle complex fixes as well as Photoshop.
 Free Download
  Free Download
Winxvideo AI is for PC, while Macxvideo AI (from our MacXDVD brand) is for macOS.
How to Easily Repair Old Photos Using Winxvideo AI
Step 1. Launch Winxvideo AI. Once you've installed it, open the program.
Step 2. Look for the "Image AI" option on the main interface and click on it. This switches you to the photo repair workspace. Click the "Add Image" button to browse your files and select the photos you want to restore. You can even add multiple photos at once for batch processing, saving you time.

If you don't need to upscale the resolution, simply choose "Enhance Image (1X)" under the "Model Settings." This focuses on repairing common damage like scratches and dust. You can also preview the repaired version in the window on the left.
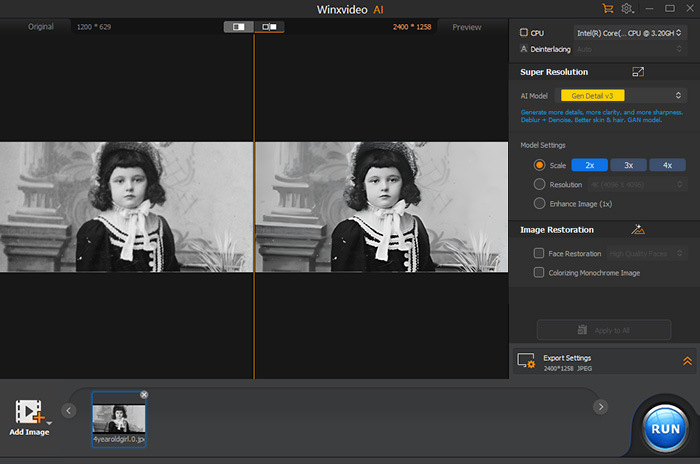
Step 3. Click the "RUN" button to initiate the repair process. Once finished, your restored photos will be ready for you to save and enjoy.
How To Repair Damaged Photos with Photoshop
Photoshop is a good choice to repair old or damaged photos. It boasts a versatile toolbox for tackling various damage types, from scratches and dust to missing pieces. The Content-Aware Fill feature helps intelligently analyze the surroundings to seamlessly fill in missing areas. What's more, you have precise control over the repairs, allowing for natural-looking restorations.
However, Photoshop isn't without its challenges. Mastering its tools takes practice, and extensive repairs can be quite time-consuming. Complex fixes often require manual work, and while powerful, Content-Aware Fill has its limitations. On top of that, it comes with a subscription price tag. For heavily damaged photos or if you prefer a more hands-off approach, consider professional photo restoration services.
How to Repair Corrupt Pictures with Photoshop
Step 1. Open the image in Photoshop.
Step 2. Duplicate the layer (usually by right-clicking the background layer and selecting "Duplicate Layer"). This allows edits without affecting the original. Assess the damage. Identify scratches, tears, missing areas, and discoloration.
Basic fixes: Use the Spot Healing Brush Tool (bandaid icon) to remove dust spots and minor scratches. Adjust the brush size for optimal results.
Content-Aware Fill: For larger areas or tears, select the damaged area with the Lasso Tool or the Quick Selection Tool. Then, go to Edit > Content-Aware Fill. Photoshop will analyze the surrounding area and fill the selection seamlessly.
Patch Tool: For complex tears or missing areas, use the Patch Tool (square with a corner patch icon). Drag a selection around the damaged area, then choose a clean area within the image to serve as the source for the patch. Photoshop will copy the source area and blend it seamlessly onto the damaged area.
Clone Stamp Tool: The Clone Stamp Tool (rubber stamp icon) lets you copy textures from undamaged areas to cover up imperfections. Hold Alt (Option on Mac) to select the source area, then click and drag on the damaged area to replicate the texture.
Color correction: If the photo is faded or discolored, use adjustment layers like Curves or Levels to enhance color and contrast.
Step 3. Save your work as a new file to preserve the original undamaged image.
How To Repair Damaged Photos Online
Inpaint Online is a free web tool that allows you to repair minor to moderate damage in your photos. It boasts a user-friendly interface with drag-and-drop functionality or a standard file upload option. It supports common image formats like JPG, PNG, and WebP. Inpaint offers two selection tools for precise repairs: a marker tool for detailed selection and a Magic Wand tool for larger uniform areas. Once you've selected the unwanted area, you can see a preview before the repair process begins, allowing for adjustments.
There are limitations to consider. Inpaint Online has a maximum file size of 10MB and a maximum resolution of 4.2 megapixels, which might not be suitable for very large or high-resolution photos. Additionally, it doesn't allow batch processing, so you can only repair one photo at a time. Inpaint uses its own algorithms to fill in the selected areas, and you don't have much control over the specific details or textures that are generated. For heavily damaged or complex repairs, Inpaint Online might not be able to fully restore the photo to its original state.
How to use Inpaint to repair damaged photos online
Step 1. Head over to the Inpaint Online website. You can either drag and drop your photo directly onto the designated area on the webpage. Alternatively, click the "Browse" button and select your photo file from your computer's folders.
Step 2. Once your photo is uploaded, you'll see some selection tools.
The primary tool is the marker tool, which works like a brush. Use this to carefully outline the unwanted areas you want to remove, such as scratches, dust spots, or tears.Inpaint also offers a Magic Wand tool (optional). This can be helpful for larger, uniform areas of damage. Click on a similar colored area next to the damage, and the tool will automatically select the connected area with the same color.
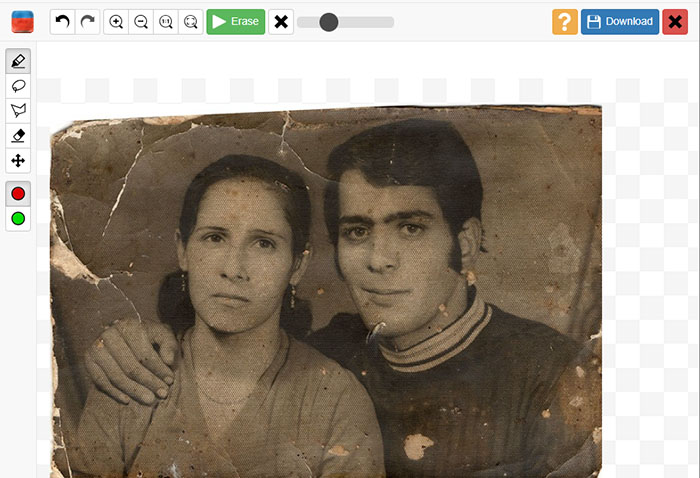
Step 3. Once you're happy with the selection of the damaged areas, click the "Erase" button. This process may take a moment, so be patient.
Step 4. If you're satisfied with the results, click the "Download" button to save the repaired photo back to your computer.
Common Types Of Photo Damage and Effective Ways to Repair
Photos are precious keepsakes that capture memories and moments in time. However, over time, photos can become damaged due to various factors. Here are some common types of photo damage and how to repair them.
Fading
Fading is the arch-enemy of cherished memories, especially in older photographs. It's a gradual process caused by exposure to light, heat, humidity, and even chemicals. Faded photos lose their vibrancy, making them look dull and washed out.
There are ways to combat this! For less severe fading, you can use photo editing software to adjust the color and contrast. By tweaking these settings, you can often breathe new life into your photos and restore some of their lost vibrancy. However, for deeply faded photos or if you're uncomfortable with editing software, professional restoration services can be a lifesaver. These experts possess the skills and tools to meticulously correct colors and bring your faded memories back to their former glory.
Scratches and creases
Scratches and creases, though not as devastating as tears or rips, can diminish the beauty and clarity of your photos. These blemishes are common occurrences during storage or handling.
There are repair options depending on the severity. For minor surface scratches, a gentle buff with a soft cloth might be sufficient. However, caution is key - overdoing it can cause further damage. For more noticeable scratches or creases, consider digitizing the photo and using photo editing software's healing tools to digitally mend the imperfections.
For deeper scratches or complex creases that defy digital solutions, professional restoration services offer the best chance of physically repairing the photo's surface and bringing back its clarity. By understanding these repair options, you can ensure your cherished photos remain clear and continue to share their stories for years to come.
Tears and rips
Tears and rips rank high on the list of dreaded photo damage. Unlike fading or scratches, they physically sever the photo, potentially destroying cherished memories. The extent of the damage determines the repair options. Minor tears with clean edges might be fixable using special archival tape or adhesives. For larger tears or rips that significantly compromise the photo, professional restoration is recommended. These professionals can meticulously reassemble the pieces and fill in missing areas, though complete restoration isn't always guaranteed.
Tears and rips are particularly damaging because they can cause a loss of visual information, essentially altering the story the photo tells. Additionally, the torn edges are vulnerable to further damage, potentially making repairs even more difficult. Despite the challenge, there is hope. Professional restoration services offer the best chance of bringing your photo back to life. In cases of severe damage, even if full restoration isn't possible, digitizing the remaining photo can preserve what's left, ensuring a lasting piece of your memories.
Water damage
Water damage is a serious threat to both traditional and digital photos. It can cause rapid and severe deterioration if not addressed quickly. For physical photos, water can make them swell and warp, damage the emulsion layer (the image-bearing part), and even promote mold growth. Mold can stain the image and damage the photo's base. For digital photos, water exposure to storage devices can lead to electrical malfunctions, data loss, and corrosion. Signs of water damage include warping, discoloration, musty odor (for mold), and error messages when trying to access photos on a storage device.
The key is to act quickly. For physical photos, remove excess water with a clean cloth and air dry them face up in a well-ventilated area. For digital storage, power off the device immediately and don't connect it to your computer. If the damage is severe, seek professional restoration or data recovery help. By following these steps, you can increase your chances of salvaging your water-damaged photos.
Digital photo damage
Unlike traditional photos that fade gradually, digital photos face a wider range of threats. Digital photo damage can be caused by both file corruption and damage to the storage medium itself. File corruption is like a scrambled recipe - the data that makes up the image gets messed up, making the photo unreadable. This can happen due to sudden power outages, faulty storage devices, software bugs, or even malware attacks. The damage can range from minor glitches to complete photo loss.
Storage medium damage can also wreak havoc on your digital memories. Physical damage like drops or extreme temperatures, magnetic interference for older storage, and just plain wear and tear can all make it difficult or impossible to retrieve your photos.
To repair damaged digital photos, use data recovery software to recover corrupted photo files. Use a professional restoration service to repair damaged storage media. Back up important photo files regularly to prevent loss. By understanding the different types of photo damage and how to repair them, you can preserve your cherished memories for generations to come.


