


How to Stabilize Shaky Video in Final Cut Pro [Comprehensive Guide]
 Mike Rule
Updated on
In today's world, capturing high-quality videos has become as simple as pulling out your smartphone. However, one common issue with mobile video recording is shaky footage caused by hand tremors. Shaky videos can be disorienting for viewers, greatly affecting their viewing experience. When faced with this problem, creators have two choices: reshoot the footage or stabilize it in post-production.
In this guide, we'll focus on the latter option, exploring how to stabilize shaky videos using Final Cut Pro. This professional video editing software offers powerful tools to rescue shaky footage and turn it into smooth, cinematic sequences. Whether you're a beginner looking to improve your home videos or a seasoned filmmaker aiming for professional results, Final Cut Pro's stabilization feature can help you achieve smoother, more enjoyable footage.
Steps to Stabilize Video in Final Cut Pro
Step 1. Create project and import your shaky video.
Launch Final Cut Pro. Once loaded, the main interface will become visible.
From the top menu bar, navigate to File > New > Project (or simply use the shortcut Cmd+N) to create a new project. Provide a name for your project and ensure "Use Automatic Settings" is selected.
Continuing with the menu at the top, select File > Import > Media (or use the shortcut Cmd+I). This action will open the Media Import window, allowing you to browse your files and choose the audio and video clips you want to bring into your project. So here, just select the shaky footage you want to stabilize in Final Cut Pro and then click "Import Selected" to proceed.
After that, close the Media Import window to return to your project workspace.
Step 2. Drag your video to timeline.
Drag and drop the shaky footage to timeline and select it.
Tips: Since Final Cut Pro conducts stabilization analysis on the entirety of a clip, you'd better isolate the problem section by cutting the clip to get the highest-quality and fastest result.
Step 3. Open the Video inspector.
You have two ways to open it.
Navigate to Window > Show in Workspace > Inspector (or use the shortcut Command-4).
Click on the Inspector button located on the right side of the toolbar.
Step 4. Enable Stabilization.
Navigate to the top of the inspector and select the "Video" tab. Then, scroll down to "Stabilization" and enable it.
Step 5. Adjust stabilization settings.
In Final Cut Pro, there are two primary methods used for stabilization: InertiaCam and SmoothCam. By default, the method is set to Automatic, allowing Final Cut Pro to determine the most suitable stabilization method (either InertiaCam or SmoothCam) for your footage.
1. InertiaCam
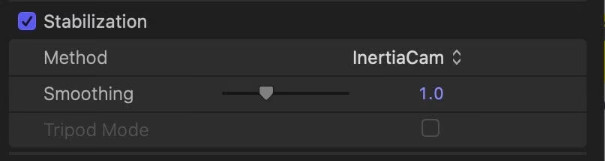
InertiaCam is tailored for stabilizing video footage that includes dynamic camera movements such as pans and zooms. When applying InertiaCam, Final Cut Pro automatically analyzes the footage and adjusts the stabilization settings accordingly. The Smoothing slider allows you to fine-tune the intensity of the InertiaCam effect, enabling you to achieve the desired level of stability while preserving the natural flow of the camera movements.
Notably, when InertiaCam is selected, Final Cut Pro may offer a Tripod Mode checkbox based on the analysis results. Enabling Tripod Mode simulates the effect of a stationary camera mounted on a tripod, ideal for scenes requiring a static perspective without any camera movement.
2. SmoothCam
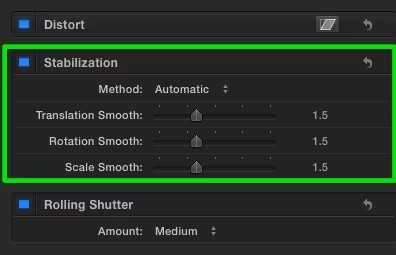
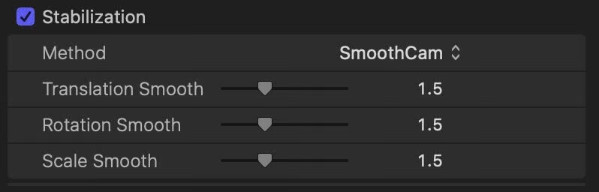
SmoothCam employs a default stabilization method that addresses various types of camera shake, including horizontal, vertical, and rotational movements. With SmoothCam, you have granular control over three key parameters:
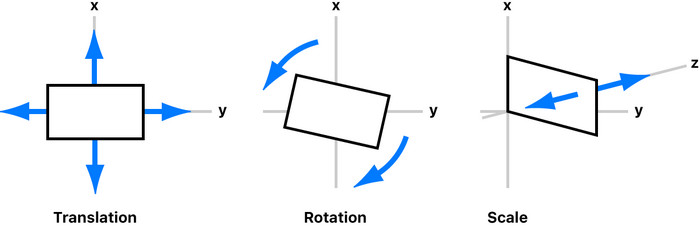
- Translation Smooth: Adjusts the left, right, up, and down movement of the shot along the x and y axes.
- Rotation Smooth: Controls the rotation around the center point of the image, helping to stabilize rotational shake.
- Scale Smooth: Manages forward or backward camera or lens movement along the z-axis, reducing or eliminating depth-related fluctuations.
For instance, if you wish to eliminate horizontal, vertical, and rotational shake from your footage, you can adjust the Translation Smooth and Rotation Smooth parameters accordingly. Experimentation with different parameter values is encouraged to find the optimal settings that stabilize the shot while maintaining visual coherence.
Step 6. Enable Rolling Shutter.
This step is optional, but if your video displays signs of rolling shutter distortion, it's advisable to proceed with this correction. These signs include the appearance of curved lines on fast-moving objects that should be straight, or footage that exhibits a wobbly or "jelly-like" appearance during rapid camera movements. If you observe these symptoms, it's probable that your footage is affected by rolling shutter distortion, and applying rolling shutter correction in Final Cut Pro could significantly improve its quality.

Step 7. Preview the result.
If you notice the message "Analyzing for dominant motion" beneath the Viewer window, it indicates that Final Cut Pro is still processing the stabilization. Once this process is complete, you can preview the video to check if the shakiness has been adequately removed. Additionally, toggling the "Stabilization" box in the Inspector allows you to compare the footage with and without Final Cut Pro's stabilization effect applied.

If you find the result unsatisfactory, you can readjust the stabilization settings as needed.
If you notice black bars appearing on the edges of your video, it could be due to excessive motion in your clip, such as extensive panning. Fortunately, there are several methods to eliminate these black bars:
- Lower the values for the Translation Smooth, Rotation Smooth, and Scale Smooth.
- Trim or cut the clip in the timeline to remove the sections with the most shake. You can identify these sections by checking the Excessive Shake tags in the Tags pane of the timeline index. Clicking on individual Excessive Shake tags will select the corresponding ranges in the timeline.
- Crop the edges of the stabilized video to delete the black bars.
Conclusion
Throughout the tutorial, we outlined a step-by-step process for stabilizing videos in Final Cut Pro, covering everything from project setup to adjusting stabilization settings and addressing rolling shutter distortion. By following these detailed instructions, users can effectively salvage shaky footage and elevate the overall quality of their video projects.
However, achieving optimal stabilization results in Final Cut Pro may require some trial and error. Every video clip is unique, and the degree of stabilization needed can vary depending on factors such as camera movement, filming conditions, and the desired aesthetic. Therefore, users may need to experiment with different stabilization settings and techniques to find the perfect balance between stability and natural motion.
Additionally, it's essential to keep in mind that while Final Cut Pro offers powerful tools for stabilizing footage, it's not a substitute for good filming techniques. Whenever possible, try to minimize camera shake during filming by using stabilizers, tripods, or other equipment designed to capture smoother footage. Doing so can significantly reduce the need for extensive stabilization in post-production and ultimately result in higher-quality videos.
In conclusion, while Final Cut Pro provides invaluable tools for stabilizing shaky footage, achieving optimal results often requires a combination of software expertise and solid filming techniques. By following the guidelines outlined in this tutorial and experimenting with different stabilization settings, users can enhance the quality of their video projects and deliver captivating content to their audience.


