


Automatic Ripping Machine: Automate Your DVD & Blu-ray Library
 Donna Peng
Updated on
Automating disc ripping can save hours of tedious work, especially if you’ve ever spent a weekend manually converting DVDs or Blu-rays. Many users on Reddit and Plex forums complain about lost subtitles, mismatched audio, or endless clicking. An automatic ripping machine (ARM) streamlines the process, handling detection, ripping, and even file organization with minimal intervention. Here’s how you can get ARM running, optimization tricks, and how to integrate it with your home media server—helping you manage your collection efficiently and stress-free.
Automatic Ripping Machine (ARM) Overview
What Is Automatic Ripping Machine?
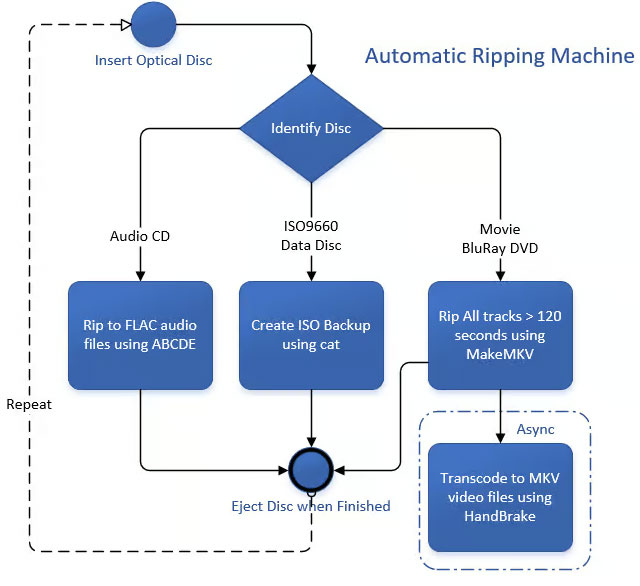
Automatic Ripping Machine (ARM) is an open-source, server-based tool designed to fully automate DVD, Blu-ray, and CD ripping workflows. Instead of manually launching ripping software, naming files, and organizing folders, ARM runs quietly in the background and handles the entire process from disc insertion to final media-ready output.
It’s commonly deployed on home servers, NAS systems, or always-on PCs, making it especially popular among Plex and Jellyfin users who want a hands-off way to digitize large physical media collections.
Automatic Ripping Machine (ARM) Core Features
- Automatic disc detection: ARM monitors optical drives and reacts instantly when a disc is inserted, identifying whether it’s a DVD, Blu-ray, CD, or data disc without user input.
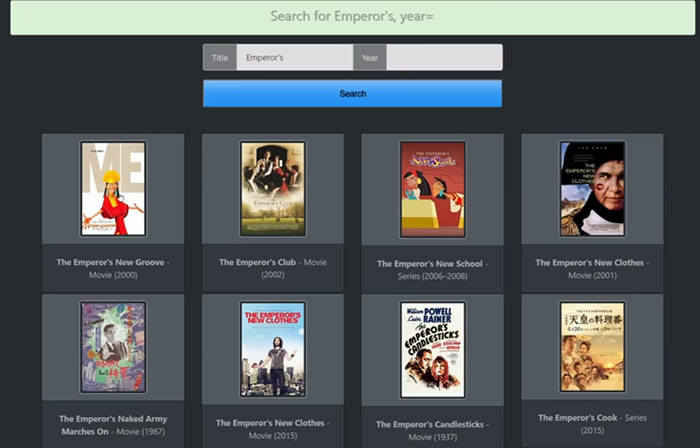
- Smart media identification: The system analyzes disc content and pulls metadata from online databases to correctly classify movies versus TV episodes and generate media-server-friendly folder names.
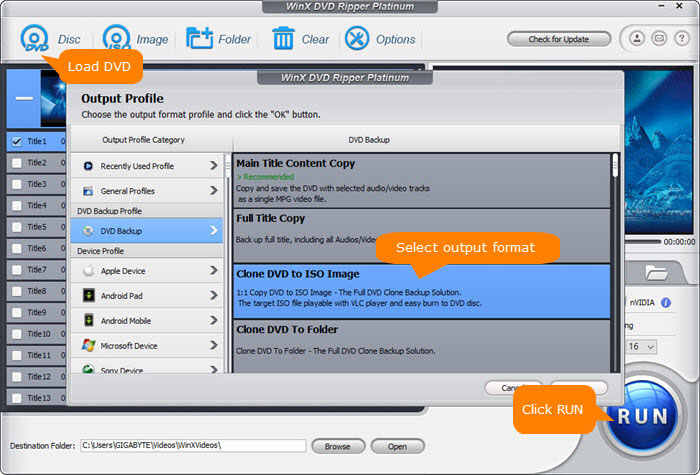
- Flexible ripping workflows: Video discs can be processed with MakeMKV, HandBrake, or WinX DVD Ripper, allowing users to extract either the main feature or all titles, while audio CDs and data discs follow dedicated ripping or ISO-backup paths.
- Queued and parallel processing: Ripping and transcoding tasks are handled asynchronously, enabling multiple optical drives to work in parallel without blocking the system.
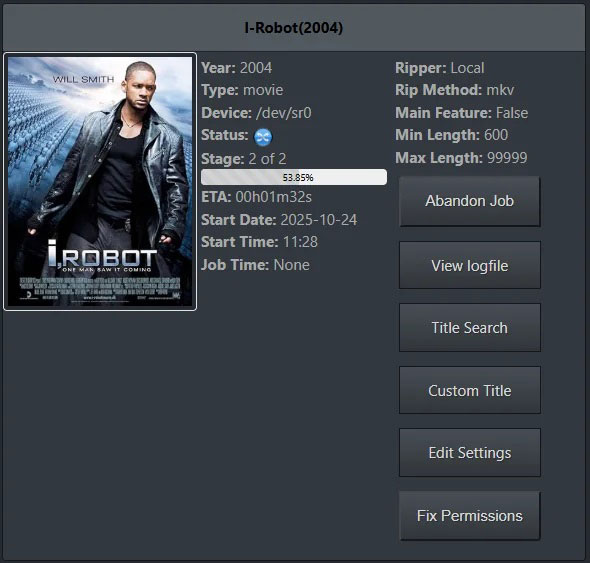
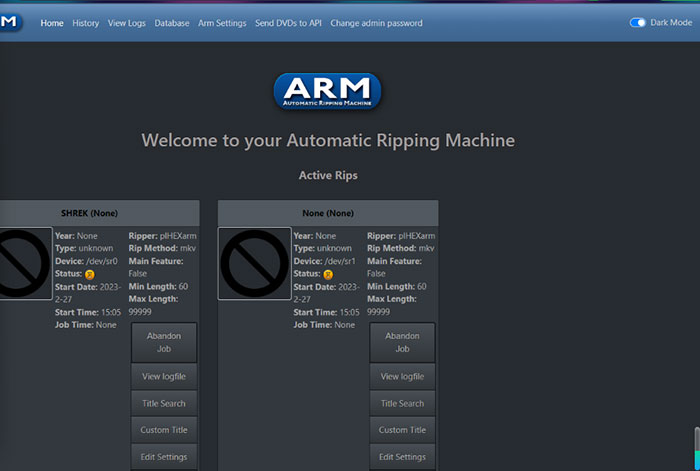
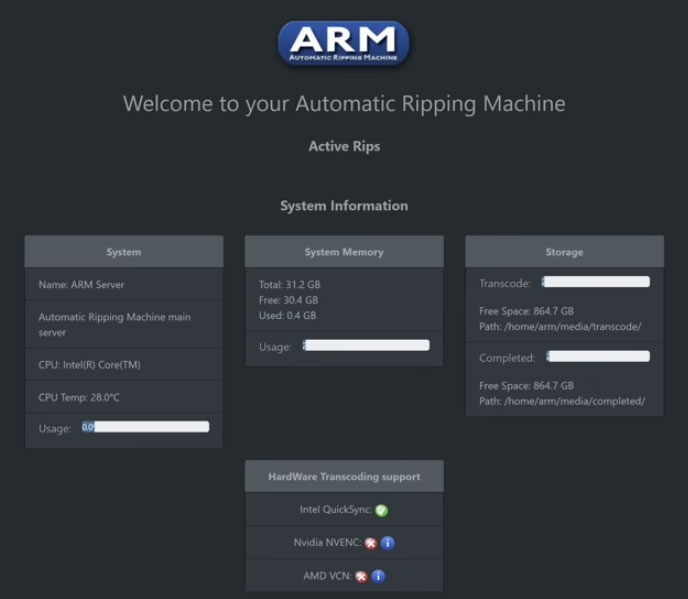
- Remote-friendly operation: ARM runs headless and provides a lightweight web interface for monitoring jobs, checking logs, and troubleshooting issues from any browser.
- Hardware-accelerated transcoding: When supported, ARM can offload encoding tasks to Intel Quick Sync, NVIDIA NVENC, or AMD VCE to speed up processing and reduce CPU usage.
- Status notifications: Optional integrations allow ARM to send updates and alerts through messaging platforms, so you know when a disc finishes without checking logs manually.

Why Users Choose Automatic Ripping Machine (ARM)
Manually ripping discs often leads to inconsistent naming, missing metadata, and hours spent supervising progress bars. ARM removes those friction points by turning ripping into a repeatable, predictable process.
- Ideal for large collections: Once configured, ARM can process stacks of discs with minimal attention, making it practical for digitizing hundreds of DVDs or Blu-rays.
- Cleaner media libraries: Automated naming and folder structures reduce post-rip cleanup and help Plex or Jellyfin recognize content correctly on first scan.
- Reliable, set-and-forget workflow: Users can focus on other tasks while ARM handles ripping, transcoding, and disc ejection in the background.
- Scales with your setup: Whether you’re running a single drive or a multi-drive ripping station, ARM adapts without changing your overall workflow.
Recommended Automatic Ripping Machine Setup Tools
Starting with an Automatic Ripping Machine (ARM) can feel overwhelming, but selecting the right setup makes a huge difference. Forum users on Reddit and Plex often share hardware and software combinations that save time, reduce errors, and simplify media management.
1. Hardware
A reliable DVD or Blu-ray drive is essential for smooth ripping, and SSDs are highly recommended for temporary storage during the process. Even modest CPUs handle ARM setup, but stronger processors accelerate large-scale ripping and transcoding tasks, keeping the workflow efficient.
2. Software
For Blu-rays, a combination of MakeMKV + HandBrake + ARM works seamlessly, while WinX DVD Ripper + ARM is ideal for DVD collections. Both serve as a robust Blu-ray auto ripping tool or automatic DVD ripper, depending on your media type, ensuring files are organized and ready for Plex or Jellyfin.
3. Community-tested workflows
Users recommend prioritizing main features, batch processing multiple discs, and adjusting default transcode settings to balance speed and quality. These small tweaks, shared across forums, often prevent common errors and make ripping predictable.
4. Optional enhancements
Hardware acceleration like Quick Sync or running ARM in a Docker container further improves performance and allows multiple sessions without interference. Following these strategies helps you set up a reliable and mostly hands-off ARM setup.
With the right hardware, software, and workflow, your media library can stay organized, consistent, and ready for Plex, Jellyfin, or any other server, turning tedious manual ripping into an efficient automated process.
ARM System and Hardware Requirements
The Automatic Ripping Machine (ARM) does not have extreme hardware demands, but system performance has a direct impact on ripping speed, transcoding reliability, and overall stability. While ARM can run on modest systems, faster processors, sufficient memory, and adequate free storage greatly reduce failed jobs and stalled rips.
Host Operating System:
ARM is designed primarily for Linux-based systems. Docker deployment is strongly recommended, as it simplifies installation, updates, and troubleshooting. According to the official ARM documentation and user reports:
- Ubuntu Server 20.04 or newer (Multiverse and Universe repositories enabled) is the most commonly used and tested option.
- Debian 10 (Buster) and OpenMediaVault 5.x are no longer officially supported as of end of 2022.
- Other Linux distributions may work but are not officially tested.
- Windows systems can run ARM via WSL2, but native Linux generally offers better performance and automation.
Processor (CPU):
CPU requirements depend largely on whether transcoding with HandBrake is enabled. For basic ripping, ARM can run on entry-level processors, but transcoding is the most CPU-intensive part of an ARM setup.
- Intel Core i3, i5, i7, i9 (6th generation or newer) or equivalent Xeon
- AMD Ryzen, Threadripper, or EPYC processors
Hardware acceleration such as Intel Quick Sync or NVIDIA NVENC can significantly reduce CPU load during transcoding when supported by your system.
Memory (RAM):
Memory usage varies based on video resolution and transcoding settings. As a general guideline:
- ~1 GB RAM for standard definition video (480p / 576p)
- 2–8 GB RAM for high definition video (720p / 1080p)
- 6–16 GB or more for ultra-high-definition video (2160p / 4K)
While 8 GB is often considered the bare minimum, 16 GB or more is recommended when running Docker containers and processing multiple discs simultaneously with an automatic DVD ripper or Blu-ray auto ripping tool.
Optical Drives:
One or more optical drives are required to rip DVDs, Blu-rays, or CDs. Higher-quality drives with better error correction are consistently reported by forum users to reduce failed rips and improve overall throughput. UHD and 4K Blu-ray discs require drives and firmware that support 4K disc decryption.
Storage:
Storage planning is critical for ARM. Jobs can fail if available disk space reaches 100% during ripping or transcoding.
- ARM Docker container: approximately 2–4 GB
- Audio CD rips: less than 1 GB per disc
- DVD and Blu-ray rips: typically 10–20 GB or more per disc
- Transcode and completed folders: at least 10 GB free space recommended at all times
SSD or NVMe storage is strongly recommended for temporary ripping and transcoding directories, as it reduces I/O bottlenecks and improves processing speed for large libraries.
By aligning your hardware and operating system with these official ARM requirements, you can minimize errors, improve reliability, and get the most out of your Automatic Ripping Machine workflow.
Automatic Ripping Machine Installation and Configuration Guide
Setting up an Automatic Ripping Machine (ARM) may seem intimidating, but following a structured workflow ensures smooth operation. ARM runs best in a Docker container, which isolates dependencies, simplifies updates, and prevents conflicts. Start by installing Docker on your Linux system; Ubuntu 20.04 or later is recommended. After installation, pull the official ARM image using docker pull automatic-ripping-machine/arm and launch the container.
Step-by-Step ARM Setup and Configuration Tutorial
Getting your Automatic Ripping Machine (ARM) up and running can feel complex at first, especially when dealing with optical drives, Docker, API keys, and transcoding options. Following the official installation workflow helps avoid common permission issues, drive detection failures, and performance bottlenecks frequently discussed on Reddit and Plex forums.
Step 1. Choose an Installation Method
ARM supports multiple installation methods, but the recommended approach for most users is running ARM via Docker on a Linux host. The prebuilt Docker image requires minimal manual configuration and is the most reliable option for new users.
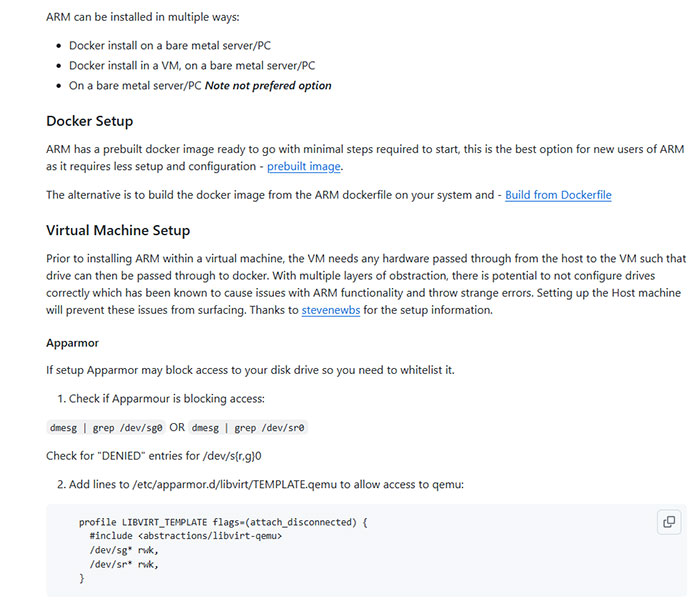
- Docker install on a bare-metal server or PC (recommended)
- Docker install inside a virtual machine
- Direct install on bare metal (not preferred)
Building the Docker image manually from the ARM Dockerfile is also supported, but generally unnecessary unless you need custom modifications.

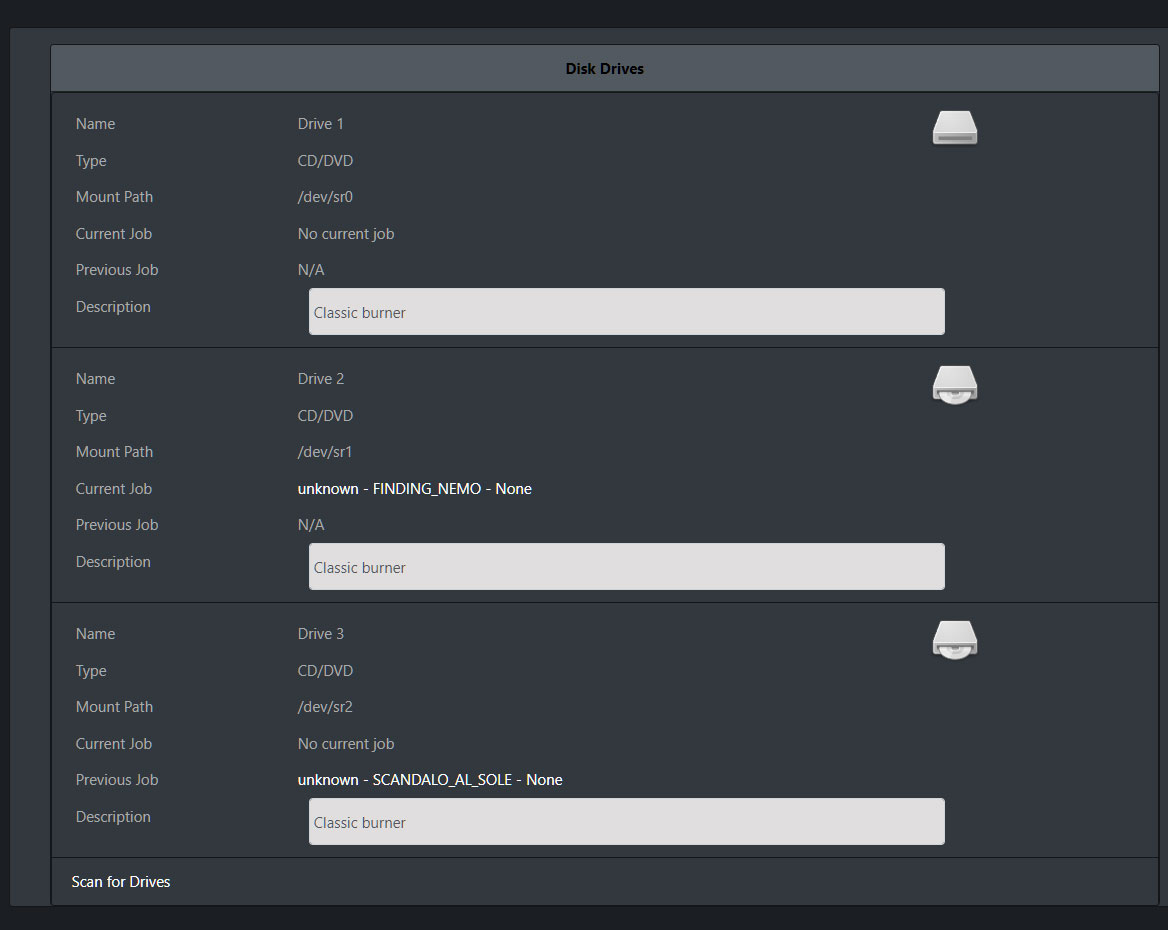
Step 2. Configure Optical Drive Access
ARM relies on direct access to optical drives. On a bare-metal Docker setup, drives must be
passed through to the container using device passthrough (for example, /dev/sr0).
Before connecting multiple drives, test with a single disc to confirm proper detection
and rule out permission or udev-related issues.
If ARM is running inside a virtual machine, the host must first pass the optical drives through to the VM using libvirt or QEMU. Misconfigured passthrough is a common source of unusual ARM errors due to the multiple layers of abstraction.
Step 3. Verify AppArmor and System Permissions
On systems using AppArmor, access to optical drives may be blocked by default. If ARM fails to read discs, check kernel logs for denied device access and whitelist the appropriate devices.
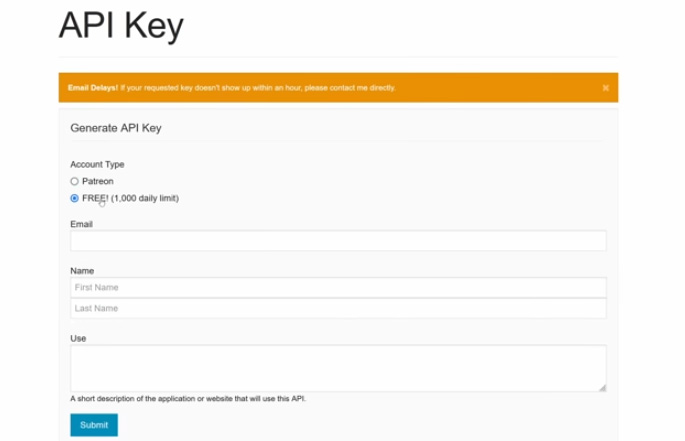
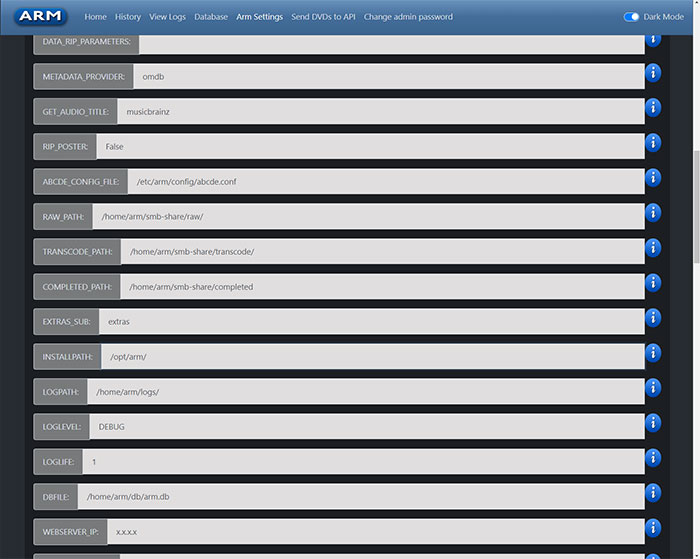
Step 4. Set API Keys and ARM Configuration
Request an OMDb API key and add it to the ARM configuration file
(arm.yaml). ARM uses OMDb to retrieve movie titles, release year, and cover art,
allowing your automatic DVD ripper or Blu-ray auto ripping tool to organize
media correctly for Plex or Jellyfin.
Without a valid API key, ripping will still function, but files may be named generically and require manual cleanup.
Step 5. Adjust Ripping and Transcoding Preferences
ARM can rip only the main feature, the full disc, or selected titles. Blu-ray ripping is handled by MakeMKV, while optional post-processing and transcoding is performed by HandBrake.
If supported by your system, hardware acceleration such as Intel Quick Sync, AMD VCE, or NVIDIA NVENC can significantly reduce CPU usage during transcoding. Be aware that hardware encoding trades some video quality for much faster processing speeds.

Tips from the community:
Verify subtitles and audio tracks on your first few rips to ensure correct defaults. Maintain a consistent folder and naming structure to avoid duplicates in Plex or Jellyfin. Many users schedule overnight batch ripping sessions to process large libraries efficiently. Running ARM in Docker simplifies updates and troubleshooting, helping keep your Automatic Ripping Machine stable and reliable over time.
ARM Usage Tips and Optimization
To get the most out of your Automatic Ripping Machine, small adjustments can make a huge difference. From speeding up rips to ensuring metadata accuracy, these practical tips reflect what experienced users often share on Reddit and media server forums. Implementing them helps your automatic DVD ripper or Blu-ray auto ripping tool run smoothly and keeps your library organized.
- Use SSD for temporary files: Store ripping and transcoding files on an SSD to reduce bottlenecks and speed up the ARM setup process for your automatic DVD ripper or Blu-ray auto ripping tool.
- Enable hardware acceleration: Use Quick Sync or NVENC to reduce CPU load and finish rips faster. Many forum users report significant time savings.
- Regularly monitor the ripping process: Check logs for errors like subtitle loss or mismatched audio tracks, which are common discussion points on Reddit threads.
- Correct metadata manually: Sometimes OMDb fetches incorrect info. Adjust titles, posters, and release dates to maintain a clean library.
- Avoid duplicates: Consistently name folders and organize files by movie title or release year. This prevents redundant rips and keeps your library tidy.
How to Integrate ARM with Home Servers
Integrating ARM with Plex, Jellyfin, or Emby allows fully automated media management. By linking an Automatic Ripping Machine with Plex, Jellyfin, or Emby, your ripped DVDs and Blu-rays are automatically organized, transcoded, and added to your library, making content instantly available across all devices without manual intervention. Here’s a simple workflow:
- Prepare server folders: Create shared directories accessible via SMB or NFS for ripped content.
- Configure Docker paths: Map ARM’s output directories to these shared folders during ARM setup.
- Adjust permissions: Ensure the container and server have read/write access to avoid errors.
- Test with a disc: Insert a DVD or Blu-ray to confirm ripping, transcoding, and metadata tagging work correctly.
- Verify server library update: Plex or Jellyfin should detect the new content automatically, enabling instant cross-device access.
Following these steps ensures your Automatic Ripping Machine seamlessly feeds into your home media ecosystem, creating a hands-off, efficient workflow that users frequently discuss on forums.
 FAQs about Automatic Ripping Machine
Yes, ARM is designed for enthusiasts with DVD or Blu-ray collections. While some technical setup is required, home users can automate ripping and organizing media libraries efficiently, saving hours of manual effort compared to traditional ripping methods.
ARM can handle UHD / 4K Blu-rays if the drive supports proper firmware and the system meets transcoding requirements. Users frequently discuss potential limitations on forums, so checking hardware compatibility and updating firmware is critical before attempting high-resolution rips.
Organize output folders with consistent naming rules and configure ARM to overwrite or skip existing files. Many forum users recommend reviewing batch jobs occasionally, especially when using automatic DVD ripper or Blu-ray auto ripping tool, to prevent duplicates and maintain a tidy library.
Many users on Reddit share that ARM’s interface can be confusing at first. Reading setup guides, watching tutorials, and starting with a small test rip helps. Familiarity grows quickly, and once ARM setup is complete, the workflow becomes mostly hands-off.
Typically yes. ARM rips with MakeMKV and optionally transcodes via HandBrake, producing MP4 or MKV files compatible with Plex, Jellyfin, or other media players. Forum users suggest verifying subtitles, audio tracks, and metadata for perfect playback before archiving.
External Sources:
1. Automatic Ripping Machine Getting Started : The official ARM “Getting Started” guide covers supported host operating systems, multiple installation options including Docker and virtual machine setups, and additional configuration steps for optimal performance.
2.
ARM Docker Setup
: Official documentation for installing and configuring ARM using Docker, including requirements for Linux,
listing devices using lsscsi -g, and configuring volumes and optical drives for container use.
3.
Configuring ARM
: ARM wiki page explaining how to modify the arm.yaml configuration file, set directories,
and update settings for media directories and ripping preferences.
4. Docker Engine Installation Guide [Docker] : Official Docker documentation covering installation instructions for various operating systems, including Ubuntu, Debian, Windows, and macOS.
5. ARM Auto-Install Setup : Step-by-step instructions for automatically installing ARM on a host system, including Docker setup, dependencies, and initial configuration to get started quickly.
6. Automatic Ripping Machine GitHub Repository : The official ARM GitHub repository containing the source code, Dockerfiles, issues, releases, and contribution guidelines.


 Free Download
 Free Download