How to Burn iMovie Project to DVD with or without iDVD
"I've made a movie project of about 1.5 hours using iMovie which has taken up most of the disk space on my iMac G3/600. I need to export it to DVD to free up hard drive room. How do you export an iMovie project to a DVD without iDVD?"
iMovie is a commonly-used app to create projects of family parties, learning classes, training videos, etc. Sometimes, we will want to burn iMovie videos to DVD as a keepsake or for easier sharing with friends on TVs. iMovie to DVD burning used to be easy with iDVD. However, since Mac OS X 10.17 Lion, iDVD is no longer pre-installed on Macs or available on the Mac App Store. It's macOS Ventura now! Well, can we burn iMovie to DVD without iDVD? Yes!
In this article, we'll show you how to burn an iMovie project to a DVD without iDVD. What's more, we'll show you how to get iDVD on Mac and use it to burn iMovie files to a DVD.
Table of Contents
Part 1. Export iMovie Project for DVD Burning
You can't export iMovie project to DVD directly. You need to export the iMovie projects to digital files for burning later. To export iMovie project, just follow the steps below.
Step 1. Open iMovie app, and then Click "File" > "Open" to open the iMovie project you would like to save on DVD.
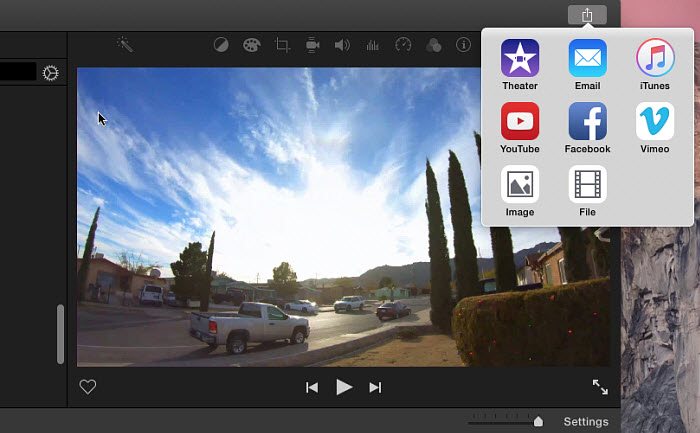
Step 2. Click the share icon in the upper right of the menu bar and choose "Export File" or "File" from the dropdown list. Alternatively, you can click "File" at the top menu bar > "Share" > "File".
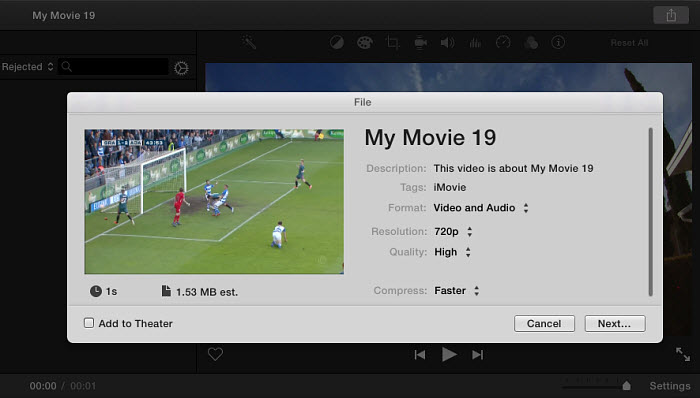
Step 3. In the "File" window, you need to enter a name for the file and set the format as "Video and Audio". As for Resolution, Quality, and Compress, just make choices based on your own needs. To burn iMovie to a DVD, you're suggested to export the iMovie project to 480P or 540P. After you have done all the settings, click "Next".
Step 4. Then the the save location window will show up. Just select a location to store the exported iMovie and click "Save". Then, your iMovie project will begin exporting into a file.
Once done, you'll see a notification on the rop-right corner of the screen saying "Exporting xxx was successful". Clicking the Show button on the notification will take you to the iMovie file's folder, at which point you can proceed with burning it to a DVD.
Part 2. How to Burn iMovie to DVD on Windows
For Windows users, the 100% free and clean iMovie to DVD burner named WinX DVD Author can easily help. This program is able to burn videos in MP4, MOV, AVI, M4V, FLV, and other files from iMovie to DVD discs with high quality. It lets users to create menu, add subtitles, adjust aspect ratio, etc. It's extremely easy to get started with.
To burn iMovie to DVD to play on TV or DVD player, you will need:
- A blank disc (Choose the DVD size based on the size of your iMovie video.)
- A computer with a built-in DVD drive or an external DVD drive.
- Download and install WinX DVD Author.
Then, follow the steps below.
Step 1. Insert the blank DVD into the DVD drive.
Step 2. Run WinX DVD Author and click the Video DVD Author button.
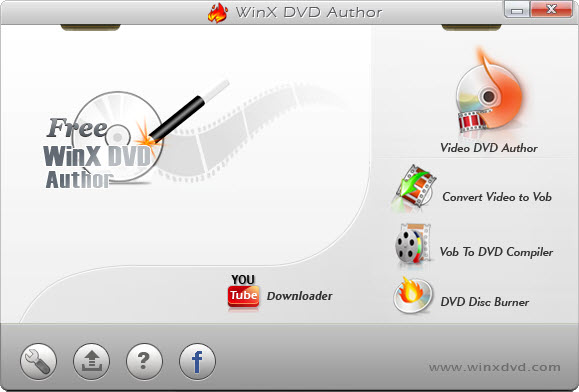
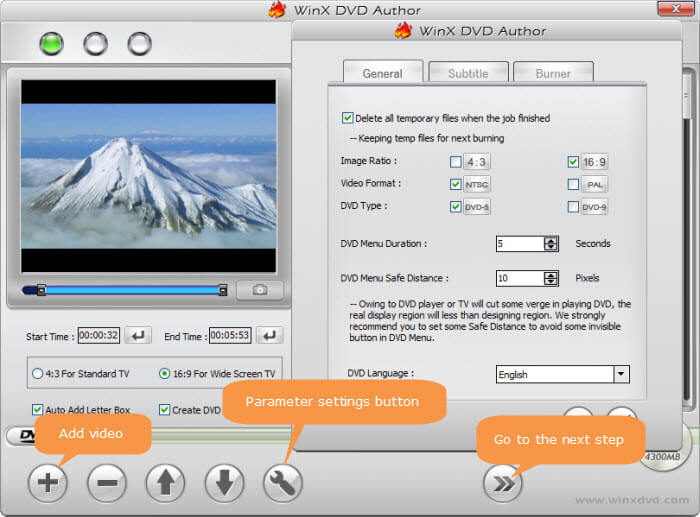
Step 3. Click the + icon to add the iMovie file you just exported from iMovie. Click the Settings and you can specify aspect ratio, video format, DVD type, language, etc.
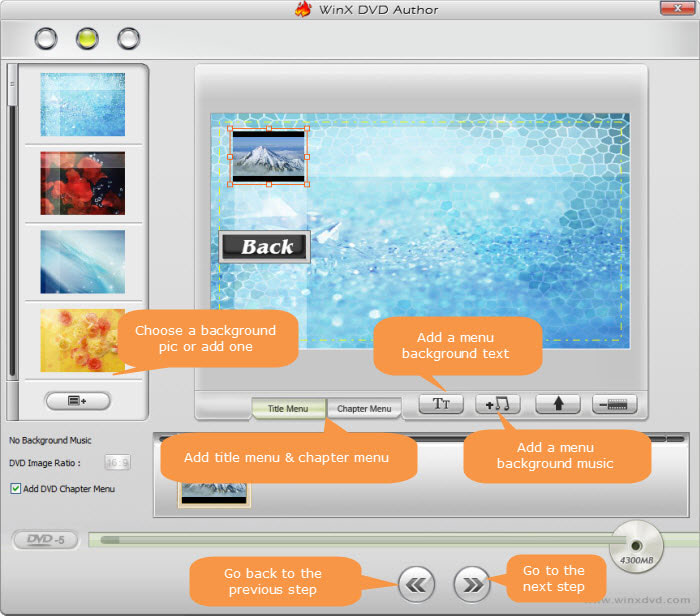
Step 2. Click the Next (>>) button and in the window you can enable Add DVD Chapter Menu. Create personal title menu, chapter menu, and customize background picture and background music based on your needs.
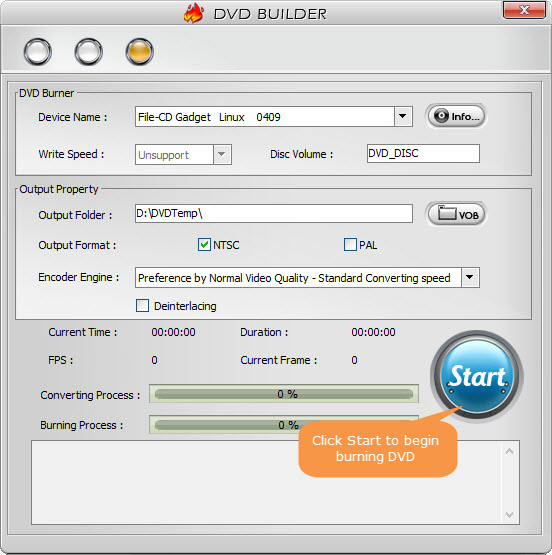
Step 3. Click the Next (>>) button and in the window you can specify the device, write speed, output folder, output format, and encoder engine. After all the changes, click the Start button to begin burning iMovie file to DVD.
Part 3. How to Burn iMovie Project to DVD with iDVD
iDVD is another way to burn iMovie project to a movie DVD. However iDVD isn't included in the iLife bundle that come with OS 10.7 Lion and later. What's worse, it is no longer included in the iLife 11 from the online Apple Store. Well, how to get iDVD if you don't have the iDVD app on your Mac?
In this case, you can look on Amazon or eBay and try to get an older version that includes iDVD 7, such as iLife version 9.
Note: The version of iDVD 7 included with iLife 11 only includes themes from iDVD 5-7. If you want all the older themes you should buy iLife 9, which has the same version of iDVD 7 but with all the themes.
After you have installed iDVD on your Mac, you can follow the procedure below to burn iMovie to DVD with iDVD.
Step 1. Put a DVD-R disc into your optical burner, either a built in burner or a plugged in external burner.
Step 2. Open iDVD and drag the movie you export from iMovie into the edge of an open iDVD project screen.
Step 3. Select Burn disc image from the iDVD File menu. It will take a while for the encoding to take place. When the encoding is finished you will see a disc image icon on your desktop.
Step 4. Control-click on the icon of the disc image and select Burn Disc from the drop down menu. Then, you'll see a box in which you should select to burn at 4x speed and check the box to eject disc when burning is finished. Next, click Burn. Then, a progress bar will show up to display the status of the burning process.
So that's how to use iDVD to burn iMovie to DVD for TV or DVD player.
Part 4. How to Burn iMovie to DVD with Finder
Though iDVD discontinued on Mac, macOS later than 10.13 offers the ability to burn video to DVDs using Finder. So you can use Finder to burn the iMovie video to DVD without iDVD. Different from WinX DVD Author, Finder burns a data DVD. And it burns only a data DVD of about 20 minutes duration. A data DVD might play only on a computer and not a DVD player (some modern DVD players have an option to play data DVDs). A data DVD movie file will be limited in size to the 4.7GB capacity of a standard DVD-r disc because, unlike an authored movie DVD, the data is not compressed.
You will need:
- A blank disc
- A Mac computer (with an external disc drive if there is no disc drive)
Step 1. Insert a DVD-R or DVD-RW into the Mac's DVD drive.
Step 2. Open Finder and select the blank DVD from the left side of the window. It's normally named Untitled DVD.
Step 3. Click the DVD icon to open it. Then copy the iMovie video you want to burn and paste the copied iMovie video into the DVD folder.
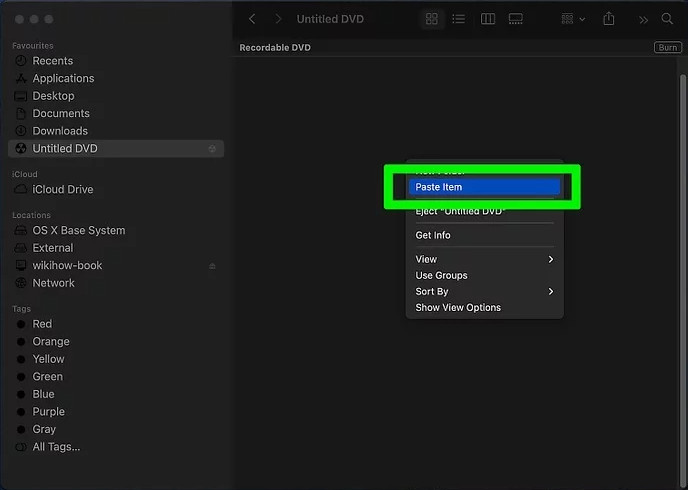
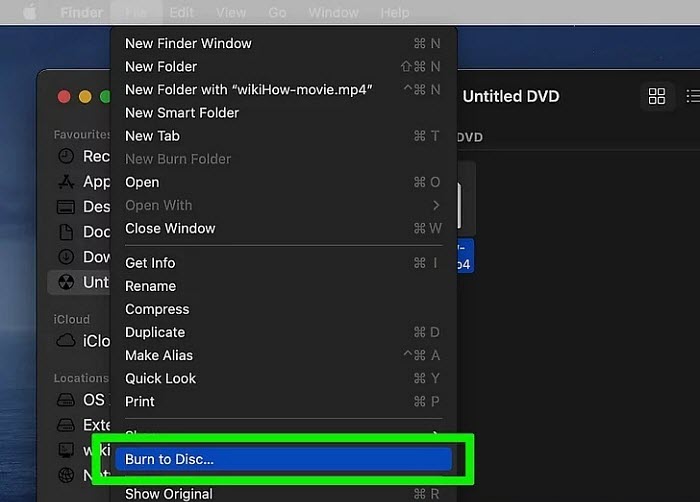
Step 4. Click File from the upper-left menu bar and you will see a drop-down menu. Select Burn to Disc from it. Then in the window you can change the DVD name and select a burn speed. After all the changes, click the Burn button to export iMovie to DVD now.
Part 5. How to Burn iMovie Project to DVD with Burn for Mac
The classic and free burning app for Mac offers a simple way to export iMovie videos to disc. Burn for Mac app can turn iMovie videos to a wide range of video discs, create interactive menus, and offers high quality. Compared to the Finder method, Burn for Mac offers more advanced options, such as file permissions, the disc icon, file dates, etc. It still works with the latest macOS Ventura.
You will need:
- A blank disc
- A Mac computer (with an external disc drive if there is no disc drive)
- Burn for Mac app
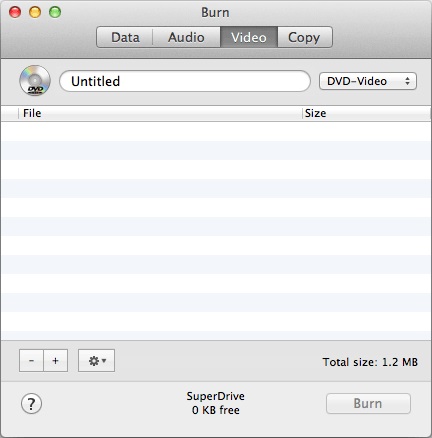
Step 1. Launch Burn on MacBook and click the video tab, then name the DVD and choose DVD from the pop-up menu.
Step 2. Click the + button and drag the iMovie video into the list. Don't worry about the iMovie video formats. Burn for Mac supports most video formats, and if not, it will convert the iMovie video to the right format for burning.
Step 3. Insert a blank DVD and click the Burn button to start to burn the iMovie project to DVD.
