VLC Hardware Acceleration: Use GPU to Play/Convert Video
VLC media player features GPU hardware acceleration for hardware decoding on Windows, macOS, Linux, Android and iOS operating systems. Yet, oodles of users have no idea on how to use GPU acceleration in VLC, what video codecs are supported for HW decoding and how to play 4K HEVC 60FPS in VLC without using too much CPU. No biggie! This post aims to help you find out the answers you need and to provide you with the smart approaches to fix the video playback/conversion errors in VLC.
How to Speed Up 4K Video Playback? Try WinX GPU-accelerated 4K Video Tools
Here comes Winxvideo AI, a hardware-accelerated 4K video converter that you can use to 47X faster convert 4K videos to 1080p/MP4/H.264 for VLC to play without issues, or directly play 4K videos smoothly and in high quality.
Table of Contents
Part 1. How to Enable GPU Accelerated Decoding & Converter in VLC
For Windows users to use VLC hardware acceleration
1. Enable GPU Accelerated Decoding in VLC Windows
For Windows PC users whose VLC version is 2.2.X branch or older, follow the below guide to enable hardware decoding in VLC.
Step 1. Run your VLC player > click "Tools" at the top banner > opt for "Preferences".
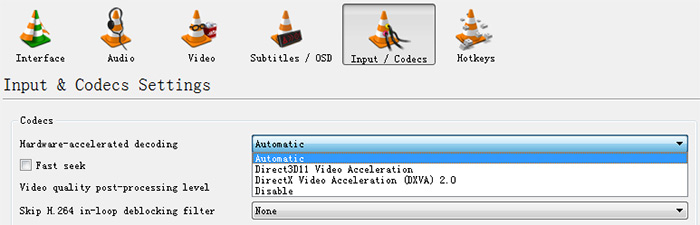
Step 2. Tap "Input/Codecs" > find "Hardware accelerated decoding" under Codecs.
Step 3. Change the default "Disable" to "Automatic".
Step 4. Give the last hit to "Save" button. And that's it!
If you don't want to manually enable GPU hardware acceleration in VLC, please upgrade your VLC to version 3.0.0 or higher, which will defaultly set it as "Automatic". What's plus, it has more video codecs supported for HW acceleration. And also just switch "Automatic" to "Disable" if you want to disable hardware acceleration on VLC in some cases.
2. Enable GPU Hardware Converter in VLC Windows
VLC for Windows PC also features GPU hardware converter to help you free hardware convert video format with less CPU usage. How to turn on hardware converter in VLC for Windows PC? Check below:
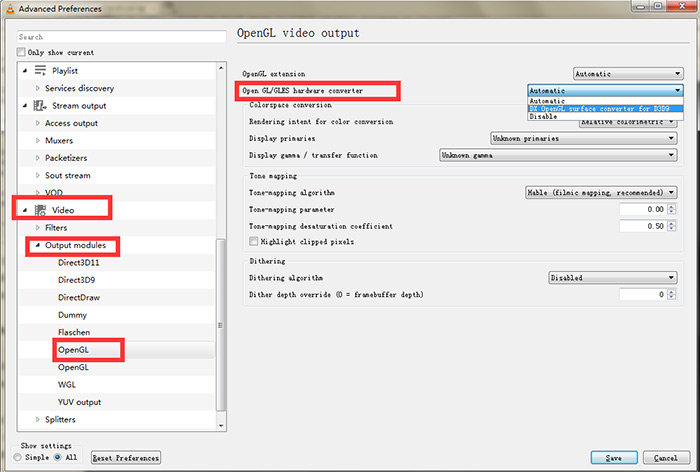
Step 1. Launch VLC player > Tools > Preferences > tap "Input/Codecs" > change Simple to All at the left-hand bottom of the interface Show settings section.
Step 2. Scroll down to Video and stay at Output Modules at the left panel of the UI.
Step 3. Choose OpenGL > move your mouse to the right panel and select hardware converter type you need: automatic or DX OpenGL for D3D9.
Step 4. Tap "Save" button. Done!
For macOS users to use VLC hardware acceleration
1. Enable GPU Accelerated Decoding in VLC Mac
For macOS users whose VLC version is older than version 3.0.0, follow the below instructions to make VLC use GPU on macOS.
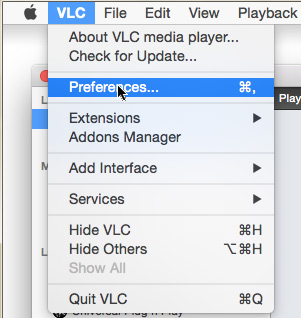
Step 1. Fire up VLC player on macOS > select Preferences under VLC option on the top menu.
Step 2. Choose Input / Codecs and enable "Hardware decoding" option under Codecs / Muxers section.
Step 3. Tap Save button and go back to VLC. Job is done.
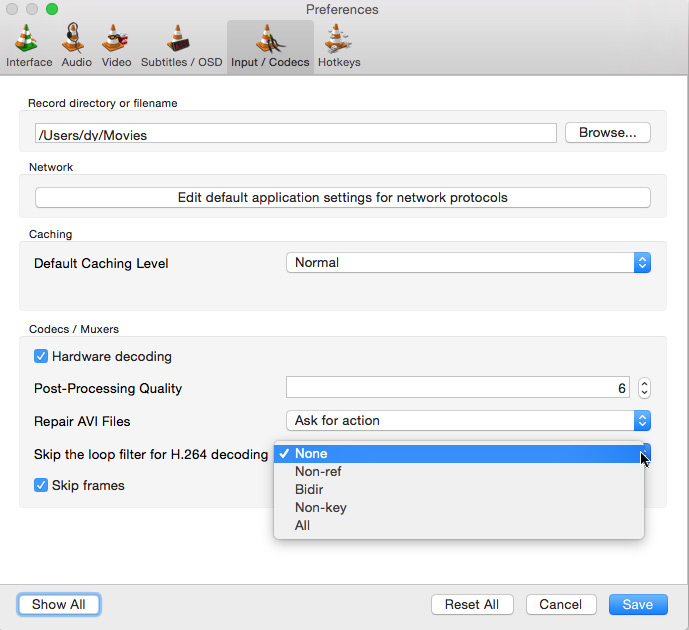
Note: You can change the default setting of "skip the loop filter for H.264 decoding" from None to other options (Non-ref, bidir, Non-key, all) if the loop bandwidth is wider enough.
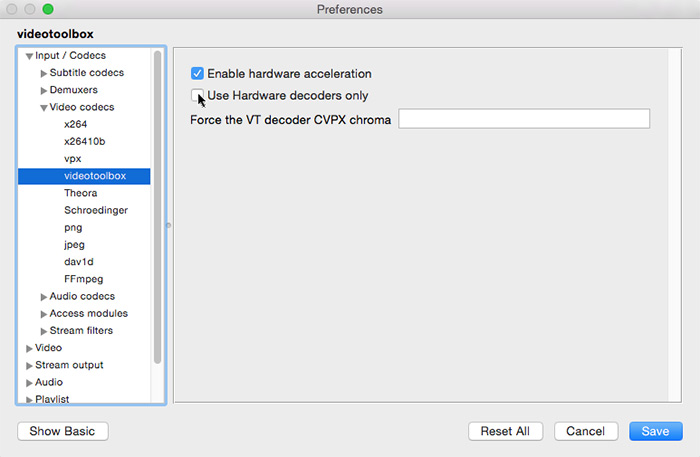
2. Enable GPU Hardware Converter in VLC Mac
Step 1. Similar to GPU hardware decoding, stay at Input /Codecs > change Simple to All at the left-hand bottom of the interface Show settings section.
Step 2. Scroll down to Video Codecs and find videotoolbox at the left panel of the UI.
Step 3. Activate "Enable Hardware Acceleration" and untick "Use Hardware Decoders Only" option. Thus, both hardware decoder and encoder are turned on.
Step 4. Tap "Save" button. Done!
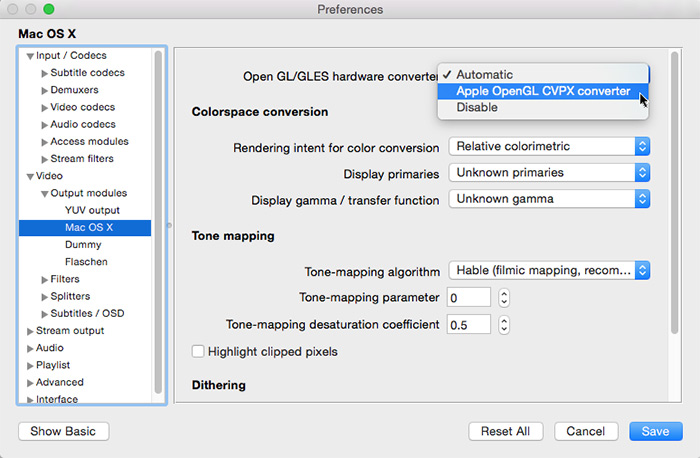
Or, alternatively, you can also choose Mac OS X under Video section at the left panel. Then choose Automatic or Apple OpenGL CVPX Converter on the Open GL/GLES hardware converter option at the right panel. Tap Save and the hardware converter feature is on.
Part 2. What Video Codecs Are Supported by VLC for Hardware Decoding
Grounded on the wiki.videolan, the supported video codecs are:
- Windows (DxVA2): MPEG-1, MPEG-2, WMV3, VC-1 and H.264 (MPEG-4 AVC)
- macOS (VDA): Only H.264 (MPEG-4 AVC)
You might have noticed that there is no HEVC x265 hardware decoding in VLC. To hardware decoding HEVC (H265) video:
- Windows: please upgrade VLC to 3.0.0 or later version with DxVA2 and Direct3D11 Video Acceleration techs.
- macOS: Please update VLC to 3.0.0 or higher if you want HEVC hardware decoding based on VideoToolbox.
Note: as is known to all, you're unable to activate hardware acceleration tech on your laptop unless both your hardware configurations and software product support GPU hardware acceleration. That's to say, it's far from enough if only your software VLC player supports GPU HW accel. tech. Consequently, you have to check if your computer hardware - graphics card sports with GPU hardware acceleration, too. Head to Intel QSV wikipedia and Nvidia official NVENC/NVDEC support matrix to check if your GPU assembles hardware acceleration.
Part 3. How to Make 4K HEVC (60FPS) Video Playback Smoothly in VLC
It's a no-brainer for VLC to play and convert the standard video or 1080p video formatted by MP4, MKV, MOV, AVI, MPEG-2, H264, etc. But when it comes to the compute-intensive 4K HEVC video, especially HEVC 4K 60FPS video, the playback errors emerge one after another.
"VLC 3.0.4 poor performance with H.265 mkv. Win 7 x64, 4790K, GTX 980. Frequent micro-stutters during playback, CPU usage is about 25%. During fastforwad / rewind, CPU jumps to 60-70%, and every jump takes a few second before playback resumes. That's horrible, and not what I am used to with H.264." - by hazardass from forum.videolan.
"Ultra HD (4k 60fps) HEVC Playback Problems. I'm using VLC Version (3.0.1, 64bit). My Samsung Smartphone can record 4k 60fps videos with the 'new' hevc /x265 codec. If playing them on my windows, my video is greenish. Recording in the 'old' x264 codec everything is fine. Any ideas?" - by jerikooo from forum.videolan
Learn more on how to convert MKV HEVC to MP4 >>
VLC consumes high CPU usage around 60-70% for HEVC x265 video playback and failed to successfully play HEVC 4K 60FPS video. Are these cases general phenomenon or the individual phenomenon? Test them on my own.
Testing environment:
- Windows OS: Windows 7 Ultimate
- CPU: Intel(R) Core(TM) i5-3470 CPU @3.20GHz 3.60GHz
- RAM: 8GB
- GPU: Intel Ivy Bridge Graphics Controller (GPU hardware acceleration supported)
Testing Results:
- VLC can smoothly play 4K HEVC Main Profile Level 5 video at 30FPS. But the same case occurs, CPU usage from 14% skyrocketing to 67%.
- In terms of the 4K 60FPS GoPro HEVC Main Profile Level 5 footage, VLC disappoints me, video freezing and audio stuttering. It can't handle GoPro HEVC video at 60FPS.

To solve VLC not working in 4K 60FPS HEVC and CPU high usage issues, take the below solutions for reference:
Solution 1: Upgrade your GPU chip to higher configurations so as to relieve CPU usage, as well as CPU high temperature.
Solution 2: Download a solid video converter like Winxvideo AI to adjust GoPro 4K 60FPS HEVC Main Profile Level 5 settings. To be specific, downscale 4K 60FPS to 4K 30FPS, compress 4K to 1080p, convert HEVC to H264 or adjust profile from Main to baseline or Level 5 to Level 4 to have one more try with VLC player.
One thing worth a mention is that this is also a GPU hardware accelerated video converter, which supports you to not only hardware decode HEVC, H264, MP4, etc., but also hardware encode HEVC to H264, MKV to MP4, etc. Do what VLC can't do.
Solution 3: If nothing changed in your 4K HEVC 60/30FPS video is what you desire, then plaing back your 4K HEVC video using VLC alternative is your way to go. One of Top Downloads on Softonic - 5KPlayer fits your bill. It gets enhanced with Level-3 GPU hardware acceleration tech to allow you seamlessly playing back 4K HEVC video even HDR video at 30/60FPS by means of GPU hardware decoding, minimal consumption of CPU and no matters of sort like stuttering/freezing/lagging.
Part 4. FAQs about VLC Hardware Acceleration
1. How to force VLC to use Nvidia GPU?
This is one of the most concerned questions about VLC GPU hardware acceleration. Partly because most of users adopt Nvidia GPU graphics. No biggie. Follow the below instructions to force VLC player using Nvidia GPU. Let's get it started:
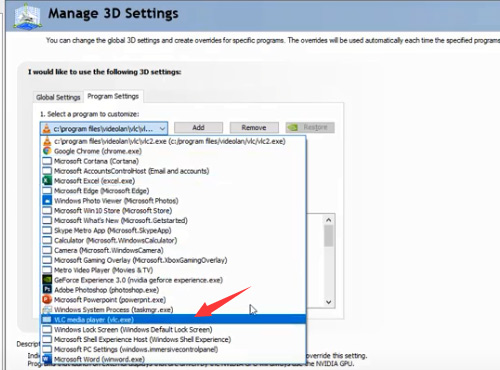
Step 1: Find your VLC program on desktop and right click to choose "open file location".
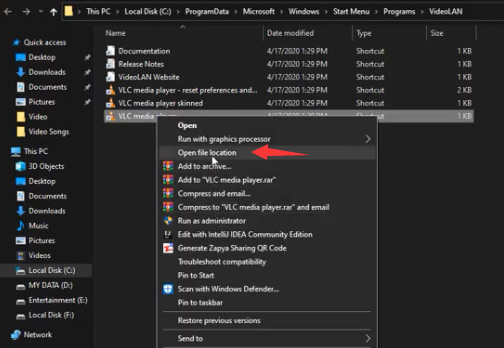
Step 2: Locate to the one with VLC icon and change VLC name. For instance, change VLC to VLC2. Tap Continue on the pop-up window.
Step 3: Go back to the desktop and right click to select "Nvidia Control Panel" > Manage 3D settings > Program settings.
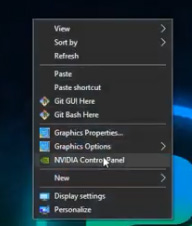
Step 4: Return to VLC file location and change VLC2 back to VLC > go back to Nvidia Control Panel > choose vlc.exe under "select a program to customize" zone. You can find Integrated graphics being default for this program.
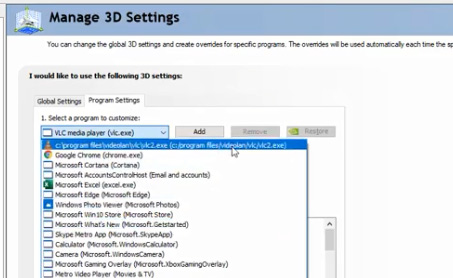
Step 5: How to change integrated graphics to Nvidia GPU? Again change VLC to VLC2 on VLC file location.
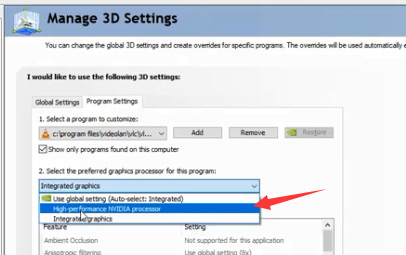
Step 6: Opt for vlc2.exe on Nvidia Control Panel > change Integrated graphics to High-performance Nvidia processor > tap Apply button at the lower right corner of the interface.
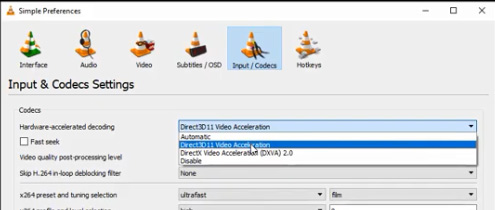
Step 7: Launch VLC and enable GPU hardware acceleration in VLC now. Just change HW decoding from Automatic to Direct3D11 Video Acceleration (shown as picture below).
Now go back to VLC for video (HEVC 4K) playback and it will automatically use Nvidia GPU for hardware decoding on your Windows PC.
2. What are SW decoder and HW decoder?
Briefly speaking, software decoder usually refers to the video decoding algorithms in software program. And the whole video decoding process mainly depends on software tool and CPU chip for decoding. Comparatively, hardware decoder requires both your software program and hardware configurations on computer with GPU HW acceleration tech supported. Then it offloads the compute-intensive video decoding task from CPU to GPU graphics card to decrease CPU burden, lower CPU usage/heat and to enhance decoding speed much faster.