[Fixed] Windows Update Error 0x80070643 on Windows 11/10
There are many users on the Microsoft Community reporting that they're greeted with error code 0x80070643 while they restart Windows PC and install the downloaded update. They've tried couples of methods to solve this error this time. Yet, they still come across this error code 0x80070643 again in the latter Windows Update installation on Windows 11 or Windows 10. How to fix this Windows Update error 0x80070643 on Windows 10/11 permanently? Read on the below post, since it covers almost all the effective solutions to permanently fix this error.
Top Solutions to Windows Update Error 0x80070643 on Windows 11/10
- Solution 1. Repair the Corrupted .Net Framework
- Solution 2. Reset Windows Update Components
- Solution 3. Perform a Clean Boot
- Solution 4. Run the Windows Update Troubleshooter
- Solution 5. Run Disk Clean up
- Solution 6. Run SFC & DISM
- Solution 7. Clear Windows Update Cache
- Solution 8. Use the Update Assistant
- Solution 9. Advanced Startup
- Solution 10. Repair Windows Using an Installation Media
- Solution 11. Make sure Windows Update and Background Intelligent Transfer Services are Available and Running
- Solution 12. Update Windows Defender Antivirus Manually
Solution 1. Repair the Corrupted .Net Framework
This Windows update error would occur if .Net Framework is corrupt. Check if the .Net Framework is corrupted. If yes, access to Microsoft official website to download and run Microsoft .Net Framework repair tool, which aims to fix some frequently occurring issues with the setup of Microsoft .NET Framework or with updates to the Microsoft .NET Framework. Visit the official download site here.
Solution 2. Reset Windows Update Components
Resetting Windows Update Components and the Windows Update files would go a long way to solving Windows Update error 0x80070643. Click this link to go to Microsoft documendation where you can find the detailed tutorial on how to reset Windows update components on Windows 11 or Windows 10. And you can also choose to reset Windows Update components manually, but the procedure is much more complex for newbies.
Moreover, the detailed documendation contains steps that tell you how to modify the registry. That being said, serious problems might happen if you modify the registry incorrectly. Consequently, make sure that you follow these steps carefully. Just in case, backup the registry before you modify it. Even if something unexpected happens, you can restore the registry. Check how to backup the registry if needed.
Certainly, providing this solution is too challenging for you and you worry about the potential registry risk, you can just skip this method and try the following workarounds.
Solution 3. Perform a Clean Boot
A clean boot allows the Windows operating system to launch without any additional programs or services running when you turn the computer on. This allows you to determine if computer issues are caused by a program or service that starts up when you boot the machine. That's why we recommend you here to perform a clean boot and to install the pending Windows Updates manually (by installing two updates at a time) to test the issue. Place the computer in clean boot and check if the issue persists. Check here to follow the detailed guide mentioned in the post to perform a clean boot in Winodws 10/8/7 (no Windows 11 yet).
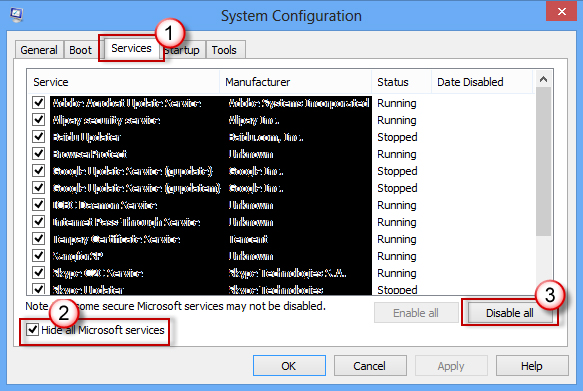
While the computer is in clean boot state, try to install the Windows Updates one by one and check if the updates are getting installed without error code 0x80070643.
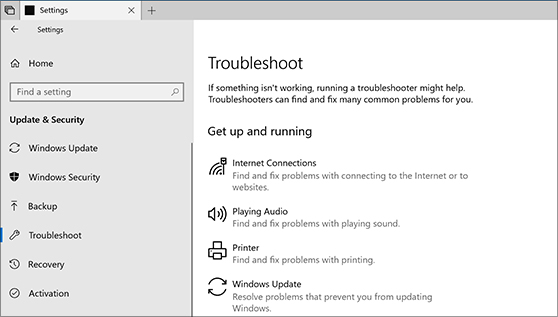
Solution 4. Run the Windows Update Troubleshooter
Have any Windows update error code, remember to resort to Windows Update troubleshooter:
For Windows 10:
- Head to Start > Settings > Update & Security > Troubleshoot > Additional troubleshooters. Afterwards, under Get up and running, choose Windows Update > Run the troubleshooter.
- When the troubleshooter is completed in running, restart your Windows 10 computer.
- Check for new updates. Select Start > Settings > Update & Security > Windows Update > Check for updates and then install any available updates.
- If the Windows update error is still not resolved, try running the troubleshooter again to check for additional errors.
For Windows 11:
- Click Start > Settings > System > Troubleshoot > Other troubleshooters. Under Most frequent, opt for Windows Update > Run.
- When the troubleshooter is done in running, re-launch your Windows 11 laptop.
- Check for new updates. Pick up Start > Settings > Windows Update > Check for updates and then install any available updates.
Solution 5. Run Disk Clean up
Use Disk cleanup to delete temporary files or system files that might incur this Windows Update 0x80070643 error:
To delete temporary files:
- In the search box on the taskbar, type disk cleanup > choose Disk Cleanup from the list of results.
- Select the drive you plan to clean up > tap OK.
- Under Files to delete, select the file types to delete. To get a description of the file type, select it. Select OK.
To delete system files:
- In Disk Cleanup, pick up Clean up system files.
- Choose the file types to eliminate. To get a description of the file type, select it > tap OK.
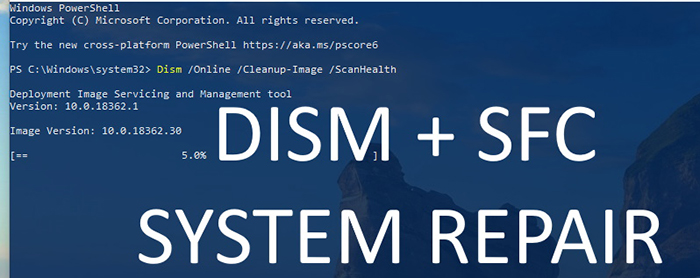
Solution 6. Run SFC & DISM
Windows also has a built-in System File Check (SFC) which aims to check for problems with files on your Windows computer. Kindly run SFC & DISM to fix any corrupted Windows System Files. To run it, follow these steps:
- Make sure you've installed the latest updates for Windows, and then re-launch your Windows PC.
- Read Update Windows to find more. In the search box on the taskbar, type Command Prompt > right-click or press and hold Command Prompt (Desktop app) from the list of results > choose Run as administrator > tap Yes.
- Type DISM.exe /Online /Cleanup-image /Restorehealth (note the space before each "/"), and then press Enter key. (Note: This step would cost a few minutes to start and roughly 30 minutes to accomplish.)
- Type sfc /scannow (note the space between "sfc" and "/") and press Enter after a message pops up saying "The operation completed successfully".
- After you see a message that says, "Verification 100% complete," type exit.
Solution 7. Clear Windows Update Cache
Clearing Windows Update cache is also a non-negligible workaround to tackle Windows Update error 0x80070643. Refer to the below tutorial if needed.
- Open Command Prompt as Administrator.
- Enter Commands:
net stop wuauserv
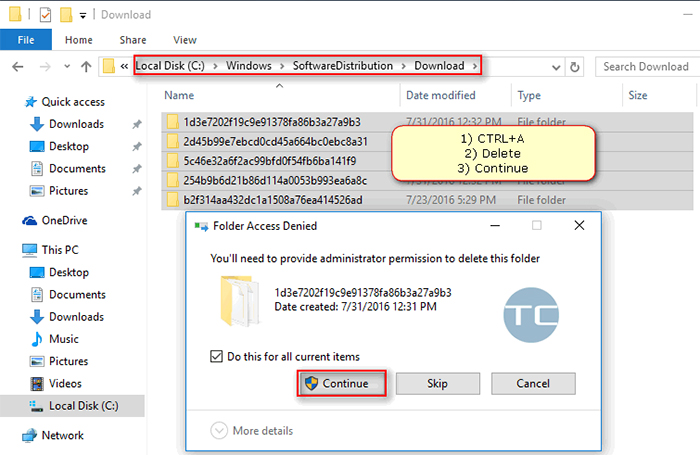
net stop bits - Press Windows key + R then type the path name:
C:\Windows\SoftwareDistribution - Select all of it's contents > right-click and choose Delete.
- Open Command Prompt as Administrator again.
- Type the commands:
net start wuauserv
net start bits - Re-launch your Windows laptop and try updating again.
Solution 8. Use the Update Assistant
The Windows 10 Update Assistant downloads and installs feature updates on your Windows 10 computer. Feature updates provide new functionality and is beneficial for keeping your systems secure. You'll get these updates automatically after you download the Update Assistant.
Solution 9. Advanced Startup
Advanced Startup can also be a silver bullet in repairing any Windows system files that might be causing for the update to fail. Check how to use Advanced Startup to fix your Windows Update error:
- Open Settings > select Update & Security > tap the Recovery tab.
- Find Advanced Startup > click Restart now.
- Once restarted, select Troubleshoot > Advanced Options > Startup Repair.
- Let it complete the process and see if Windows will be repaired.
Solution 10. Repair Windows Using an Installation Media
Apply an installation media and the Windows Repair feature to repair your copy of Windows.
- Access to Software Download website > click the "Download tool now" button.
- Run the MediaCreationTool2004.exe file after the download is finished.
- Accept the terms > Select Create an installation media > click Next.
- Proceed with the prompts.
- Once the installation media is created, double click on the file then on the Windows Setup screen, click on Repair your computer.
Solution 11. Make sure Windows Update and Background Intelligent Transfer Services are Available and Running
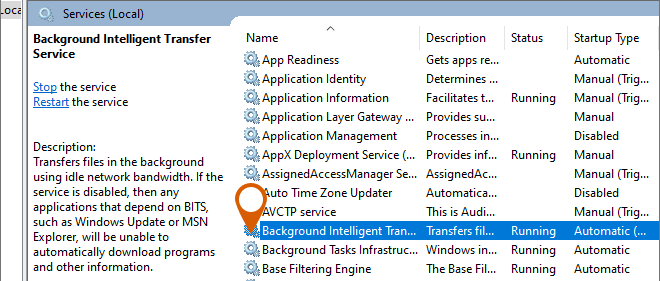
Click Start, type services.msc in the Start Search text area, and then select services.msc in the programs list. Suggesting you are prompted for an administrator password or for a confirmation, enter the password or tap Continue.
Double-click Background Intelligent Transfer Service. If it shows "Stopped" on the Startup status, click Start and then tap OK. If the status is Running, right click > choose Restart.
Double-click Windows Update. Similarly, click Start and then click OK to handle "Stopped" case in Startup status. Right click and select Restart to face the "running" status.
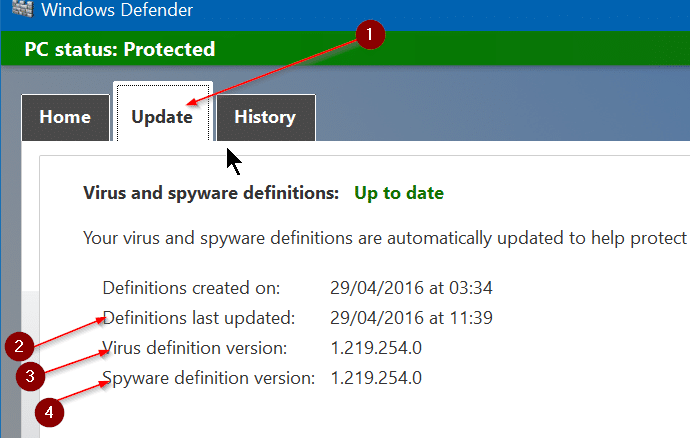
Solution 12. Update Windows Defender Antivirus Manually
The install error – 0x80070643 would also bother you when the system failed in updating the Windows Defender. Try fixing the issue by manually installing updates for the Windows Defender Antivirus on your Windows computer. Let's see how to make it right:
- Follow this Microsoft Defender Updates link.
- Scroll down to the Manually download an update section > opt for the version best for you based on the type of operating system.
- Free download the exe files and launch them to manually install the newly updated version for the Windows Defender.
- Restart your Windows PC after the completion and launch the Windows Update to check if the error 0x80070643 gets fixed.