How to Update to iOS 26 on iPhone
The new operating system, iOS 26, has been released. After the official announcement of its features, many users are eager to upgrade to enjoy the latest Apple Intelligence enhancements. If you're looking to Update to iOS 26 but aren't sure how, read the guide below for a seamless upgrade experience.
Table of Contents
Part 1. What iPhones Support iOS 26 Upgrade?
iOS 26 brings a host of new features and improvements, and many iPhone users are eager to take advantage of them. Here's the list of iPhones compatible with the iOS upgrade:
- iPhone XR
- iPhone XS
- iPhone XS Max
- iPhone 11
- iPhone 11 Pro
- iPhone 11 Pro Max
- iPhone 12 mini
- iPhone 12
- iPhone 12 Pro
- iPhone 12 Pro Max
- iPhone 13 mini
- iPhone 13
- iPhone 13 Pro
- iPhone 13 Pro Max
- iPhone 14
- iPhone 14 Plus
- iPhone 14 Pro
- iPhone 14 Pro Max
- iPhone 15
- iPhone 15 Plus
- iPhone 15 Pro
- iPhone 15 Pro Max
- iPhone 16
- iPhone 16 Plus
- iPhone 16 Pro
- iPhone 16 Pro Max
- iPhone SE (2nd generation)
- iPhone SE (3rd generation)
With a wide range of models supported, including the latest iPhone series and the old SE models, users can enjoy the enhanced functionality and performance that iOS 26 offers. If you're unsure about your device's eligibility, check the model number in your settings to confirm compatibility. Upgrading ensures you benefit from the latest security updates, features, and improvements, making it well worth the effort.
Part 2. How to Download and Install iOS 26 Official Version?
Important Tip: Always have a backup of your iPhone before upgrading to a new iOS version. Backing up your files to a Windows or Mac computer ensures that your data is safe if anything goes wrong during the update. Use a reliable tool like WinX MediaTrans to easily transfer and back up your photos, music, videos, iTunes purchases, podcasts, ringtones, iBooks, and more from iPhone to your computer. Once the backup is complete, you can safely Update to iOS 26.
How to Set Your iPhone to Update Automatically
For added convenience, you can set your iPhone to update automatically. Here's how:
1. Go to General in your iPhone Settings
Open your iPhone's Settings app, then tap on General.
2. Select Software Update
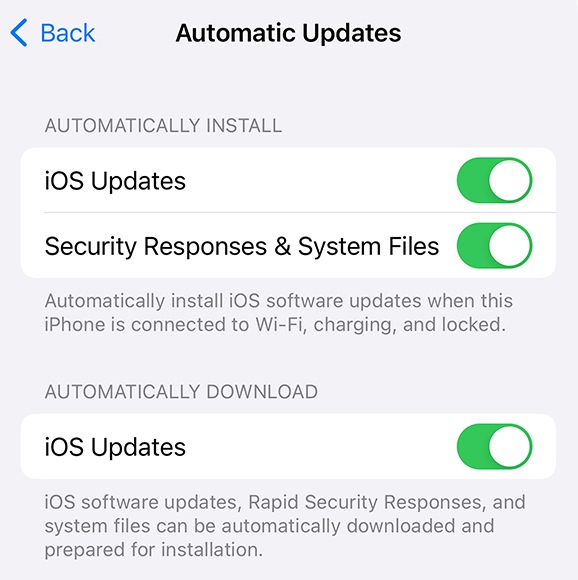
In the General menu, tap Software Update, then tap on Automatic Updates.
3. Turn on Automatic Updates
To enable automatic updates, toggle on iOS Updates below both Automatically Download and Automatically Install.

When enabled, your iPhone will automatically download and install iOS updates while charging and connected to Wi-Fi. You'll receive a notification before the update is installed.
Tips: If you prefer to manage updates manually, you can turn off automatic updates by returning to Settings > General > Software Update > Automatic Updates and toggling off the options.
This feature ensures your iPhone stays up-to-date without needing to check for updates manually.
How to Download and Install iOS 26 Manually
1. Go to General in your iPhone Settings
Open your iPhone's Settings app, then scroll down and select General.
2. Select Software Update
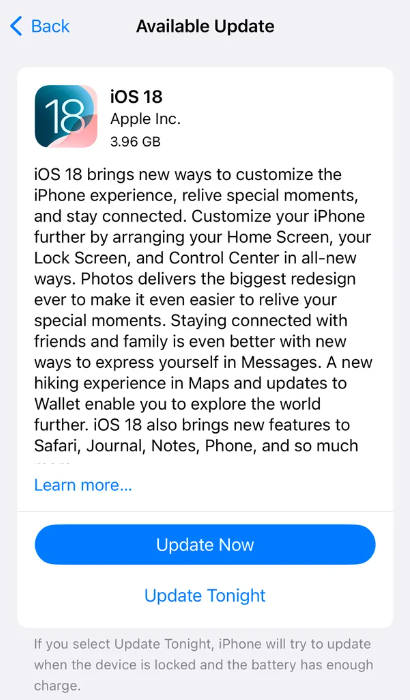
In the General menu, tap Software Update. This will allow your iPhone to check for the iOS 26 update.
3. Download and Install iOS 26
If the iOS 26 update is available, you'll see an option - Update Now. Tap on it, and your iPhone will begin downloading the update.

4. Enter Your Passcode and Follow the Instructions
You may be prompted to enter your passcode to authorize the installation. Follow the on-screen instructions to complete the process. After the installation, your iPhone will restart with the latest iOS version.
Note: Upgrading to iOS 26 may bring exciting new features, but it's not without risks. Some users may encounter issues like rapid battery drain, Wi-Fi connectivity problems, App Store glitches, or frozen notifications. If you experience any major issues after upgrading, you can either downgrade to an older iOS version or refer to troubleshooting guides to fix these problems one by one. Always weigh the pros and cons before proceeding with the update.


