How to Fix 'iPhone Photos Not Showing Up in iPhoto on Mac' Issue
Generally speaking, the iPhone photos existing on Camra Rolls are supposed to show up once you connect your iPhone to your MacBook, iMac or Mac Studio. And then, you can freely select pictures to backup, edit, archive or share. But things won't always go the way it used to. It will go wrong now and then.
Many a user complains on forums that iPhone photos won't show up in iPhoto library on Mac. iPhone photos not showing on Mac could be a technical glitch due to outdated software. Or possibly it's caused by iCloud Photos which is accidently disabled on your iPhone. Irrespective of what reasons, you can get this issue resolved by using the top effective solutions shared in this post.
Top Solutions to Fix iPhone Photos Not Showing Up on Mac Error
- #1. Update iPhone and Mac Operating System
- #2. Restart Your iPhone and Mac
- #3. Transfer Photos from iPhone to Mac without iPhoto
- #4. Shut Down Conflicting Software on Mac
- #5. Check iCloud Photo
- #6. Save Space in iCloud Storage
- #7. Reset iPhone Location & Privacy
- #8. Resort to a Photos Library Repair Tool
Solution 1. Update iPhone and Mac Operating System
The outdated operating systems on iPhone or Mac would lead in the failure of iPhone photos showing up on Mac. If this happens, follow the below steps to upgrade your operating system for iPhone or Mac, or both:
- Click on the Apple menu > choose System Preferences > Software Update.
- Tap either "Update Now" or "Upgrade Now", whichever option shows up. 'Update Now' installs the latest updates of the current macOS on your system while 'Upgrade Now' gets the latest macOS, for instance macOS Big Sur (in case older OS your Mac is running on).
To update macOS on Mac:
- Connect your iPhone to power supply and meanwhile make sure Wi-Fi connection is stable.
- Head to Settings > General > Software Update.
- Select the software update > tap Install Now.
To update iOS on iPhone:
Solution 2. Restart Your iPhone and Mac
Sometimes, if not all, restarting your devices can successfully get your problem resolved with roughly 80% chance. To restart your iPhone and Mac, do as follows:
- Unplug the USB cable between your iPhone and Mac. Press the Side button until the Power Off screen is displayed. Move the slider to in a bid to power off your iPhone. Roughly 30 seconds later, reboot your iPhone.
- Turn to your MacBook, iMac or Mac Studio > go to Apple menu > hit Restart. Afterwards click Restart again to re-launch your Mac.
- Use the Lightning cable to connect your iPhone to your Mac desktop. A prompt will be displayed onscreen. Tap Trust for confirmation.
Solution 3. Transfer Photos from iPhone to Mac without iPhoto
You don't have to stick with iPhoto library for iPhone photos to Mac syncing. When you're confronted with such iPhone photos not showing up on Mac issue, you can resort to another much more simple way to copy iOS pictures to Mac. That is using iPhoto best alternative
- MacX MediaTrans. The tool allows you to access to iPhone photos on Mac without using iPhoto library, and to bulk transfer photos (jpg, png, HEIC) from iPhone to Mac at GPU hardware accelerated speed without WiFi.
What's better, 1000 4K photos can be transferred within a few seconds. It also supports previewing HEIC/HEIF photos, exporting and converting iPhone/iPad HEIC/HEIF photos to JPG on Mac for wider compatibility. Use it to bulk transfer music, videos, movies, iTunes purchases, audiobooks, ebooks, podcasts, etc. between iPhone iPad and Mac if needed.
How to Access iPhone Photos on Mac without Using iPhoto
Free download MacX MediaTrans now on your Mac laptop and follow the steps below to access or backup iPhone photos on Mac.
Step 1: Connect iPhone with Mac via USB Cable.
Open this iPhone photo manager and connect your iPhone with your Mac laptop via a USB cable. Click the "Photo Transfer" button on the main interface to open the photo window.
Step 2: Access iPhone photos on Mac without iPhoto.
Here you can view and access all iPhone photos/pictures on the Photos Transfer window. You can choose to group and view the iPhone photos by day, month and year. Double click photo to preview its original image.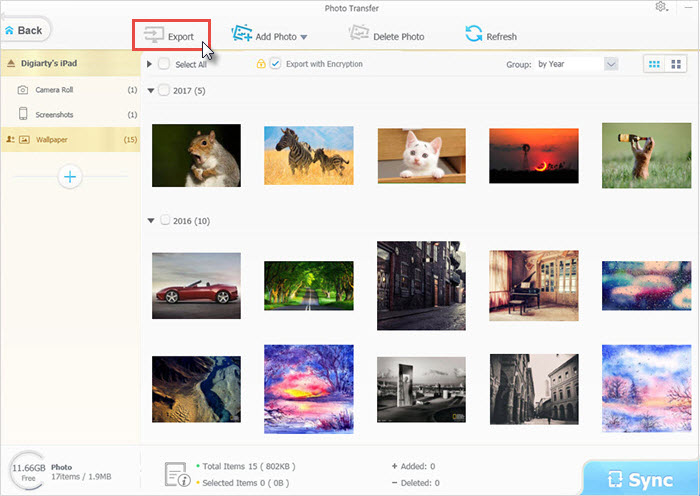
Step 3: Get Photos off iPhone.
Select the photos you'd like to transfer from iPhone to Mac. You can choose to transfer one photo, a batch of photos or all iPhone photos to Mac. Click "Export" button to start offloading iPhone photos to Mac hard drive. Then you can use iPhone to take more beautiful pictures.Solution 4. Shut Down Conflicting Software on Mac
Some of you might launch Dropbox on Mac and use it a third-party storage platform. There is high likelihood that this app would cause conflict with iPhoto. Therefore, you'd better shut down Dropbox on your Mac. In addition, other 3rd-party security apps or cleaning tools might also affect the normal execution of iPhoto. Suspend or uninstall them before connecting iPhone to Mac.
Solution 5. Check iCloud Photo
Focus on your Mac laptop and iPhone to check if you activate iCloud settings for photos on your iPhone and Mac. This means that photos located within the Camera Roll of your iPhone have already been moved to the computer. Hence, iPhone photos won't show up within iPhoto on Mac.
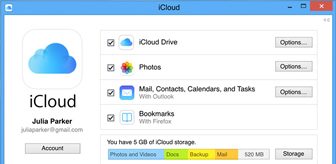
- To visit iCloud Photo Library within your Mac computer, launch iPhoto > Preferences > General > iCloud.
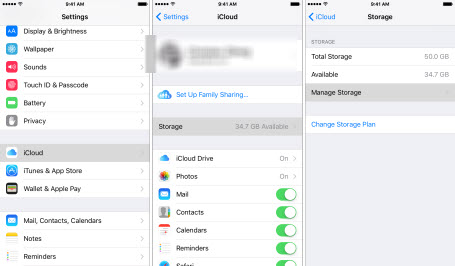
- To visit iCloud Photo Library within your your iPhone, head to Settings > press [Your Name] > iCloud. Finally, visit Photos.
Go to iPhoto to check if your iPhone images have already copied to iPhoto. Go to Preference and then General. Afterwards, click Show within Finder > right-click the photos > Show Package Contents to show its details. Generally, suppose the photos (located in your iPhone device' Camera Roll) have been transferred into the album folder, syncing iPhoto again won't be necessary.
Solution 6. Save Space in iCloud Storage
Only 5GB storage in iCloud photos are free to use. You iPhone photos may not show up on Mac just because you've already used up the free storage space.
To check storage space in iCloud, open iCloud.com > find 'Settings' under 'Storage' > check the storage occupied by iCloud Photos. Upgrade to premium plan to expand your iCloud storage if there is insufficient storage space in your iCloud. Or bulk transfer photos from iPhone to Mac if you don't have the budget to pay for iCloud storage.
Solution 7. Reset iPhone Location & Privacy
Resetting your iPhone location and privacy would go a long way to fix iPhone photos not showing up on Mac trouble. Disconnect your iPhone from your Mac. Navigate to Settings > General > Reset > Reset Location & Privacy > Reconnect to your Mac and select Trust when your iPhone asks > Import iPhone photos to Mac.
Solution 8. Resort to a Photos Library Repair Tool
If, unluckily, the above-mentioned solutions still didn't help you out of this iPhone photos not showing up on Mac problem, use a photos library repair tool such as Repair Library to repair the application.
Run 'Repair Library' to scan the app's database and repairs the corruption. The repairing process might cost you half of an hour or even longer depending upon the size of your photos library. Steps to repair Photos Library:
- Select Photos on your Mac laptop > Quit Photos.
- Press Option-Command. Double-click the Photos icon in the Dock.
- Tap Repair under Repair Library window to start the photo library repairing process.