VideoProc Guide

1. Get Started
1-1. Download
Download the installation package of VideoProc.
Supported OS:
For Windows: Windows 7, Windows 8, Windows 8.1, Windows 10 (32 & 64 bit)
For Mac: Mac OS X Snow Leopard/Lion/Mountain Lion/Mavericks/Yosemite/El Capitan/macOS Sierra/macOS High Sierra/macOS Mojave (10.14)
1-2. Install
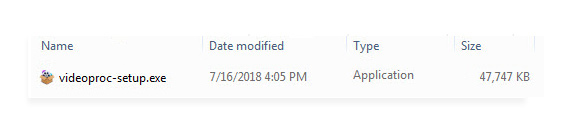
1 Double click "videoproc-setup.exe" to install it.
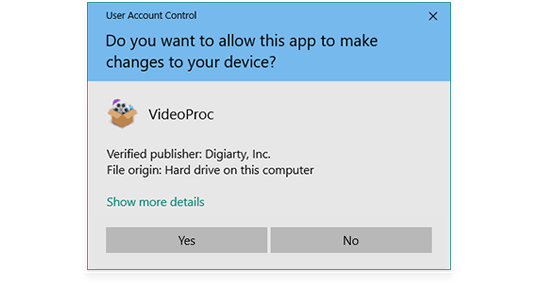
2 Click "Yes" if the User Account Control (UAC) window pops up and then go ahead.
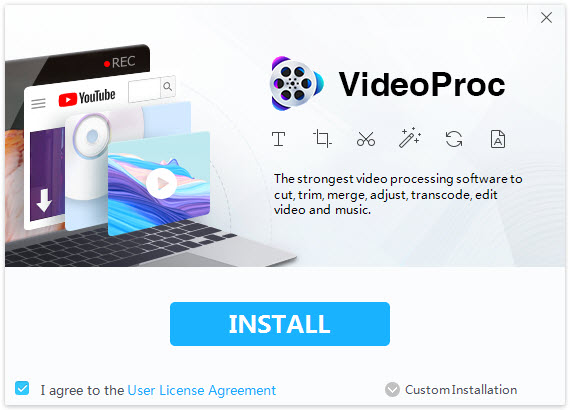
3 Check "I agree to the User License Agreement" and then click "INSTALL" to set it up on PC.
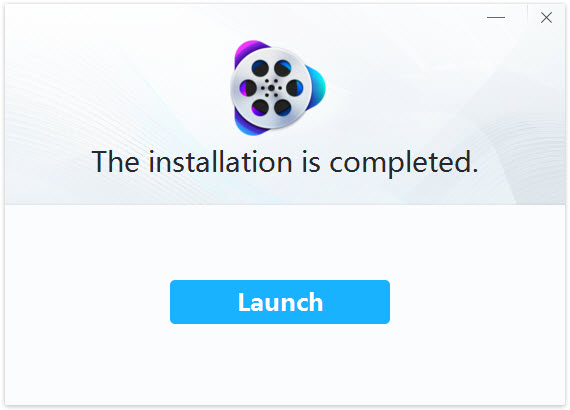
4 When the installation is completed, click "Launch" to open up VideoProc (trial version).
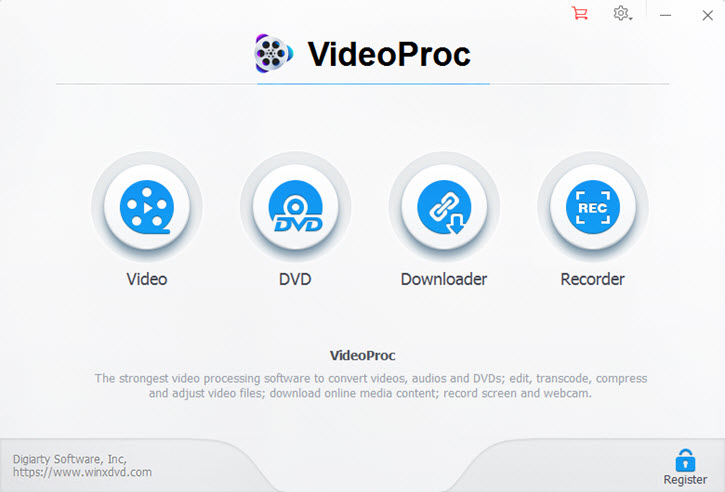
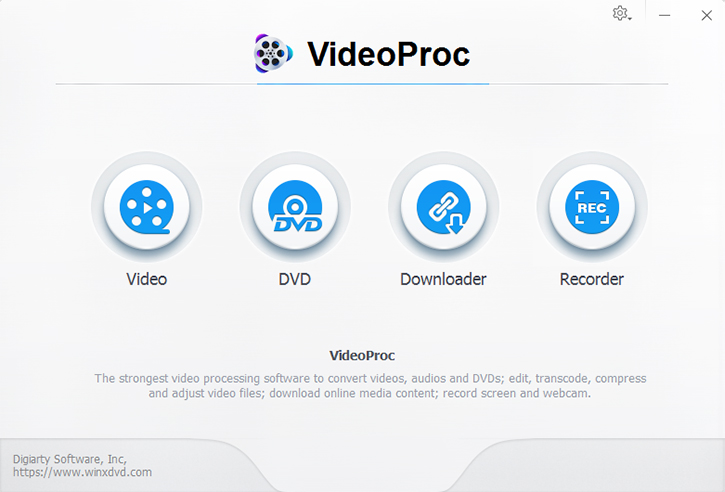
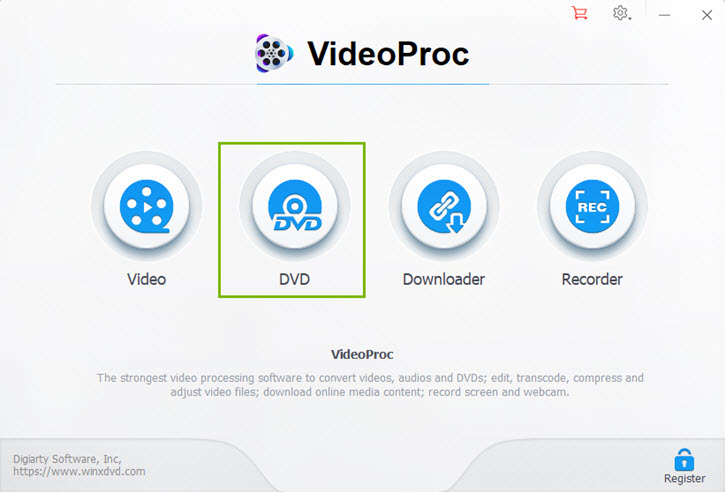
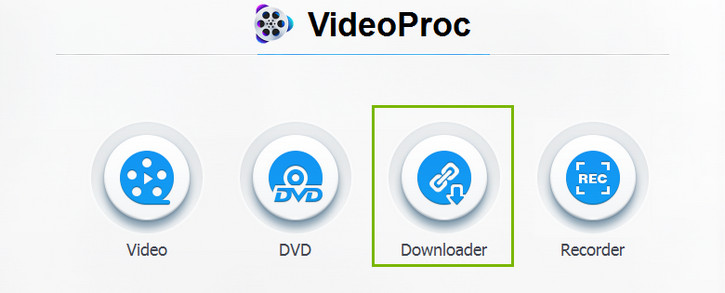
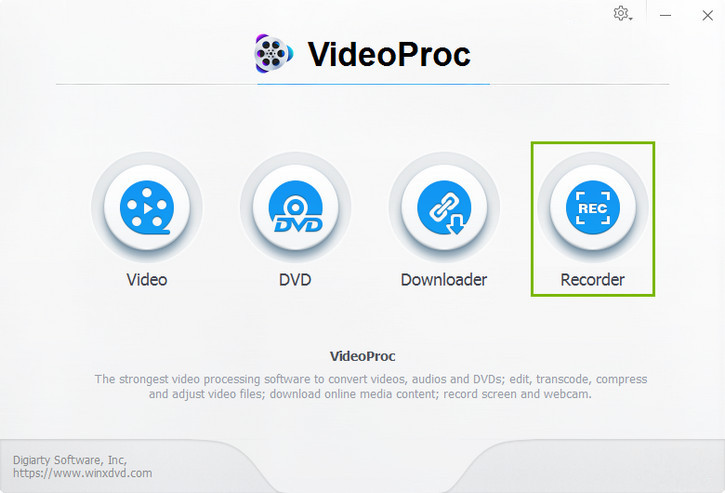
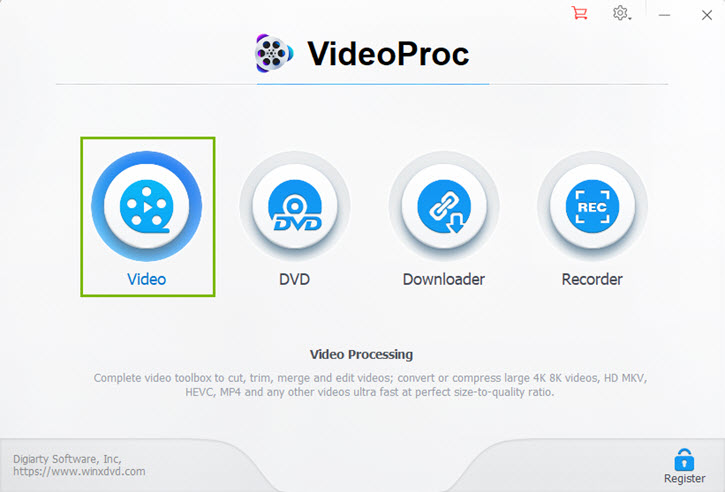
5 Launch WinX (trial version) and you will see the main interface as below, with four sections provided - Video, DVD, Downloader and Recorder.
1-3. Trial Limits
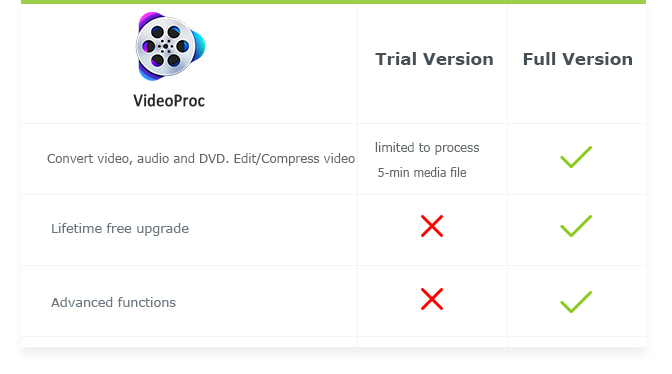
The trial version of VideoProc has the following limitations:
1 Trial version is limited to convert 5-min video or DVD for evaluating purpose.
2 No free update to the latest full version.
3 Advanced features are not available.
※ Tips: You can upgrade to full version to remove the 5-min limit. Also, the full version will constantly upgrade to latest version for free and provide technical support.
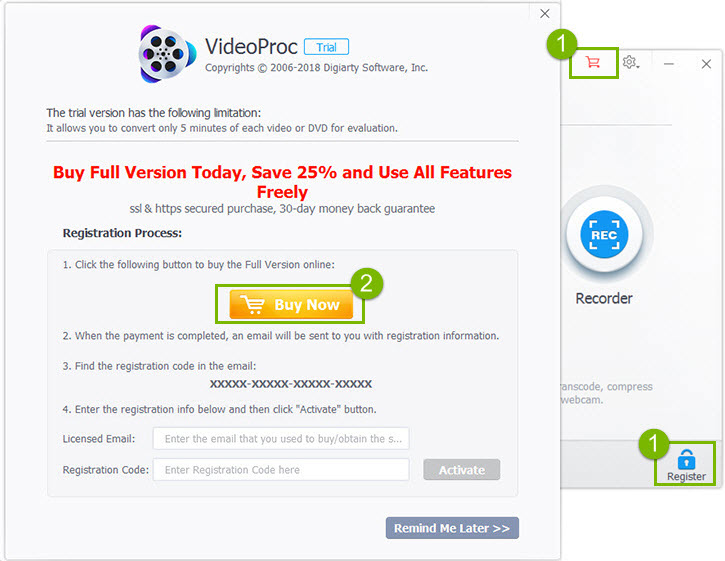
Here is how you can upgrade to VideoProc full version.
1: Click "Buy Now" below to purchase the full license code.
2: Or click "Register" / "Cart" button on the main UI and click "Buy Now".
1-4. Register
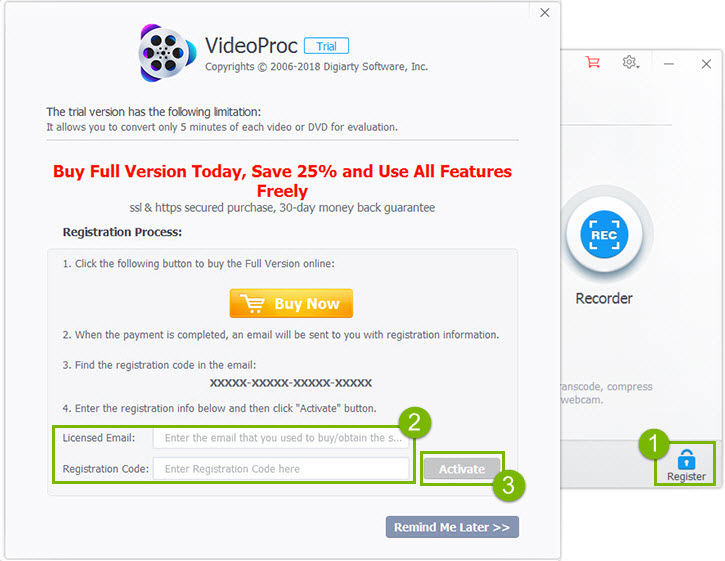
※ You will receive product information with license code via email once you complete the order.
1 Open VideoProc, click "Register" button.
2 Input your "Licensed Email" and "License Code".
3 Click "Activate" to complete the registration process.
※ There are no spaces in the license code field. It's highly recommended to copy & paste your code to avoid any typos.
※ Please make sure you have proper Internet connection when registering VideoProc program.
4 When you have registered successfully, you can enjoy the full VideoProc with the main UI below.
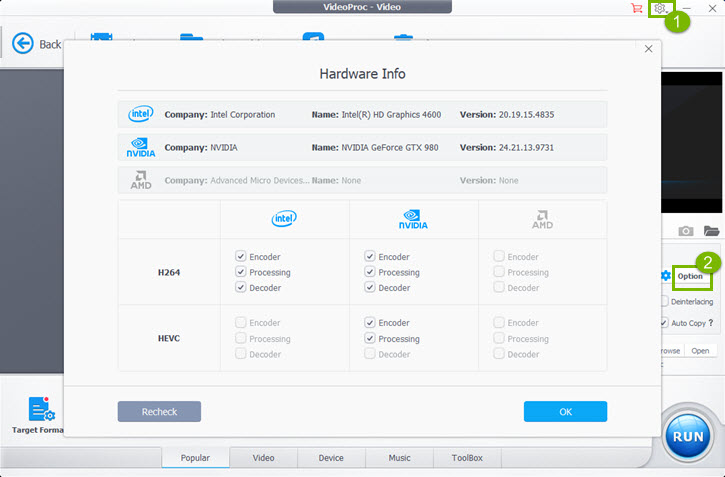
1-5. Set Hardware Acceleration
※ Check whether your PC is hardware accleration supportable by getting its hardware information.
1 Open Settings and click "Option" right near "Hardware Accelration Engine: Nvidia / Intel / AMD".
2 Go to "VideoProc - Video" or "VideoProc - DVD" and click "Option" right near "Hardware Accelration Engine: Nvidia / Intel / AMD".

2. Edit
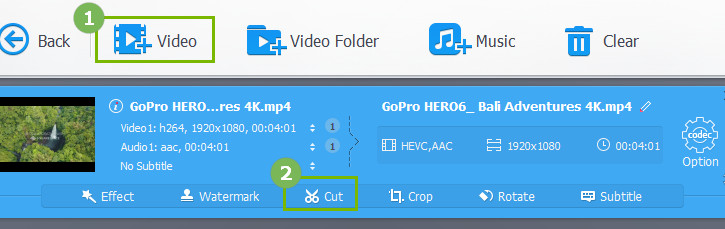
Click "+Video" button to import one video or multiple videos you want to edit into the program.
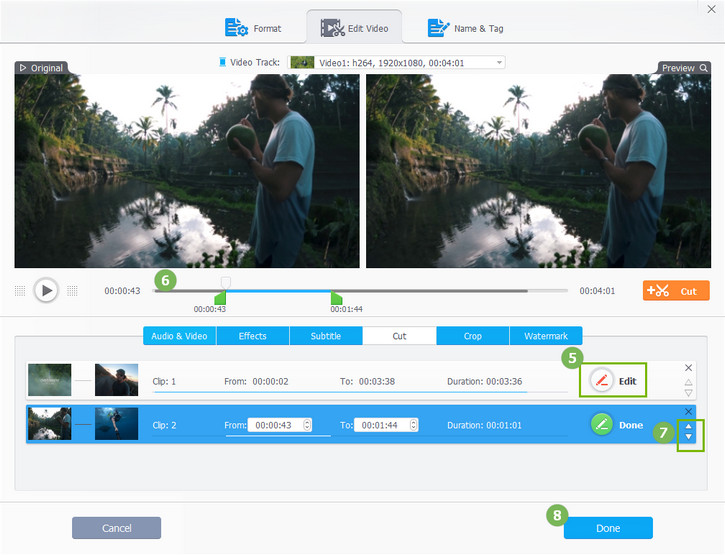
2-1. Cut a Video
1 Click "+Video" to add one or more video files.
2 On the Edit Toolbar, click "Cut".
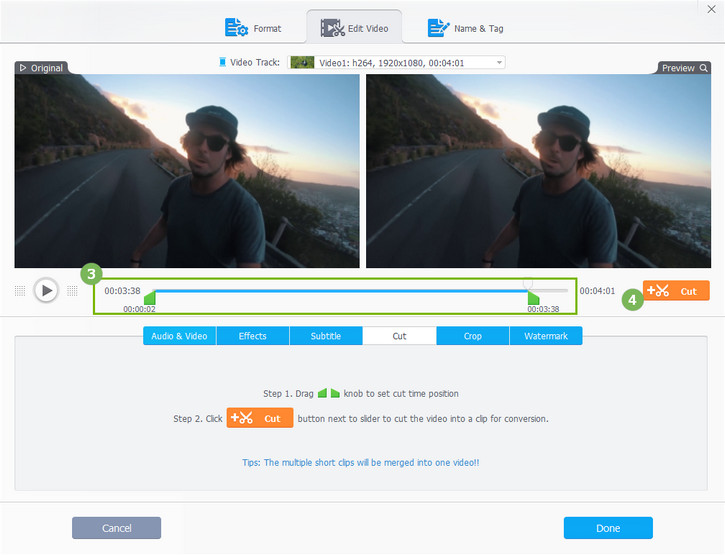
3 Drag the green knobs on two ends of the video to set the start and end time positions.
4 Click the orange Cut button on the right and then the middle part between the knobs will be kept.
5 Click the Edit icon next to the clip trimmer, then fine-tune the start time and the end time of the clip. And click "Done" to complete the cutting of clip 1.
6 If you need to cut out a different clip, drag green knobs again to set different time position and repeat step 3 – step 5.
7 After cutting into different clips, you can adjust the sequences of the clips by clicking the up and down arrows of each clip.
8 When everything is OK, click the "Done" on the bottom right. The multiple short clips cut from the original video will be merged into a new video.
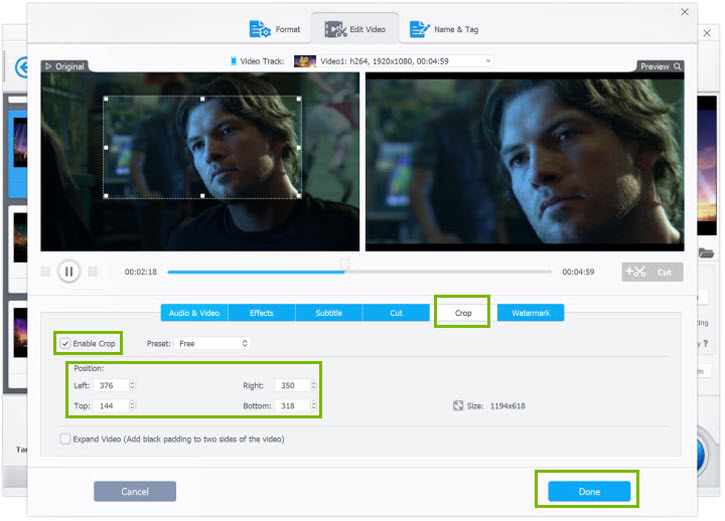
2-2. Crop Video
1 Click the "Crop" button to open the video cropping window.
2 Tick the "Enable Crop" option, and you can see the dot line on the four sides of the original video.
Simply drag the dot line to freely crop the video to remove unwanted areas of the video frame.
Click the "Preset" drop-down icon and you'll get a list of options to automatically crop the video: Crop LetterBox, Keep Current, Keep Origin, 16:9, 4:3, 1:1.
You can also crop the video by setting specific Position and get desired video size.
3 Click "Done" to save the change.
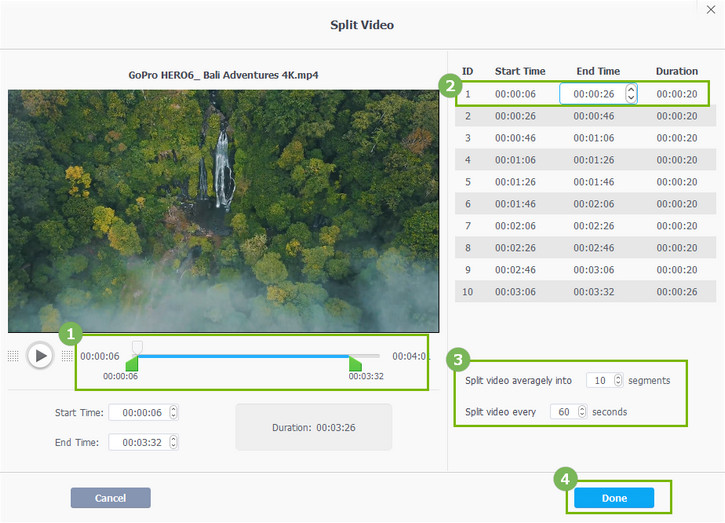
2-3. Split a Video
Click "ToolBox", find "Split" button and double click it or hit the "Codec Option" button on the right of the video display column on the "VideoProc - Video" interface to open the Split dashboard.
※ Tips: By default, VideoProc will split video averagely into 10 segments and split video every 60 seconds.
1 If necessary, trim the video on the left into the duration you need to split.
2 If necessary, change the default segments and time you want.
3 If necessary, fine-tune the start time and end time of individual segment.
4 Click "Done" on the bottom right of the window.
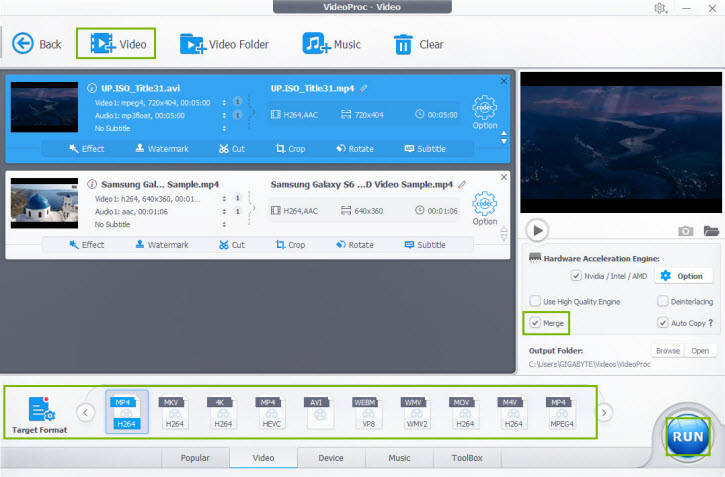
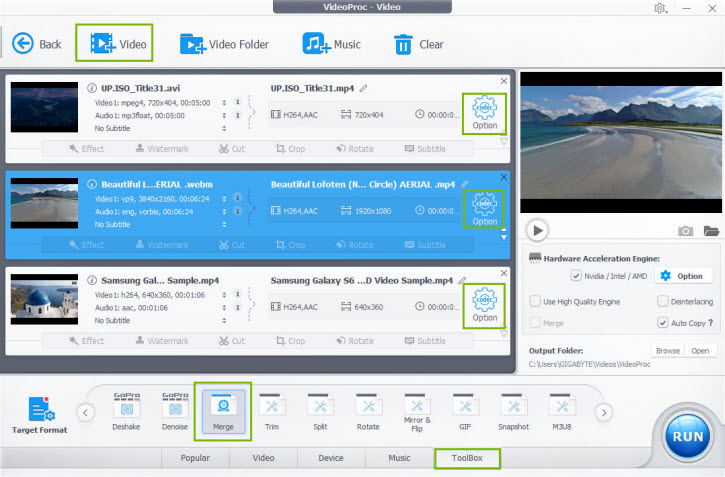
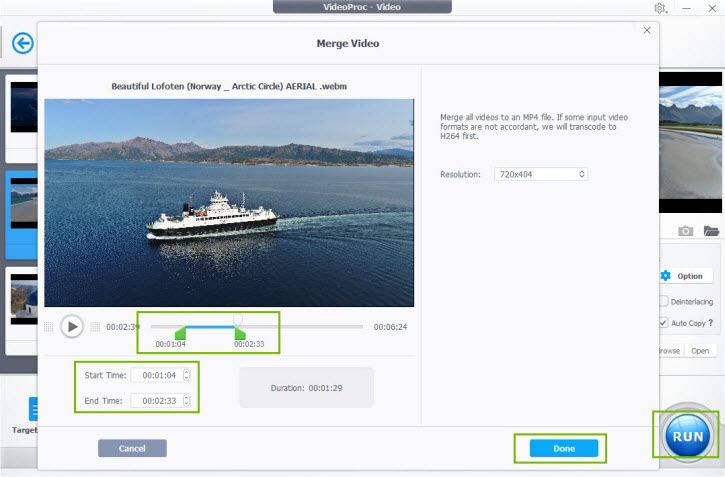
2-4. Merge Video
You can merge video clips with VideoProc in two ways.
1. Directly merge source videos into one.
Step 1: Click "Video –> +Video" to load all the video clips you'd like to merge into one from computer.
Step 2: Choose a target output format.
Step 3: Tick "Merge" button on the main UI. And click "RUN" to fast merge all added video clips into one file.
2. Trim needed video clips and merge them into one at one go.
Step 1: Click "Video –> +Video" to import all your source videos. Choose a target output video format.
Step 2: Tap one video and click "ToolBox -> Merge -> Codec Option", and you can freely set Start Time and End Time to cut favorite clips from each video. Click "Done".
Step 3: Hit "RUN" button to start fast combining the cut video clips into one.
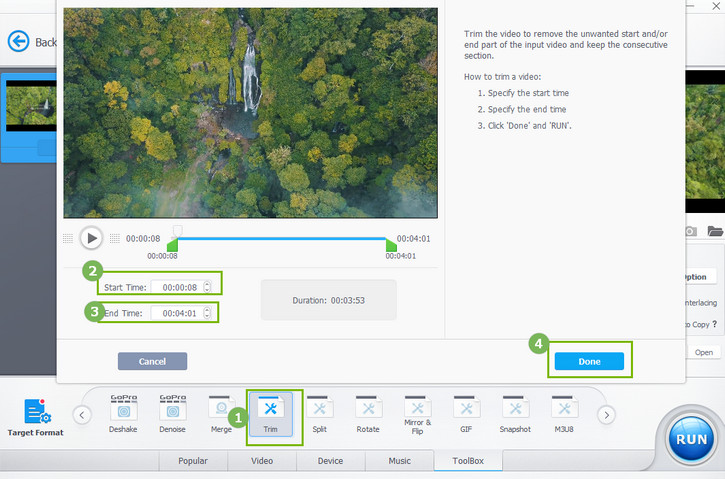
2-5. Trim a Video
Trimming is different from cutting. It only allows you to remove the unwanted start / end part, instead of cutting out any parts of a video.
1 Click "ToolBox", find "Trim" button and double click it or hit the "Codec Option" button on the right of the video display column on the main interface to open the Trim dashboard.
2 Specify the start time by dragging directly or change the time data next to Start Time.
3 Specify the end time by dragging directly or change the time data next to Start Time.
4 Click "Done" on the bottom right of the window.
2-7. Subtitle
Add a movie, TV episode or any other video you want to burn subtitle in or export subtitle from.
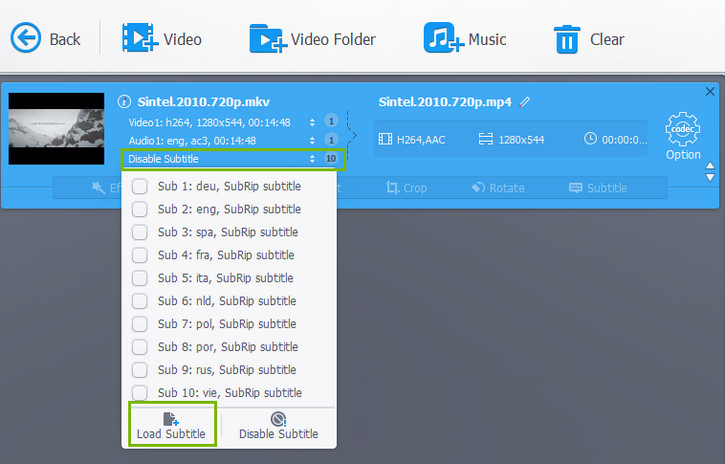
2-7-1. Import Subtitle from Hard Drive
You have two ways to load an existing subtitle file from your computer or the external hard drive / USB drive that is connected to your computer:
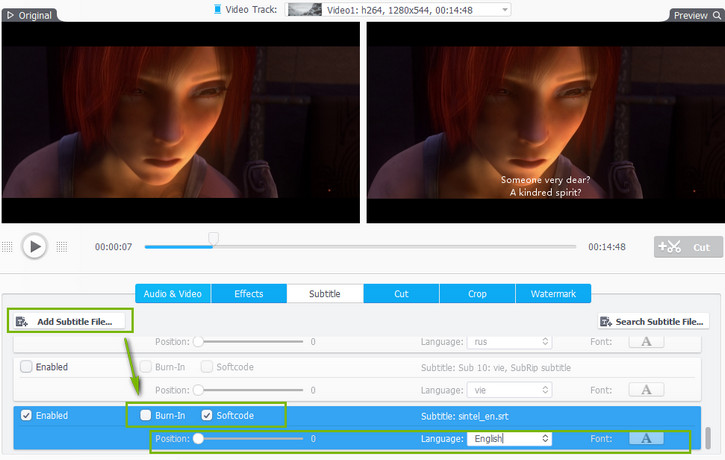
Method 1: On the video display column on the "VideoProc - Video" interface, click "Subtitle" and then click "Load Subtitle" of the dropdown menu. Browse to find and select the corresponding SRT or ASS subtitle file from your computer and click "Open".
Method 2: Click "Subtitle" item on the Edit Toolbar. If it is gray, choose an output video format first. On the Subtitle dashboard, click "Add Subtitle File" to load a corresponding SRT or ASS subtitle file from your computer. You can choose "Burn-In" or "Softcode" mode.
Tips:
1. If you choose Burn-In (Hardcode) mode, the subtitle texts are merged in original video frames and when playback there will be no option for you to remove or select the subtitle track. If you choose Softcode mode, the subtitle will be a standalone track in the video so that you will be able to turn off/on subtitle and choose language in multiple subtitle variants during playback.
2. Only in Burn-In mode can "Position" and "Font" be adjusted.
2-7-2. Search and Import Online Subtitle
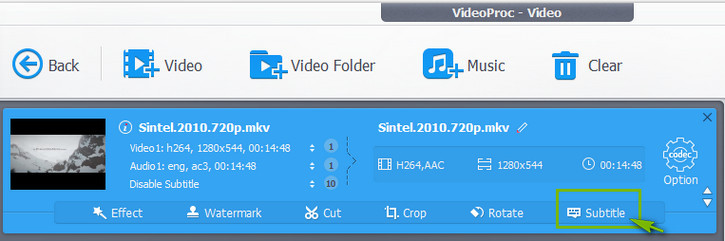
1 Click "Subtitle" item on the Edit Toolbar. If it is gray, choose an output video format first. On the Subtitle dashboard, click "Search Subtitle File".
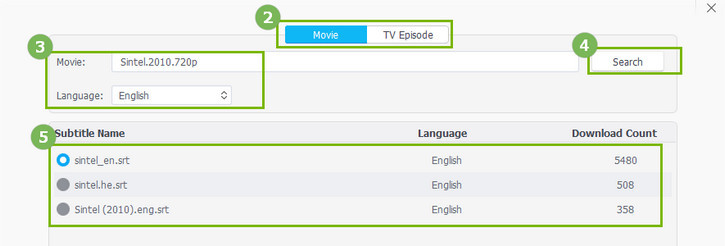
2 Choose "Movie" or "TV Episode" on the top.
3 Set movie name or language if necessary.
4 Click "Search" button and wait a second until the subtitles are searched online.
5 Choose the most likely subtitle and click "Download".
6 Preview the embedded subtitle texts to see if they are corresponding and sync with the video. If yes, click "Done"; if no, go back to the previous operations and try a different one.
2-7-3. Export Subtitle from Video
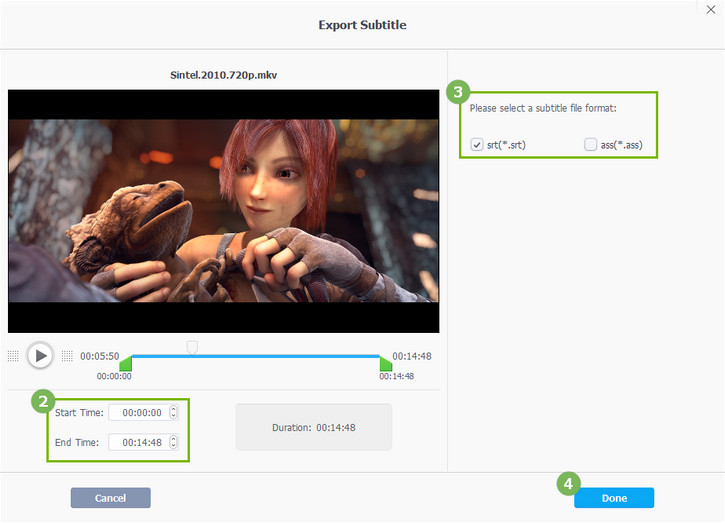
1 Add a video that has subtitle, and double click "Export Subtitle" in the ToolBox.
2 Set the Duration (Start Time and / or End Time) of the video if necessary.
3 Select .srt or .ass as the output subtitle format.
4 Hit "Done" button.
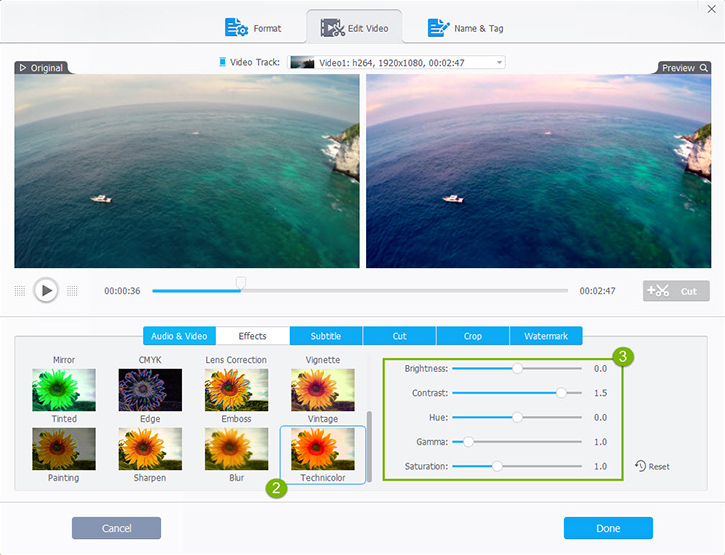
2-8. Effect
1 Click "Effect" function button labeled in magic wand icon to pop up the video effects controls.
2 Preview and choose the video filter effect you like most.
3 You can also ajust video brightness, contrast, hue, gamma, saturation to achieve more satisfied visual effect.
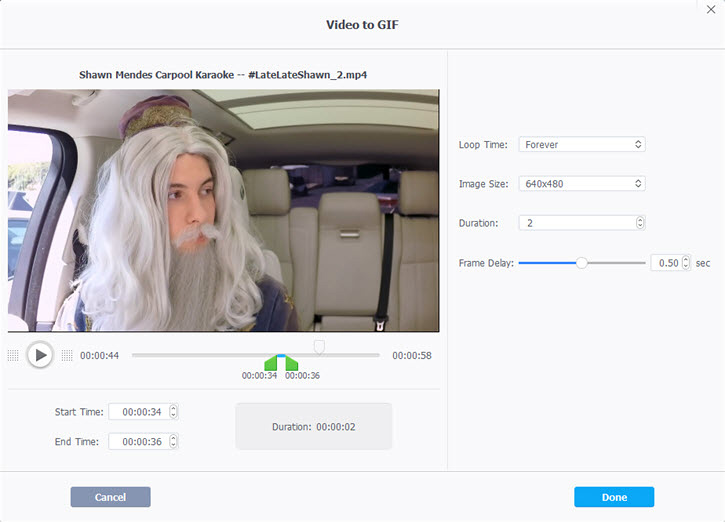
2-10. Video to GIF
1 Navigate to ToolBox and double click the "GIF" button or the setting icon to open up a "Video to GIF" window.
2 Set the loop time, image size, duration, and frame delay.
3 Click Done -> Run to output the animated GIF file.
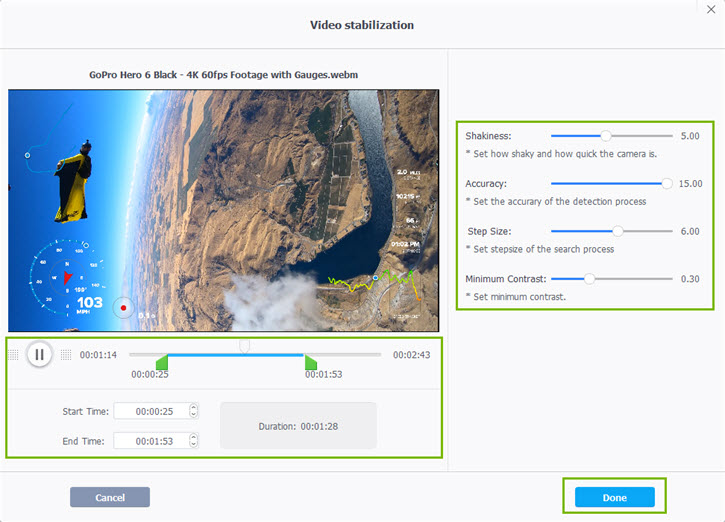
2-11 .Stabilize
1 Click "Toolbox" tab on the bottom of the interface and select "Deshake". Double-click Deshake button or hit gear icon on the top right corner of this button to access to video stabilization controls.
2 Move two green cursors to trim the shaky segment. Otherwise, manually input Start and End Time.
3 Move the sliders to adjust Shakiness, Accuracy, Step Size and Minimum Contrast for stabilize the cut segment.
4 Click "Done".
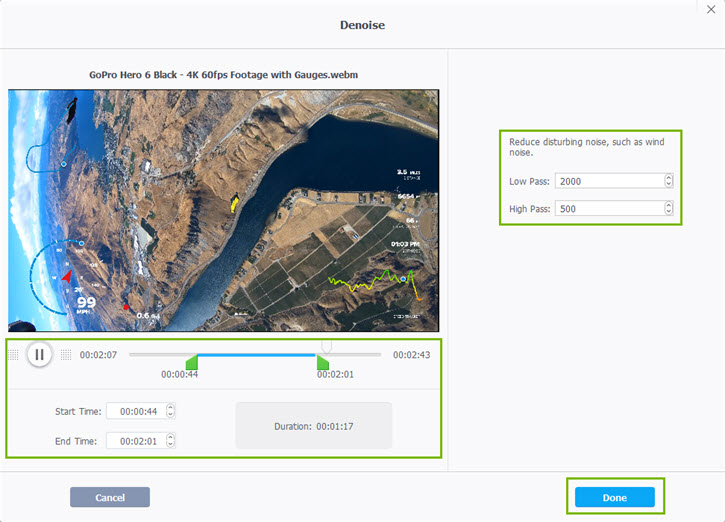
2-12. Denoise
1 Click "Toolbox" tab and select "Denoise". Double-click Denoise button or hit the gear icon on the top right corner of this button to access to controls.
2 Move two green cursors to trim the segment which has disturbing noise. Otherwise, manually input Start and End Time.
3 Redefine values of Low Pass and High Pass to reduce the noise.
4 Click "Done"
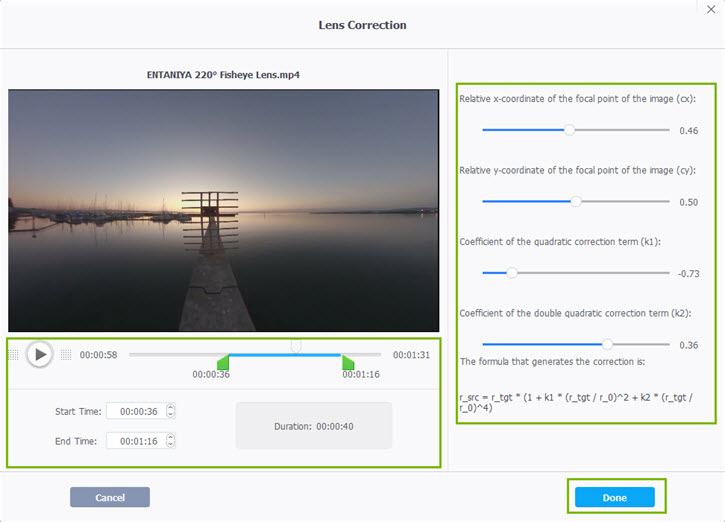
2-13. Lens Correction
1 Click "Toolbox" tab and move the right arrow to find "Fisheye" option. Double-click Fisheye button or hit the gear icon on the top right corner of this button to access to lens correction controls.
2 Move two green cursors to trim the segment which has fisheye effect. Otherwise, manually input Start and End Time.
3 Move the sliders to adjust cx (relative x-coordinate of the focal point of the image), cy (relative y-coordinate of the focal point of the image), k1 (coefficient of the quadratic correction term) and k2 (coefficient of the double quadratic correction term) to remove fisheye lens.
4 Click "Done".
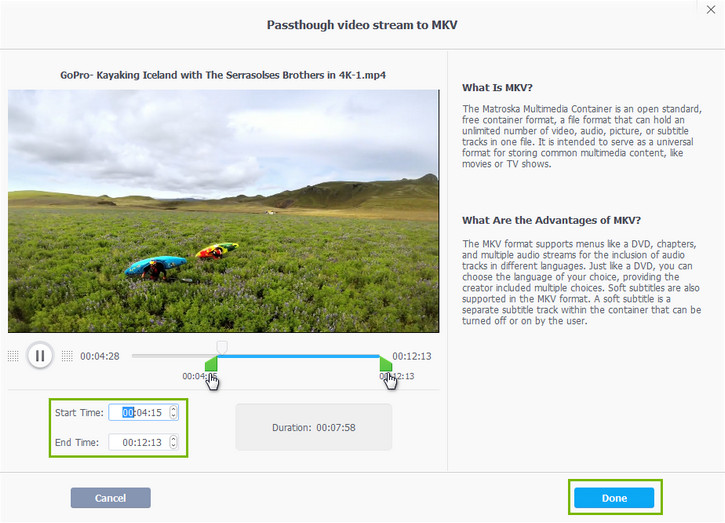
2-14. MKVMaker
1 After loading the video you want to passthrough to MKV, click "ToolBox" tab at the bottom bar and locate "MKVMaker".
2 Double click "MKVMaker" if you need to trim source video. You can drag the green knobs to specify start and end time points or manually set "Start Time" and "End Time". Then, hit "Done".
3 Hit "RUN", and your video will be immediately converted to MKV without re-encoding. New MKV file will keep original quality, resolution, codec and other parameter settings.
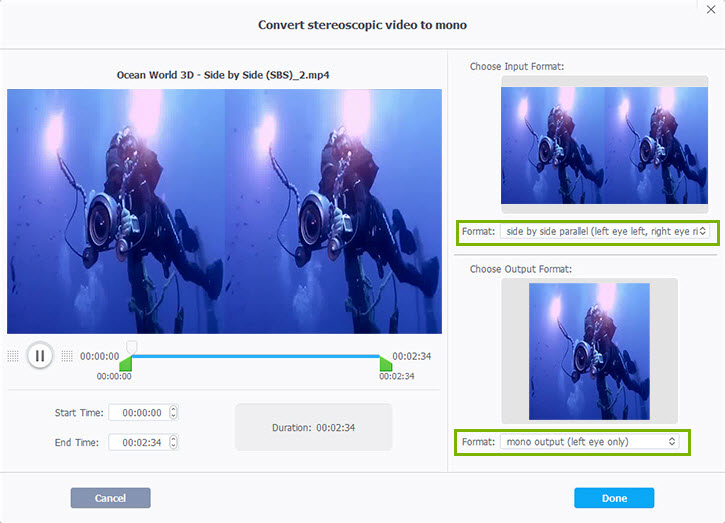
2-15. 3D → 2D
1 When a source 3D stereoscopic video is loaded successfully, head over to the "ToolBox" section, find and double click "3D → 2D" option to access to controls.
2 Choose input 3D format first and then select output 2D/mono video as "left eye only" or "right eye only". You're also free to trim source video to maintain the fragment you prefer.
3 Click "Done" -> "RUN" to convert 3D movie into 2D format in a flash. Thus you can wath 3D film on any 2D screen normally.
※ Tip: VideoProc is able to make 2D video out of 3D one in the following formats:
- side by side parallel (left eye left, right eye right)
- side by side crosseye (right eye left, left eye right)
- side by side parallel with half width resolution (left eye left, right eye right)
- side by side crosseye with half width resolution (right eye left, left eye right)
- above-below (left eye above, right eye below)
- above-below (right eye above, left eye below)
- above-below with half height resolution (left eye above, right eye below)
- above-below with half height resolution (right eye above, left eye below)
- alternating frames (left eye first, right eye second)
- alternating frames (right eye first, left eye second)
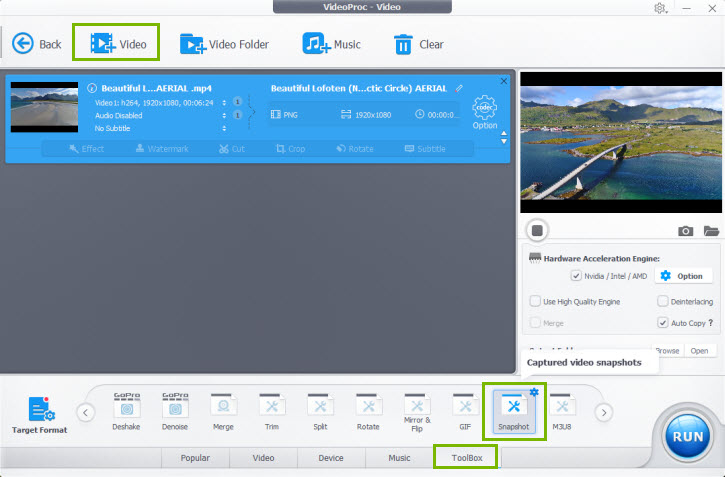
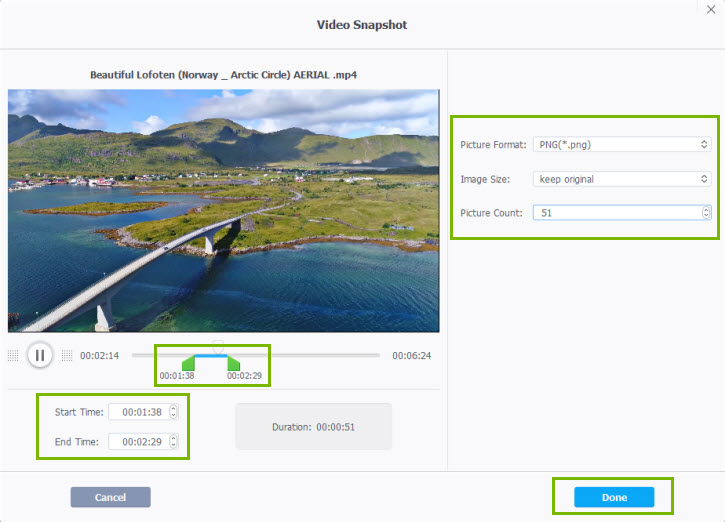
2-16. Snapshot
VideoProc enables you to capture video snapshots in 2 ways.
Method 1:
1 Open VideoProc -> Click "Video" button -> Click "+Video" button to load source video.
2 Tap "ToolBox" and locate "Snapshot" function -> Double-click Snapshot button or click the wheel-like icon at the top-right corner of the button to open the video snapshot window.
3 Choose picture format (PNG or JPG). Select preferred image size (recommended: keep original). Set picture count (how many pictures you'd like to capture from the video). Then click "Done".
4 Finally hit "RUN" button to start capturing snapshots from video. Once the job is finished, the output folder will auto pop up, and you can find your snapshots folder. In this way, you can catch multiple snapshots one time.
※ Tips: 1 VideoProc captures one picture per second by default. It will auto calculate the total video time and set the Picture Count. But you can freely change the number.
2 In the preview window, you can also freely drag the two green knobs or set specific Start Time and End Time to cut a preferred video clip for capturing snapshots.
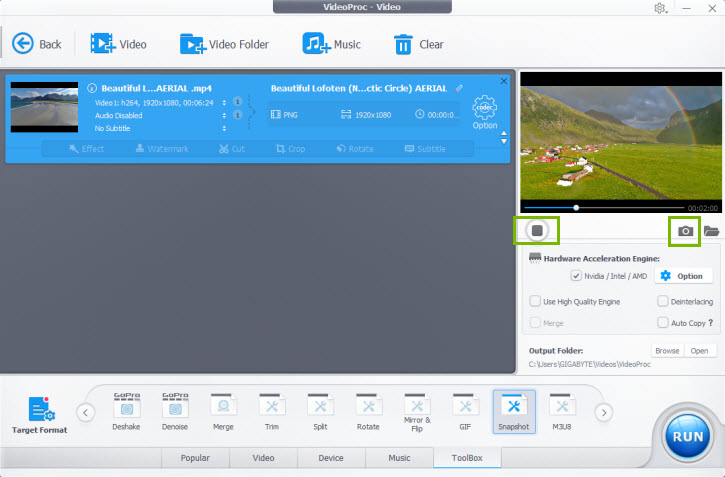
Method 2:
1 After you load your original video, you can see a video preview window on the right, click the arrow "Play" button and the video will begin to play.
2 You can drag the play slider to a particular point. When you see your favorite scene in the video, rightly click the "Camera" icon and VideoProc will auto capture and save the current video scene to computer.
3 Click the "Folder" icon next to camera to open the output picture folder to check the captured video snapshot.
※ Tip: For capturing snapshots from DVD video, you can click "DVD" button on the main UI to load source DVD, and follow the same guide above to capture favorite scene from DVD movie video.
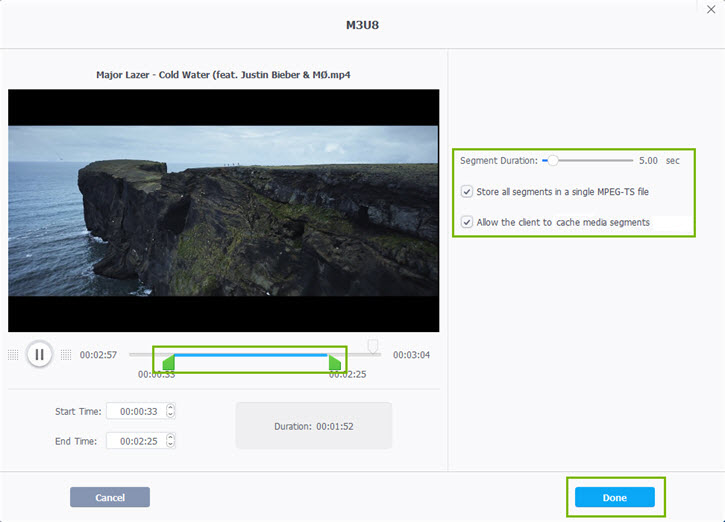
2-17. M3U8
1 Move the mouse on "ToolBox" tab and select "M3U8" option. Double-click the button to enter setting window.
2 On the left panel, preview window with progress bar is presented. Move the green cursors or manually input start/end time to trim a clip for exporting as M3U8.
On the right panel, move slider to set "Segment Duration" (5 seconds by default). Tick or untick options "Store all segments in a single MPEG-TS file" and "Allow the client to cache media segment" according to your needs.
3 Click "Done".

3. Convert
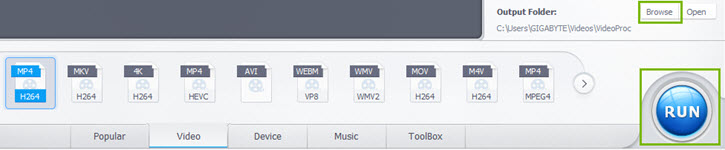
3-1.Video
1 Click "+Video" button to import one video or multiple videos (for batch transcoding) into the program.
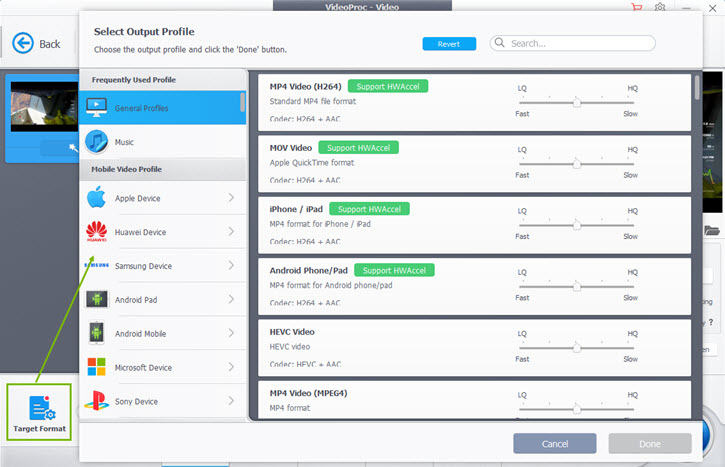
2 Click "Video" tab on the bottom of the interface. Many popular video formats are presented. Select the desired one as output format.
If there is no format you want, click Target Format button to get more profiles.
"General Profiles": Transcode video to H.264, MPEG4, MOV, HEVC, WebM and more.
"Music": Convert video to audio file in MP3, M4A, WAV, FLAC, AAC, iPhone Ringtone etc.
"Mobile Video Profile": Transfer video to Apple, Huawei, Samsung, Android, Microsoft Device and Sony Device.
"Web Video Profile": Make the video compatible with YouTube, Facebook, Vimeo and other online video-sharing sites.
"DVD Profile": Change the format to NTSC/PAL VOB for later DVD burning.
"HD Video": Turn the video to TS, AVCHD, MKV and MPEG HD.
3 Click "Browse" button to set a new destination folder.
4 Click "RUN" button to start transcoding.
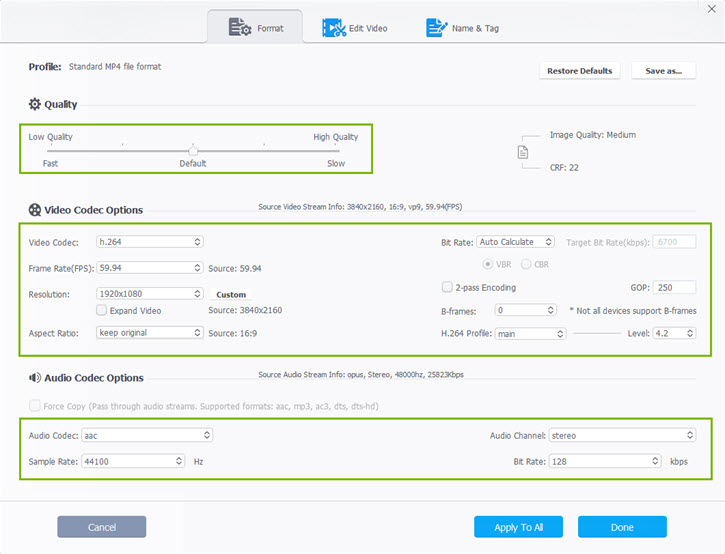
※ Tip: Click Codec Option. Format settings window appears allowing you to adjust parameters.
"Quality": Move the pointer to High Quality for higher image quality or Fast for the fastest transcoding speed.
"Video Codec Options": Modify frame rate, resolution, aspect ratio etc. for obtaining better playback effects.
"Audio Codec Options": Audio channel, sample rate and bit rate can be fine-tuned for outputting Hi-fi audio.
3-2. Music
1 Click "+Music" button to load a song or several songs into the program.
2 Select "Music" tab on the bottom of the interface and output audio formats are listed. Select one as output format.
3 Click "Browse" button to choose a destination folder to save resulting file.
4 Click "RUN" button to start music conversion.
3-3. DVD
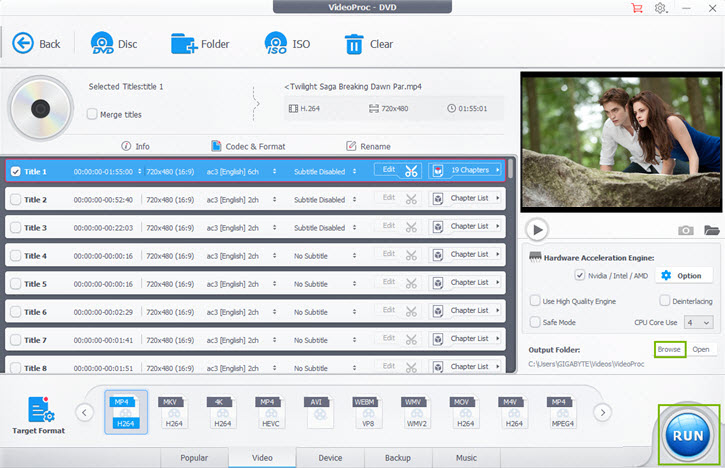
1 Insert DVD disc you want to convert into DVD drive. Launch VideoProc and click "DVD" on main interface.
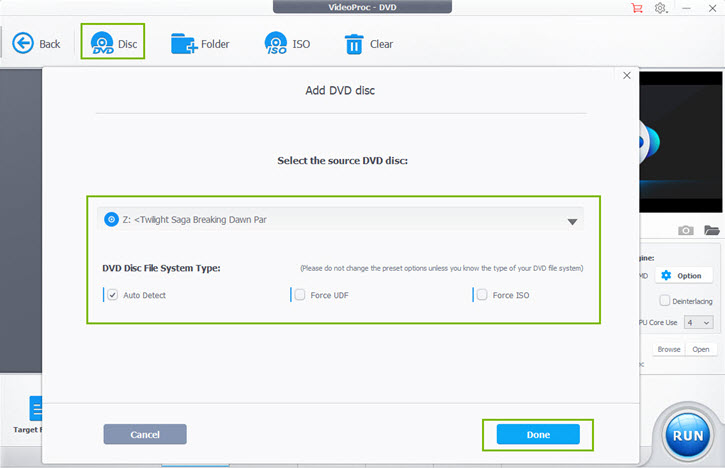
2 Click "DVD Disc" button and a window pops up asking you to select source DVD discs. After selecting the source disc, click "Done".
※ Tips:
• It will automatically detect and select your DVD if there is only one disc inserted in the drive.
• For DVD disc file system type, keep it as Auto Detect if you don't know the type of your DVD file system exactly
• This DVD converter will automatically check the correct title so that you can rip DVD in correct order. It also supports (Disney) 99-title DVDs, TV series DVDs and workout DVDs.
3 Click "Video" tab to select one format as output format.
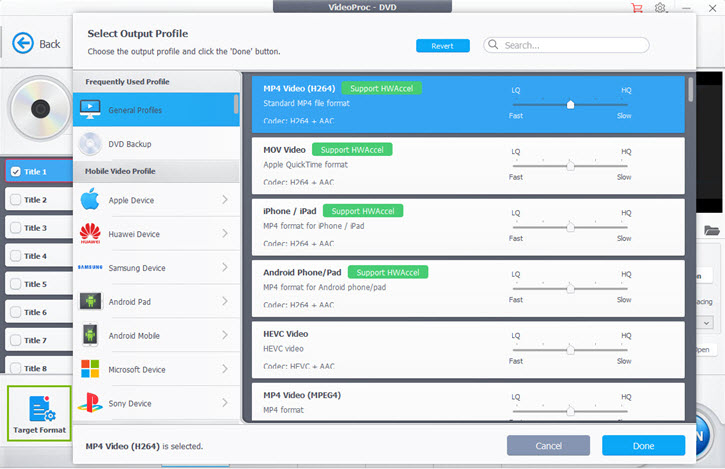
※ Tip: If there is no wanted format under Video category, hit Target Format for more profiles.
General Profiles: Convert DVD disc to H.264, MPEG4, MOV, iPhone, Android, HEVC, WebM and other mainstream video formats.
DVD Backup: Copy main movie content, full title to MPEG2 or MKV or clone DVD to ISO image, VIDEO_TS folder at 1:1 ratio.
Mobile Video Profile: Convert DVD to Apple, Huawei, Samsung, Android, Microsoft and Sony Device.
Web Video Profile: Convert DVD to YouTube, Facebook, Vimeo or other online video-sharing sites.
Music: Extract soundtracks from DVD as MP3, AAC, AC3, FLAC etc.
4 Click "Browse" button to set a destination folder.
5 Click "RUN" button to start DVD conversion.
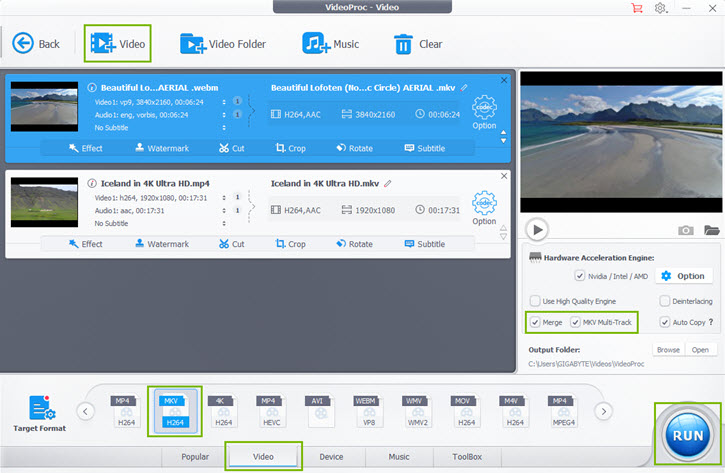
3-4. Multi-track
• Convert Videos to MKV with Multiple Video/Audio/Subtitle Tracks
1 Launch VideoProc and click "Video" button.
2 Click "+Video" to import at least two videos you want to convert as a multi-track MKV file.
3 Move to "Video" tab and select "MKV H264" as output format.
4 Check "Merge" option. Another new option "MKV Multi-track" appears. Check it as well.
5 Click "RUN" to start conversion.
• Convert Video from Multi-track MKV
1 Click "+Video" to add a multi-track MKV video.
2 Move to "Video" tab and select a format as output format, for example "MP4 H264".
3 Title, video/audio/subtitle tracks are displayed on the left in the video info bar. The number indicates how many video/audio tracks are included in a MKV video.
Click "Video1" to change the track from Video1 to Video2 or keep original. Please note that only one video track can be selected.
Click "Audio1" to select Audio1 and Audio2 or keep one track.
4 Hit "Browse" button to set a new output folder and Click "Run" to start conversion.

4. Download
4-1. Download Videos/Music
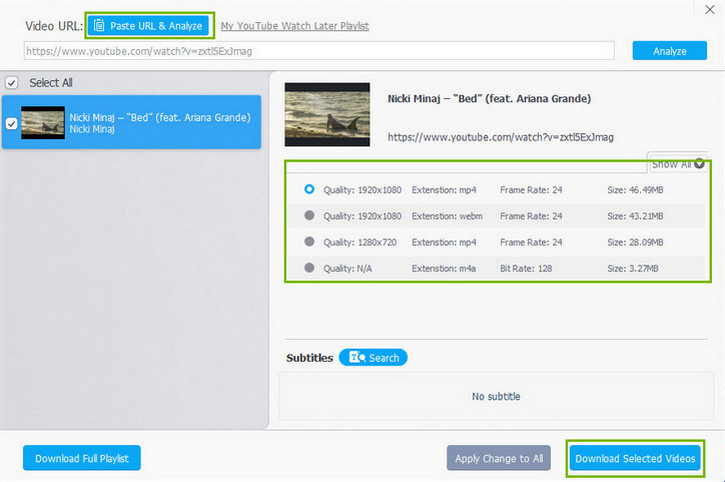
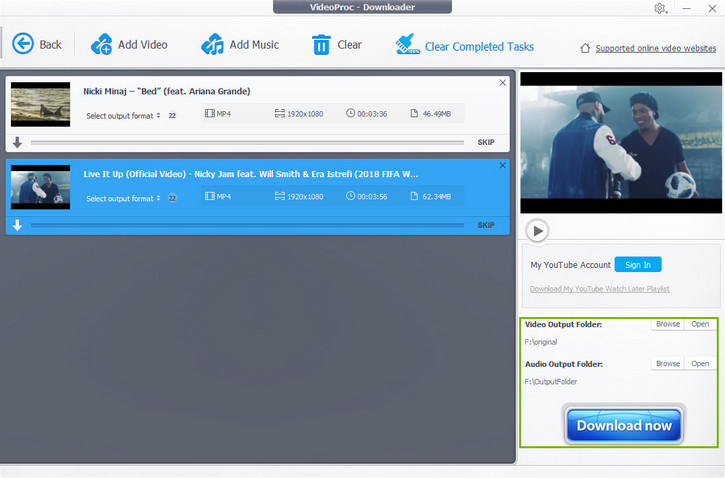
1 Click the "Downloader" button to access the Downloader panel.
2 Open your browser, find out the video / music you want to download, and then copy its URL.
3 Back to the Downloader, click "Add Video" or "Add Music", and then hit "Paste URL & Analyze" to insert the URL you just copied. The video link will be analyzed instantly.
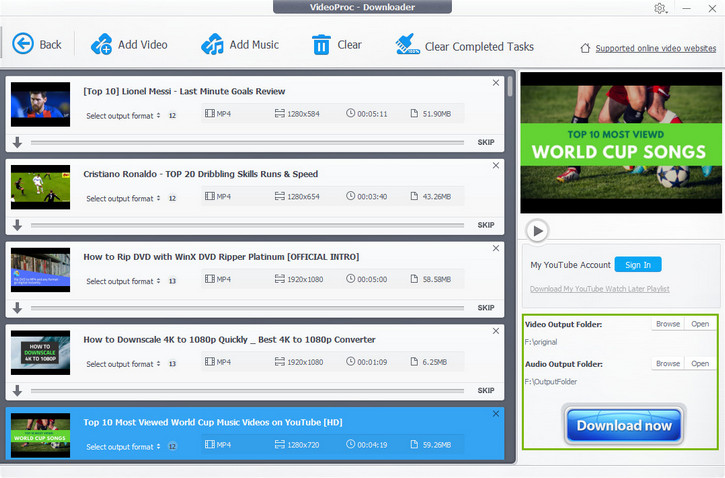
4 Choose desired output quality and format, and click "Download Selected Videos".
※ Tip: VideoProc allows you to download files in batch. Repeat step 2, 3, 4 to load other video or music files.
5 Click "Browse" to specify output folder based on your own needs. Hit the "Download now" button to start video / music downloading.
4-2. Download Playlist/Channel
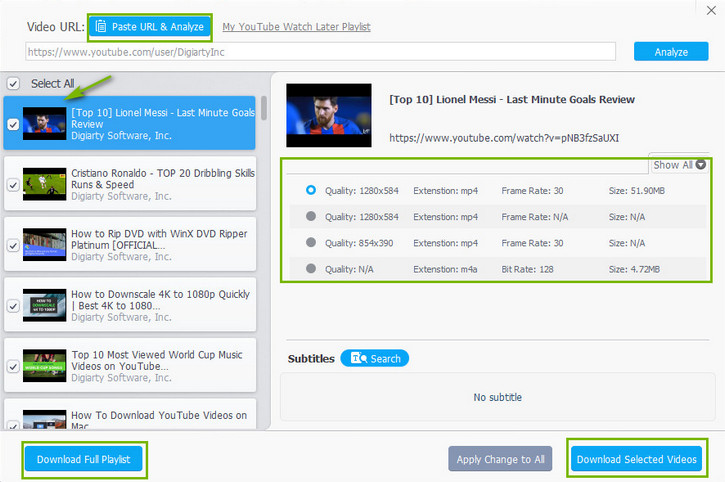
1 Click the "Downloader" button to open Downloader tool.
Then, click "Add Video" button.
2 Open your browser to get the playlist / channel URL, copy it, and then click "Paste URL & Analyze" button to parse the link. Then all videos in the channel or playlist will pop up in the left column. You can select all videos or some of them.
3 Choose the output quality and format.
4 Click "Download Selected Videos" if you just need to download some of the videos. Click "Download Full Playlist" button when all videos are what you want.
5 Hit "Browse" button to set output folder, and "Download now" to get playlist / channel videos download started.
4-3. Download & Record YouTube Live
1 Click "Add Video" button.
2 Search live streaming you want on YouTube and copy the URL. Click "Paste URL & Analyze".
3 Soon, video title and versions will be listed. Select one version.
4 Click "Download Selected Videos".
5 Click the green "Start Recording" button to download and record YouTube live. Also, you can adjust the "Start Time" and "Duration" by clicking the "pencil" icon and stop recording at any time.
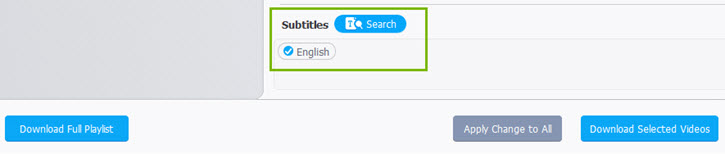
※ Tip: You are allowed to download YouTube video with subtitle. Click "Search" button next to Subtitles. It will list available subtitle(s) according to language. Tick it.

5. Record
VideoProc allows you to record desktop screen activities, record video with Webcam, and also record screen and webcam at the same time.
5-1. Record Desktop Screen
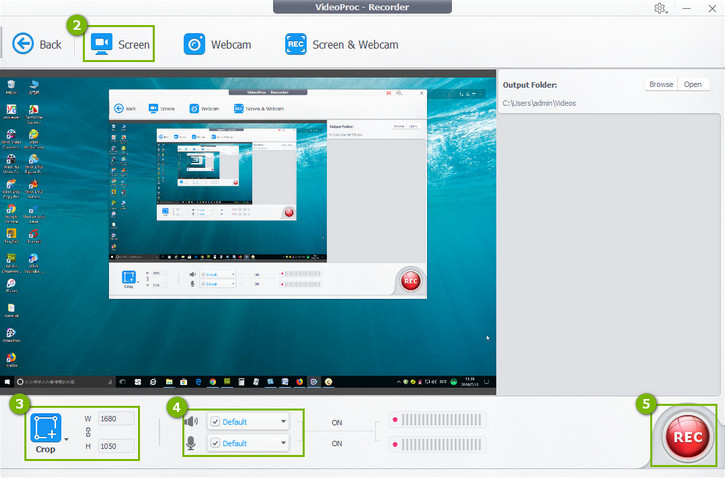
1 Click "Recorder" button in the main screen, and then get access to Recorder interface.
Click the gear icon at the top right corner and choose "Settings" to make some settings before recording. In the Settings panel, you can reset shortcuts, specify recording quality, recording format, and whether you want to show mouse, mouse clicks, key, and countdown in the screen, and more.
2 Exit Settings window, and then click "Screen" button to load your computer screen.
3 Click "Crop" button at the bottom left corner to specify the area you want to record. To record the entire screen, you don't need to trouble "Crop".
4 System sound and microphone are turned on by default. Enable or disable audio according to your own needs.
5 Click "REC" button at the lower right corner, then it will begin recording screen within 5 seconds.
If necessary, press Ctrl and T keys to open Paint Tools.
6 Press Ctrl and R simultaneously, or click "STOP" button, when you need to finish screen capture.
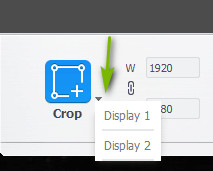
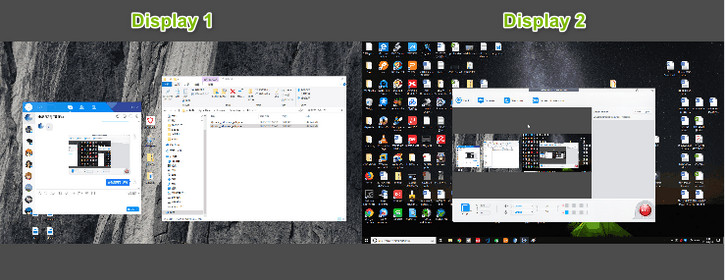
※ Tips: In addition to recording screen in a single monitor, VideoProc also allows you to record the screens of dual or multiple monitors at the same time.
To record two screens, you need to:
1 Click the drop-down menu of "Crop" and choose a display, "Display 1" for example.
2 Click "Crop" and extend the recording region from selected display to the other monitor. Thus, two screens will be covered.
The rest steps follow the same rule of capturing a single screen.
5-2. Record Video with Webcam
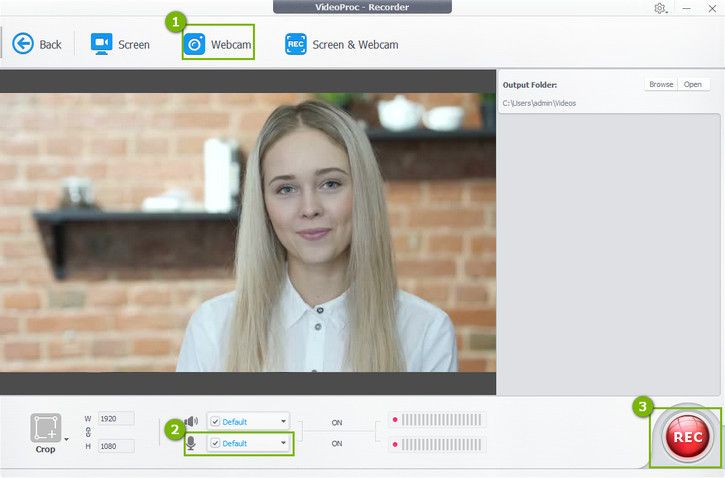
1 Click "Recorder" button, and choose "Webcam" to fire up your webcam.
2 Microphone is enabled by default, thus you can record facecam video with your voice.
3 Click "REC" icon to start recording webcam video.
④ Hold down the Ctrl key and R key at the same time, or click "STOP" button, to stop video recording.
5-3. Make Picture-in-Picture Videos
1 Click "Record" button, and hit "Screen & Webcam" option. Then, you should see two options, namely,
• Record screen while showing facecam: screen recording will be the main video and your webcam recording will be a smaller one overlaying the main video.
• Record webcam while showing screen: it is contrary to the above one.
2 Click the smaller video, and then hold down your left mouse button to drag it to your desired position. Meanwhile, you can drag the frame to resize its playing window.
3 Click "Crop" button to choose the recording area. If you don't specify it, this tool will capture full screen.
4 Enable or disable system audio / microphone, based on your own needs.
5 Hit "REC" to start recording facecam and screen at the same time and click "STOP" when finished.

6. Settings
Click the wheel-like "Settings" icon at the top-right on the main UI.
6-1. Common settings
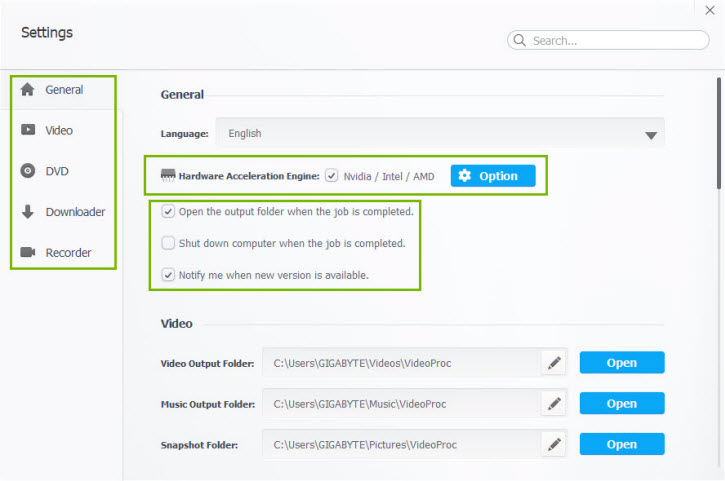
1 Click "Check Update" to check the update information for latest version of VideoProc.
2 Click "About" to check your license information, current version No. of VideoProc, release date, etc.
3 Click "Help" to open the detailed user guide page of VideoProc.
4 Enable hardware acceleration: Choose to enable Nvidia/Intel/AMD hardware acceleration engine to accelerate the video processing speed at most. VideoProc will auto check your computer hardware info. Click "Option" button to check it.
5 3 other common settings: Open the output folder when the job is completed; Shut down computer when the job is completed; Notify me when new version is available.
6-2. Path for outputs
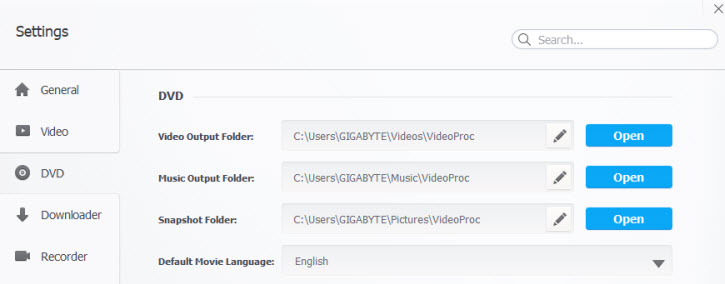
6-2-1. DVD
Default video output folder: C:\Users\GIGABYTE\Videos\VideoProc
Default music output folder: C:\Users\GIGABYTE\Music\VideoProc
Default snapshot folder: C:\Users\GIGABYTE\Pictures\VideoProc
Optionally click the pen-like icon to specify a target computer folder to store the output media, or click "Open" button next to each output path to open the output video/music/snapshot folder of VideoProc.
Default movie language: Click the down-arrow icon to choose preferred default movie language.
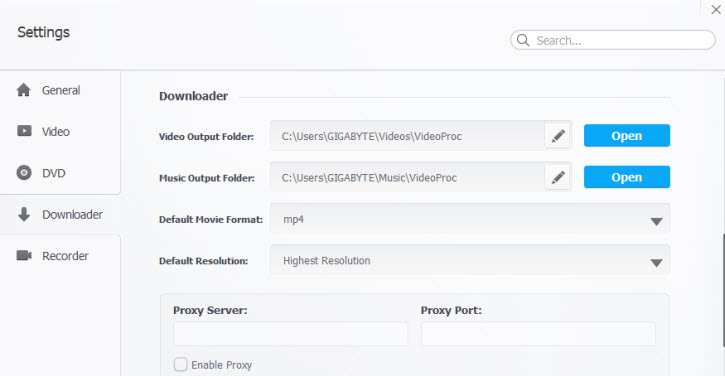
6-2-2.Downloader
Default video output folder: C:\Users\GIGABYTE\Videos\VideoProc
Default music output folder: C:\Users\GIGABYTE\Music\VideoProc
Default movie format: MP4, FLV, 3GP, WebM, M4A, MP3. Choose preferred one.
Default resolution: Set default resolution for the downloading video: Highest Resolution, 1080p, 720p, 480p, etc.
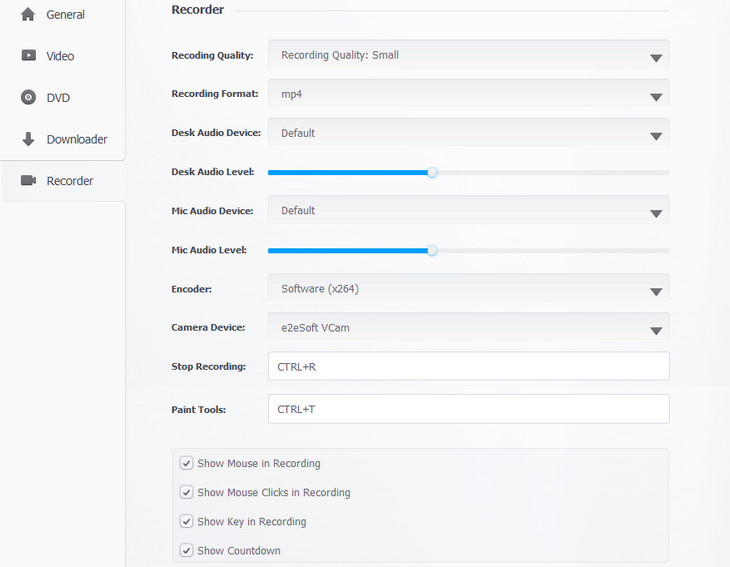
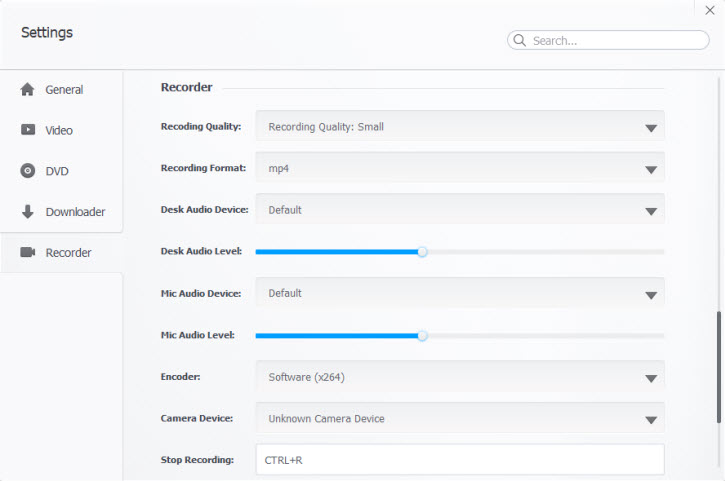
6-2-3. Recorder
Default recording quality: Small, HQ.
Default recording format: MP4, FLV, MOV, MKV, TS. Choose one.
Desk audio device: Default, Realtek Digital Output (Realtek High Definition Audio).
Desk audio level: Drag the slide bar to adjust it.
Mic audio device: Default, Realtek Digital Output (Realtek High Definition Audio).
Mic audio level: Drag the slide bar to adjust it.
Encoder: Software (x264), Software (x264 low CPU usage preset). Depend on your computer hardware.
Camera device: Set default camera device, built-in or connected external camera.
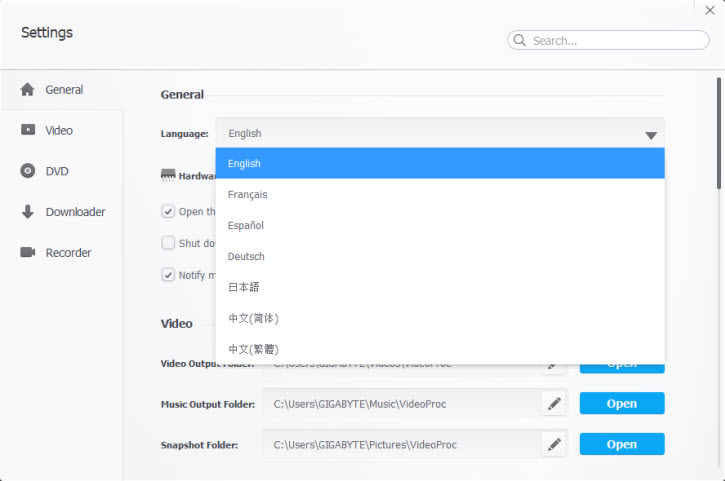
6-3. Default Language
Under General -> Language, you can change the default software language: English, Japanese, German, French, Chinese (Simplified), Chinese (Traditional). Once you choose a language and click "Continue", the software will auto restart.


 1. Get Started
 2. Edit
 3. Convert
 4. Download
 5. Record
 6. Settings