


How to Screen Record on Windows 10 without Watermark | Top 5 Ways
 Kistent Waung
Updated on
Whether you're creating a presentation, making a detailed tutorial video, creating a product demonstration, or producing a viral content, screen recording can be your go-to way.
To screen record on Windows 10, you have a bounty of different options, including using built-in features and third-party screen capture programs. Here we assemble the top solid screen recorders for Windows 10/11 to help you screen capture activities on Windows 10, Windows 11 with audio and best quality.
1. Xbox Game Bar
- OS: Windows 10/11
- Output Format: MP4
Windows 10 and Windows 11 have built-in screen recorder – Xbox Game Bar, which frees you from installing any 3rd party software and easily lets you record gameplay walkthrough with system audio or microphone audio. It can be activated simply by the shortcuts - the Windows Key + Alt + R.
Though Xbox Game Bar dwarfs other rivals in simplicity, there is scarcely a man but has weakness. Xbox Game Bar works as well in other applications such as Chrome as it does in Games, but it only screen records one app at a time and is unable to capture the Windows desktop or File Explorer. Consequently, in case you mean to screen capture multiple programs like a powerpoint and a web browser, Xbox Game Bar would let you down. In a nutshell, this built-in free Windows 10 screen recorder is best for recording one app activity.
- Built-in software, no installation, free to use.
- Screen capture video up to 60FPS with sound.
- No recording time limits, no watermark.
- Record only one app at a time.
- Output format limited to MP4 only.
- No screen drawing feature, nor Chroma key feature.
How to use Xbox Game Bar to record Windows 10 screen
Step 1. Press Win + G on your keyboard to open the Xbox Game Bar overlay. If prompted, confirm that "Yes, this is a game" is selected.
Step 2. Click on the "Capture" button (camera icon) in the Game Bar overlay. You can use your microphone to record audio, or mute the mic if you don't want to capture any sound.
Note: before recording screen on Windows 10, you can also adjust settings in Xbox Game Bar to better suit your needs.
1. Head to Settings -> Gaming -> Captures > Record what happened (Win 11) / Background Recording (Win 10). Press Windows key + G to launch Xbox game bar and you can save the 30 seconds screen activities that just passed, even though you weren't actively screen recording it. This would help you save some epic killing part during your gameplay or live streaming.
2. The default recording length goes to 2 hours. If your gameplay recording is above 2 hours, you can change the max recording length in Settings.
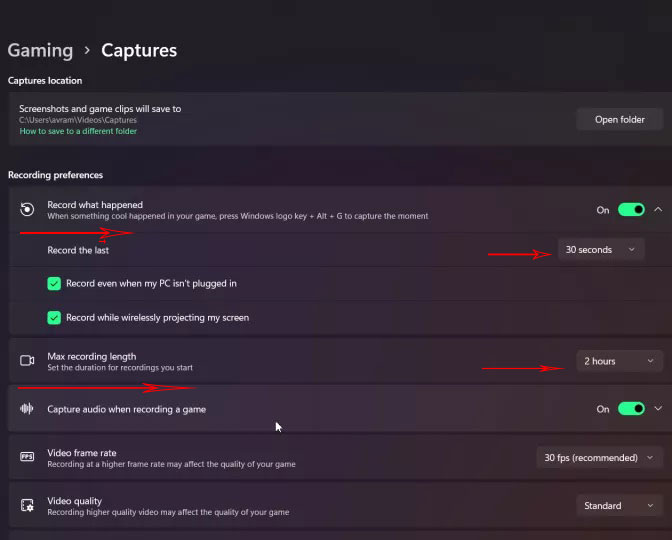
3. Gameplay recording users concern quality and frame rate a lot. Change quality from standard to high and turn the default 30FPS to 60FPS if high quality is your primary concern.
Step 3. Choose the "Record" option to start recording your screen.

Step 4. Once you're done recording, click the stop button in the Game Bar overlay. Or hit the Windows Key + Alt + R to stop screen recording on Windows 10 or Windows 11. The recorded video will be saved in the "Captures" folder within the "Videos" library on your system.
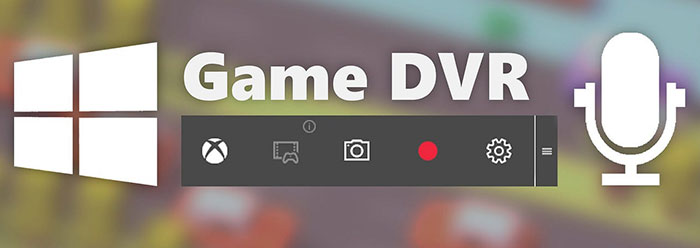
2. Game DVR
- OS: Windows 10/11
- Output Format: MP4
The Game DVR, also a built-in feature in Windows 10, was earlier so popular on Xbox App but today it can work on Windows 10 to capture your gameplay walkthrough, as well. This free game recorder is exceptional in automatic video recording of PC Gameplay with background recording mode and saving it as per your selection.
Similar to other game screen capture tools, Game DVR is also high-demanding in CPU usage, esp for capturing 4K game videos at 60FPS. Thus, you'd better capture gameplay video using Game DVR at a Windows 10 computer with high-end hardware configurations. Providing gameplay recording doesn't happen on your Windows 10 a lot, disable it manually.
- Built-in feature, needless to install.
- No recording time limits, no watermark.
- High-consuming in CPU.
- Output format leaves much to be desired.
- Lack draw, Chroma key, picture-in-picture features.
How to use Game DVR to capture Windows 10 screen
Step 1. Open the "Settings" app by pressing Win + I.
Step 2. Go to "Gaming" and then select "Game DVR" from the left menu.
Step 3. Toggle on "Record game clips, screenshots, and broadcast using Game bar."
Step 4. To start recording, press Win + G to open the Game Bar overlay while you're on your desktop or in the app you want to record.
Step 5. Click on the "Record" button in the overlay to start recording, and click it again to stop. The recorded videos will be saved in the "Captures" folder within the "Videos" library.
3. Winxvideo AI
- OS: Windows 10, 11, 8, 7
- Output format: MP4, MOV, MKV, FLV, TS
The above two screen recorders for Windows 10 are all in short of drawing and editing features. Luckily, this professional screen recorder for Windows 10 happens having them all. It helps you screen record gameplay videos, capture streaming videos, create instrumental videos, record Skype videos, etc. up to 4K with system or microphone audio. Meanwhile, it provides you with Draw feature to mark the highlights while recording and Chroma key to remove green background from recording at 1 click.
This top screen recorder software for Windows 10 feature is completed by its webcam recording, letting you capture gameplay screen with your face, creating a more engaging video for your fans.
 Free Download
 Free Download
Note: AI tools for Mac are currently unavailable, but they're coming soon. Stay tuned.
- Easy to use, no watermark, no recording time limits.
- Support a wide range of output format, from MP4 MKV to FLV TS.
- Almost all the editing features needed for recording are included, be it draw, trim, Chroma key, picture-in-picture, split.
- Unable to capture screen video at 60FPS currently.
How to make screencasts on Windows 10 using Winxvideo AI?
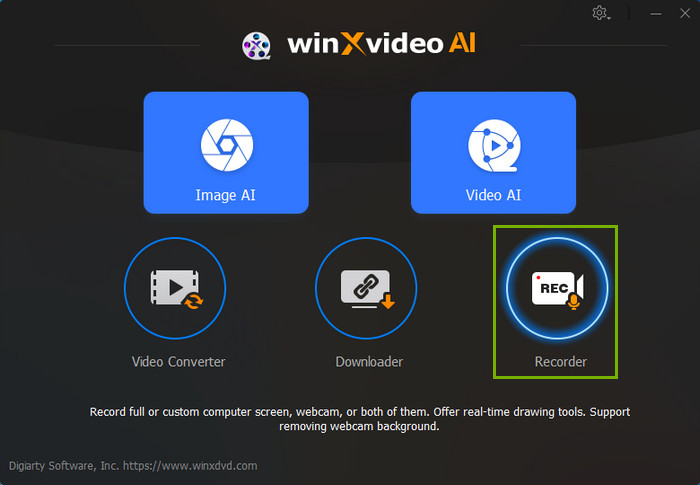
Step 1. Launch Winxvideo AI after installation and select Recorder on the main interface.
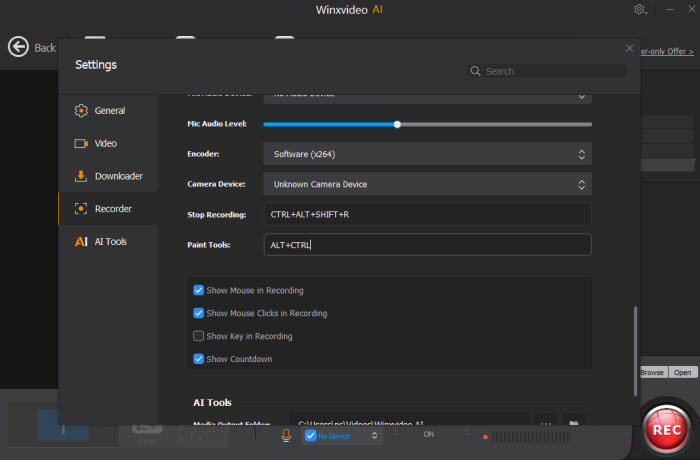
Note: tap the Setting icon on the top right corner of the UI and choose Recorder to adjust settings if needed. You're allowed to change recording quality, format, audio level/device, and know the shortcut for drawing (Ctrl+Alt+Shift+T).
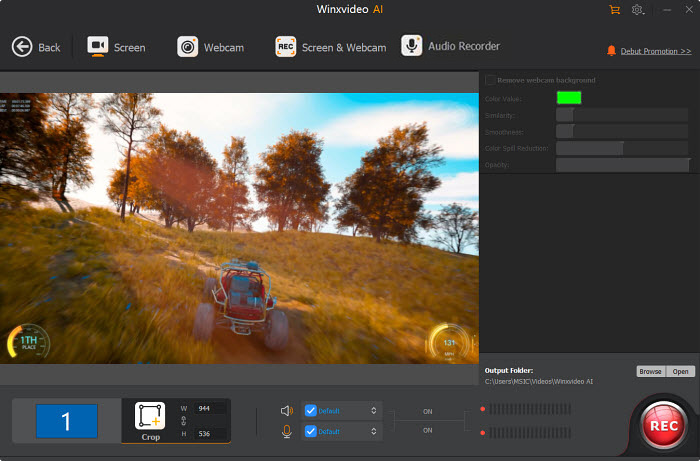
Step 2. Select a recording mode on the top.
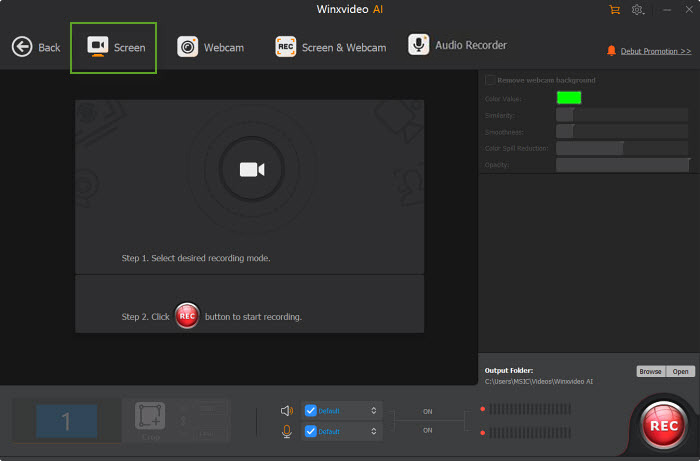
Step 3. Choose to record the entire screen or part of the screen at the lower-left corner.
Step 4. Enable audio device(s).
Step 5. Click on the REC button to start recording. When everything is OK, click on the Stop button to end.
4. OBS Studio
- OS: Windows 10, 11, macOS 11.0 or newer, Linux
- Output format: MP4
OBS Studio is a must-mention when it comes to free screen recorder for Windows 10. This is definitely a Swiss Pocket Knife of recording. Certainly, if you know a thing or two about this free open source screen recorder program, you know it owning distinct advantages and disadvantages.
Honestly speaking, it provides an extensive range of features for content creation. You will particularly appreciate its versatility and flexibility. Its customization for recording and streaming wins countless thumbs up already.
For content creators, the benefits you can enjoy include improved production quality, increased audience engagement, and enhanced brand visibility.
Likewise, its disadvantage is quite clear. There is a learning curve involved, especially for beginners. The initial setup and configuration can be slightly overwhelming. All these confusing settings, and OBS Studio's lack of default hotkey settings for brief bursts of recording, are reasons to stay away for most beginners. If you're an experienced user, OBS can improve your recording experience to a new level.
- Free open source, available for Windows PC, macOS and Linux.
- Powerful functions, alongside with rich customization settings.
- Hardware encoding supported to reduce CPU and GPU usage.
- Not very user-friendly for beginners.
- Lacks some video-editing functionalities.
How to Screen Capture Gameplay with OBS Studio
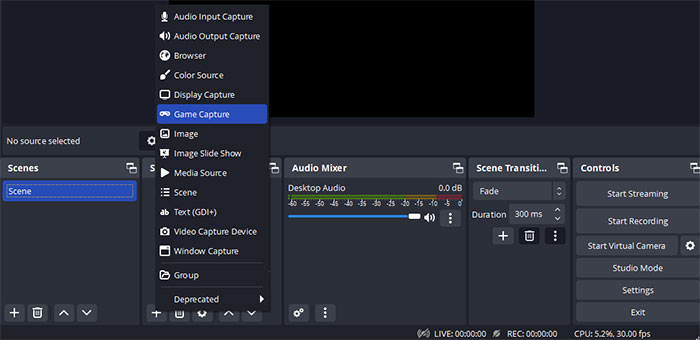
Step 1. Download and install OBS Studio from its official website.
Step 2. Open OBS Studio and set up a new "Scene" and "Source" for your gameplay recording in Windows 10/11.
Step 3. Configure recording settings like resolution, frame rate, and output format in the "Settings" menu.
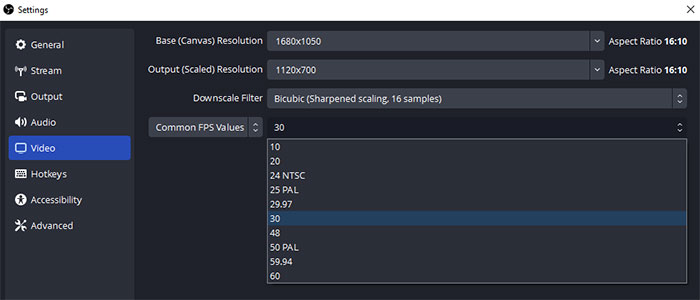
Note: there are a bounty of settings in OBS. Just pay attention to Settings > Output > Recording. Here you can specify the video encoder to use, the recording format, and recording quality. By default, OBS enabled hardware encoding, but that setting can get a little finicky. For the most reliable results, you're advised to select one of the software (x264) options instead.
Step 4. Start recording gameplay walkthrough video or capturing streaming live video by clicking the "Start Recording" button in the main OBS window.
Step 5. Stop recording by clicking the "Stop Recording" button. Afterwards, go to the storage folder to check your recorded gameplay video.
5. Camtasia
- OS: Windows & macOS
- Output format: MP4, WMV, AVI, BMP, WAV, MP3
Camtasia is widely recognized by the public as a professional editor first. Yes, it can polish your video footage with trimming, cropping, splitting, adding overlays, denoising, special effects, speeding up, etc. features. But if your video source needs coming from screen recording, Camtasia can still render you help.
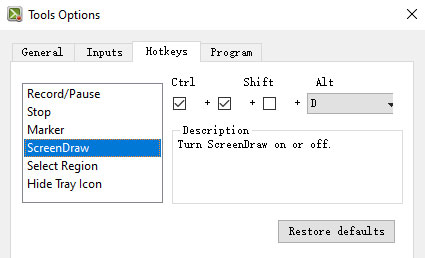
You can run this Windows 10 screen recorder to capture screen video with audio, record video with webcam, create picture-in-picture video and record the powerpoint presentation, as well. If you need to draw while screen recording, go to Options under Tools and check hotkeys to find the hotkey for ScreenDraw. Drawing feature is gonna be activated by Ctrl+Shift+D keys.
- A feature-rich screen recorder and video editor.
- Multiple record modes: record the screen, record PowerPoint, record webcam and record audio.
- Only support screen recording at 30FPS.
- Unable to output recording video to 4K 2160p quality.
How to Record Windows Screen with Camtasia
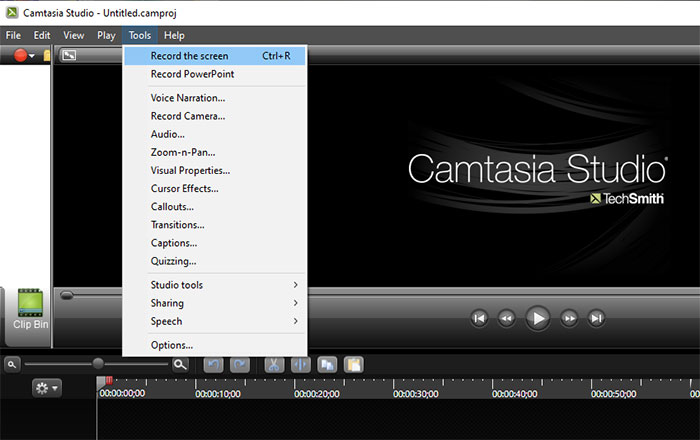
Step 1. Fire up Camtasia after installation. Choose "Record the screen" under Tools at the user interface > tap Tools on the newly pop-up record interface > click "Options" on the recording window.
Step 2. Customize recording settings. Recording settings are in your full disposal, including frame rate (up to 30FPS), audio device, system audio, webcam device, etc.

Meanwhile, switch to Hotkeys window, where you can know the hotkeys for screen drawing, record/pause, stop, select region, marker, etc.
Step 3. Click OK after the setting adjustment is done.
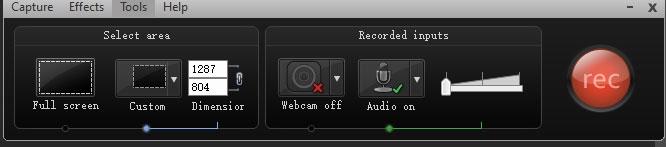
Step 4. Select the screen recording area at your willing. When the recording area is settled, tap the red button "rec" to begin recording your Windows 10 screen. Tap the Stop icon or press F10 hotkey to end your recording.
These high-end screen recording software should help you record your screen on Windows 10. Windows 10 built-in game screen recorders easily capture gameplay on your Windows 10, but they leave the later video editing much to be desired. OBS Studio provides powerful customization, it might also have a steeper learning curve compared to simpler tools. If you're looking for a more straightforward yet all-covered solution, Winxvideo AI and Camtasia are worth your consideration. Just choose the one that best suits your needs and preferences.


