How to Upload a Video to YouTube from Computer or Phone
Video has undoubtedly become the most popular choice for content consumption nowadays, which has also been an irreplaceable part of business marketing strategy. So it's no surprise to see marketing videos posted by businesses. If you are getting started with YouTube marketing and would like to publish high-quality video content to the famous social media platform, this post will walk you through the steps to take in order to upload a video to YouTube from your computer and mobile. With the right solution, you can therefore reach a large audience and further strengthen your content marketing strategy.

What If the Video File Is Not Supported or Too Large to Upload?
YouTube accepts limited video files and endures a long video processing time especially when the file is too large or the exported video is in wrong settings. Don't worry, Winxvideo AI can fix the problem by converting any video to a file format that is perfectly fit for YouTube.
Table of Contents
Part 1. Preparing to Upload Video to YouTube
Part 1. Preparing to Upload Video to YouTube
YouTube 4K uploading error can be caused by various reasons, from the poor computer configuration, improper 4K video specifications, to bandwidth of network and so on. Let's take a closer look of the culprit of 4K video not working properly on YouTube.
What Video Format Does YouTube Support?
Before you upload the video to YouTube, make sure the platform supports your video format. We are lucky to find YouTube supports a wide range of formats including 3GPP, AVI, CineForm, DNxHR, FLV, HEVC, MOV, MP4, MPEG4, ProRes, WebM, WMV, etc. In the meantime, audio files like MP3, WAV, etc cannot be uploaded to YouTube. You can check the full video format list supported by YouTube.
If your video file type like .wlmp or .mswmm isn't supported by YouTube and you get the error message like “invalid file format” when you are uploading a video to YouTube, you need a video converter to convert the video to a supported format first.
What Size Should Your YouTube Video Be?
Landscape? Vertical? Square? Sometimes, you may record a video vertically, which isn't preferred by YouTube media player. So it's necessary to crop your video to 16:9, a standard video aspect ratio that YouTube accepts on a computer. If not, YouTube may add paddings for optimal viewing.
In the meantime, uploading large-sized videos such as 4K is quite time-consuming, especially when you have a slower link from home, maybe do that overnight. So we highly recommend you convert the 4k file to 1080p video before uploading it to YouTube. In the meantime, video length is limited to 15 minutes or less.
What Video Tools Should You Use before Uploading to YouTube?
There are a lot of video processing tools that can deal with video converting, cropping, and compressing. However, the biggest struggles are most tools process video files speedily at the cost of quality degradation or maintain a higher level of quality yet transcode video at a relatively slow speed. If you need a tool that well balances the quality and speed, here are the 2 useful tools to help you convert and edit video content before you post the video to YouTube platform.
Winxvideo AI is a great tool for fast video processing. It is packed with rich features that let you convert video to over 420+ formats including MP4, HEVC, MOV, MKV, AVI, etc. It goes beyond your SD and HD videos. It manages to convert video up to 4K and 8K. You can even convert video to a format ready for uploading to YouTube and playing on iPhone iPad Android.
It is also good at downsizing large videos to be 90% smaller, without compromising the output quality. You can also cut, crop, merge video files, and add external subtitles to the video without any hassle. On top of that, this tool takes advantage of hardware acceleration tech, speeding up the whole video processing drastically, without any quality loss visually.
It doesn't matter the kind of video format you wish to convert. Handbrake works with almost all modern formats and transcodes the format without the need for any third-party codec library. If you are experienced with obscure settings, you will find Handbrake more helpful. Not only does it change video dimension, resolution, frame rate, and aspect ratio, but also gives you full control over the 2-pass encoding for higher quality, denoising, deinterlacing, encoding preset, etc. Therefore, you can spice your video as per your needs.
Part 2. How to Upload a Video to YouTube?
After you've prepared your video content for YouTube, then you can follow the steps to learn how to upload a video to YouTube from your phone or computer.
Upload video to YouTube from Mobile Phone.
Step 1. Open your YouTube app from your phone. If your device doesn't have a YouTube app, just download it from Apple App or Play Store.
Step 2. A YouTube account is needed in order to post your video to YouTube. So log in to your YouTube account first.
Step 3. Click on the profile icon on the top right corner of the screen, open the menu, and tap the YouTube Channel on the top end of the menu.
Step 4. Tap the Create camera icon at the top of the screen. Please grant access to YouTube to your camera so that it can get the video content if you haven't ever updated a video to YouTube before.
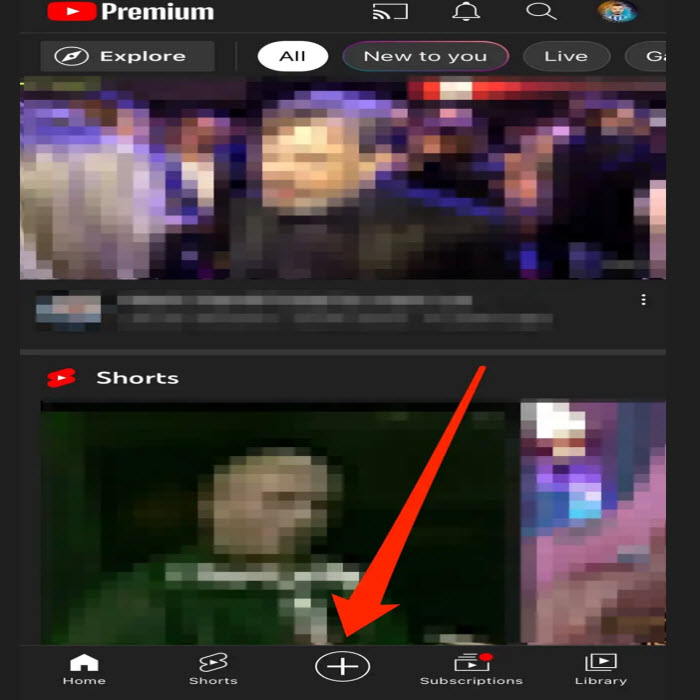
Step 5. Click Upload a video and Pick a video in your library of your device storage, and tap on it you want to upload. If the video is less than 60 seconds, it will be uploaded as a Short on YouTube.
Step 6. Optionally, you can tweak the video with its default YouTube editor before uploading it. For example, you can choose an artistic filter, trim your video, add royalty-free music on your iPhone, etc.
Step 7. Click Next. Then Add a title, description, and privacy settings (such as Public, Private, and Unlist) you have already prepared before you started uploading.
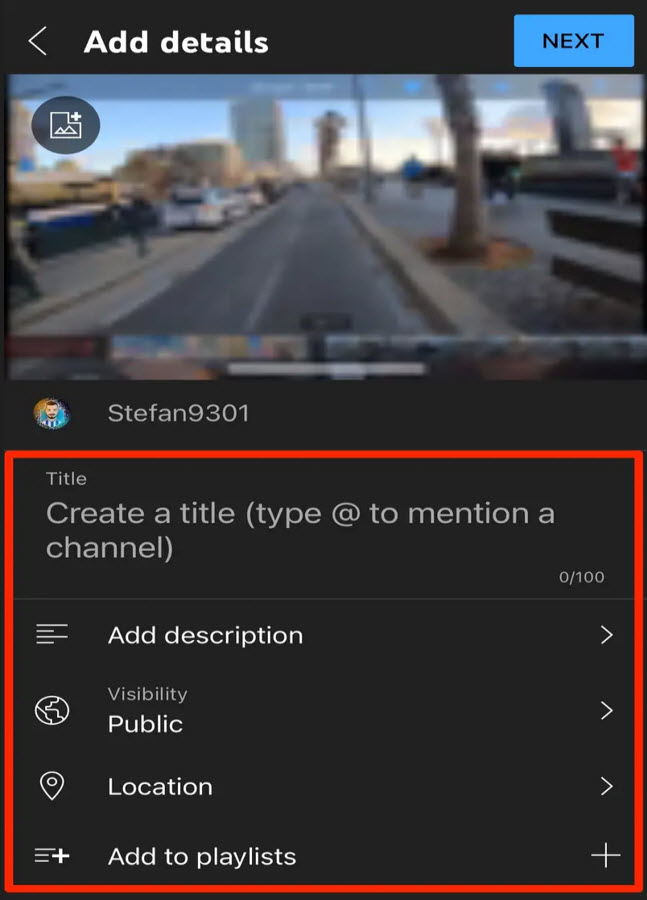
Please be sure the title is enticing, short, and crisp and accurately tells the exact content of the video to your audience instead of fooling them into clicking the video with click-bait one. On the other hand, make sure your description is a brief summary of your video and include the keyword in order to increase its reach.
Step 8. Select the location, which helps YouTube reach out with your content to users residing in the same geographical area.
Step 9. Once you are ready to publish the video, click Upload in the top-right corner.
Upload the video to YouTube from the computer.
Step 1. Open your browser, be it Chrome, Firefox, Safari, or IE.
Step 2. Navigate to YouTube. And login to the YouTube site, if you don't see your profile image in the upper right corner.
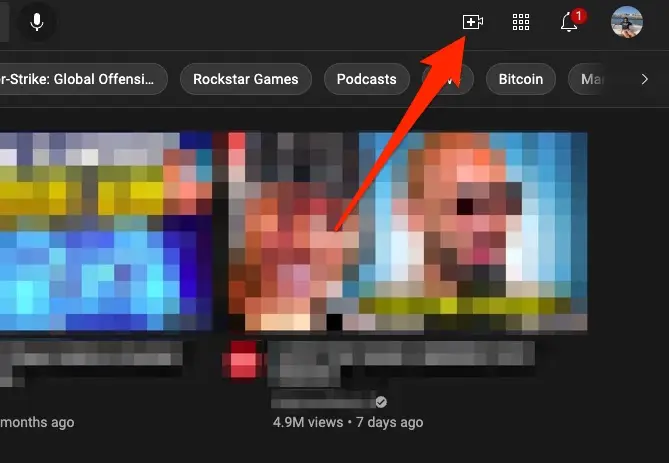
Step 3. Click the CREATE camera icon next to your profile image in the top-right corner and select the Upload Video option. Then you will be directed to YouTube Studio where you can proceed further.
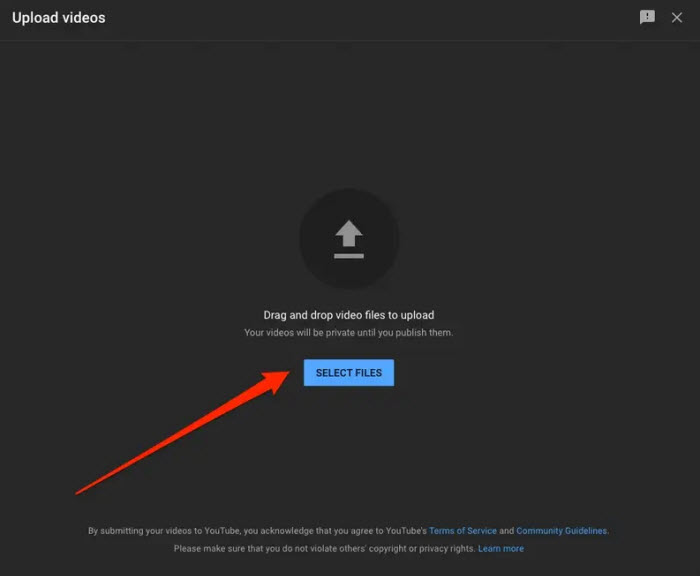
Step 4. Go to Select files to Upload to choose a file from your computer, or you can directly drag and drop the video file, and click Open. You can upload up to 15 videos each time.
Step 5. Enter the video title, description, and tags, meant to help attract more views and gain subscribers.
Step 6. Choose a thumbnail for the video from the YouTube suggestions. You can also upload a new one as per your needs. And add your video to one of your existing playlists, or simply create a new playlist if required.
Step 7. Optionally, you can select if the video is suitable for kids or not or explore More Options, where you can edit the options such as subtitles, recording data, and location, category, comments, and ratings, etc.
Step 8. Select the video visibility of the video to make it public, private, or unlisted.
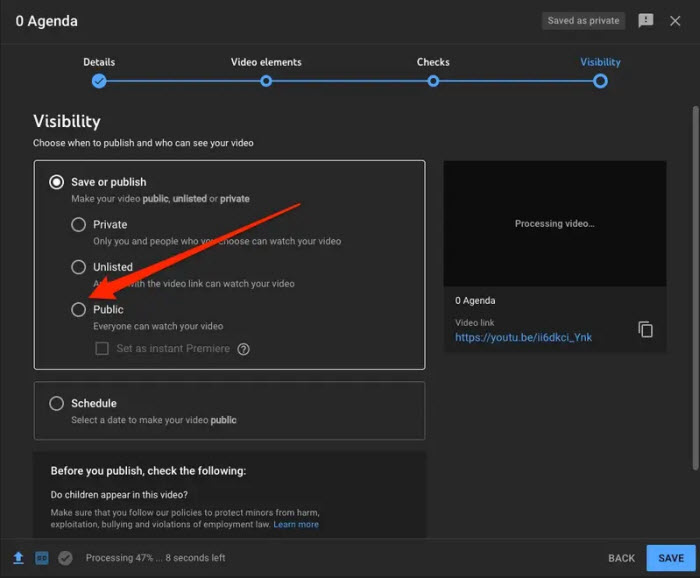
Step 9. Click on Publish to finish posting the video to YouTube. During the uploading process, it takes a bit of time, especially when the video is large and long.
Other useful tips:
- Dwell on your audience's preferences by giving them what they ask for.
- Encourage viewers to subscribe to your channel.
- A Call To Action is important. Leave your audience with instructions after viewing your video.
Troubleshooting Steps to Common Video Uploading Errors on YouTube
1. Get an Error "Invalid file format" or "The server has rejected the file".
File formats such as .mswmm, .msdvd, .wlmp, .camproj, .dvdproj, .rcproject, .piv, etc are not supported by YouTube, and you cannot upload video to YouTube, let alone the video files like PCM, MP3 and WAV. Make sure to convert video or audio in the right format that YouTube accepts first.
2. Get an Error "An error has occurred while sending data over the network" or "A network error has occurred"
Generally, outdated browser is the root cause if you have the problem with uploading video to YouTube. You need to upload the browser to the latest version and then check if you can publish video to YouTube successfully.
3. Get an Error "Failed (empty .mov file)"
If you cannot upload MOV video to YouTube and get the error, it generally means the QuickTime movie is saved as a reference movie rather than a true video file. Please make sure to select “Save as a self-contained movie” and then upload the video to YouTube again.
4. Why my video stuck during upload on YouTube.
A common frustration is that when people are uploading videos it takes forever like 2 hours or more. This issue that people struggle with when uploading videos to YouTube is that their file size is way too big. Typically, the bigger the file size this is, the longer it is going to take to upload to YouTube. If the video is exported in the wrong settings, it makes the file way too big and therefore wasting hours of uploading time. According to YouTube recommended settings, you can export video in MP4 H.264 format with a video resolution preferably in 1080p. So when you create a video before uploading it to YouTube, make sure the video file you are going to have is small in size and is saved in MP4 H.264 preferably.
Click to learn the best video size for uploading to YouTube >>
5. Why does YouTube ruin my video quality?
Many users complained that YouTube degrades video quality. That's not the truth. Generally, high-quality video will initially be processed in low resolution on YouTube, as a move to complete the upload process faster. Once the high-resolution processing is finished, the high-resolution video will be available on your video in YouTube.
Part 3. After Uploading Video to YouTube
Once you've successfully uploaded the video to YouTube, you can share the link with your friends, and family, and on social networks, let your follower on other platforms know to get as many views as possible. In addition, you can partner with influencers to reap the benefits of reaching more audiences. Make sure to stay informed about what's trending and therefore grow your channel.


