[iMovie Tutorial] How to Compress Video in iMovie
If you're finding that iMovie exports result in files that are too large, you're not alone. Many iMovie users are heading to the discussions.apple website to voice their concerns about this issue. The solution? It's quite simple: compress the video in iMovie before exporting.
Never used iMovie's compression feature before? No worries! This guide will take you through the process of compressing a video in iMovie step by step. The goal is to help you achieve an iMovie export with a well-balanced mix of size and quality.
iMovie Compressor Tutorial
iMovie Alternative to Compress Videos without Losing Quality
Resort to Winxvideo AI, with 98% quality kept and 50% - 90% size off!
- Compress 4K video from H264 codec to HEVC to cut 64% size off at the same quality! 62% size off for 1080p video!
- Remove clips from video, lower resolution/frame rate/bit rate, crop to further reduce video up to 90% size off, 1GB input, 102MB output!
- No noticeable quality loss with the support of HQ engine and de-interlacing engine.
Part 1. iMovie Tutorial: How to Reduce Video Size Using iMovie
Before we get into the subject, please have a check on your iMovie version. Some minor differences exist among different iMovie versions during the actual compressing procedure. Afterwards, let's cut to the chase.
Step 1. Check your original video size.
Step 2. Load video file to iMovie. It slightly varies among different versions of iMovie.
- Hit the button with downward facing arrow on the upper left corner of iMovie window. Or click "Import media" button for some versions.
- Double-click the video footage you want add or, alternatively give it a single click and tap "Import All" option.
- Drag your video to the editing area with extensive gray area on the bottom of the iMovie interface.
Step 3. Split or cut your video to compress file size in iMovie.
iMovie offers you the editing features split and cut for compressing video. Split a long video into clips with average length and you can just pick up one or some clips. Cut the unwanted footages from your video to reduce video file size. Skip this step if you want to keep the complete video.
Step 4. Select resolution, quality and compress option before exporting video.
At the upper right corner of iMovie main panel, find out the icon with a upload icon and click it. Or in other versions of iMovie, go to the menu bar of your MacBook/iMac, tap "File" > "Share" > "File...". Then, adjust the settings on the pop-up File window.
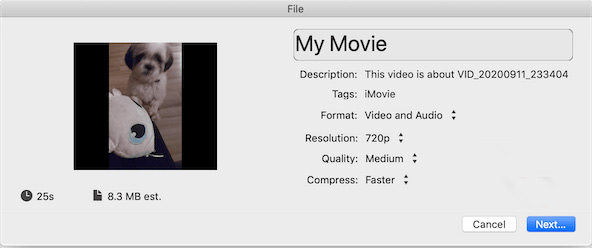
- Resolution: 720p or 1080p is recommended. Downscale 4K/8K Ultra HD resolution if necessary.
- Quality: 3 options are available: Low, medium and high. Generally, medium is advised.
- Compress: Faster or Better Quality. For high-end computer and video input with short length (less than 1 hour), you're suggested to prefer Better Quality. As for large-sized yet hi-def 4K/8K video in long length, faster is preferred.
High resolution and high quality are inversely propotional to video size. But highly compressed video file will result in poor quality. Thus, strike a balance between file size and quality when adjusting these settings.
Step 5. Save your file.
Tap "Next" after the settings are done. Name your resulting file and find a place to save your file. When everything is ready, click "Save".
Find out your iMovie exporting file and compare its size with the previous size. If the video compression ratio doesn't make you happen or the output quality is distorted, you can consider to resize your video using other iMovie alternatives.
Recommended reading => How to Crop A Video in iMovie [iMovie Tutorial]
Part 2. iMovie Alternative to Compress Videos without Losing Quality
Step 1. Free download this video compressor and install it on your macOS or Windows. It's 100% safe, clean and virus-free, no bundled 3rd party software, plugins or adware.
Step 2. Click "+Video" button at the upper left corner of the home screen and opt for the video file to load into this tool. Bulk compression is available. An expansive library of input formats are supported, MP4, M4V, MKV, MOV, AVI, FLV, WMV, MTS, HEVC, VP9, H.264...
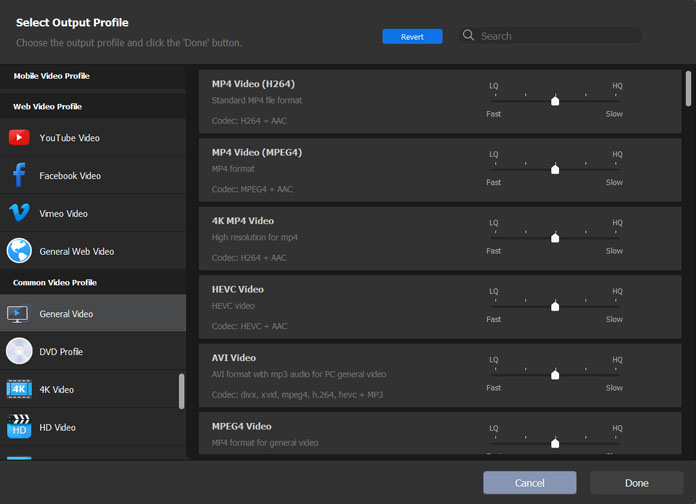
Step 3. Choose a high compression codec HEVC as output codec. When the video is loaded, an Output Profile window appears, choose MP4 Video (HEVC, AAC), and click OK. HEVC will compress your resulting file with at least 50% size off while keeping intact quality loss. It's a lossless compression. If your ultimate device or platform doesn't support HEVC codec, pick up H264 with best compatibility.
Step 4. Simply drag file size slider bar. Then cut video length (lossless compression, as well). Enable Trim to freely set the start time and End Time to shorten your video length, or drag the slider to the video section you want to keep.
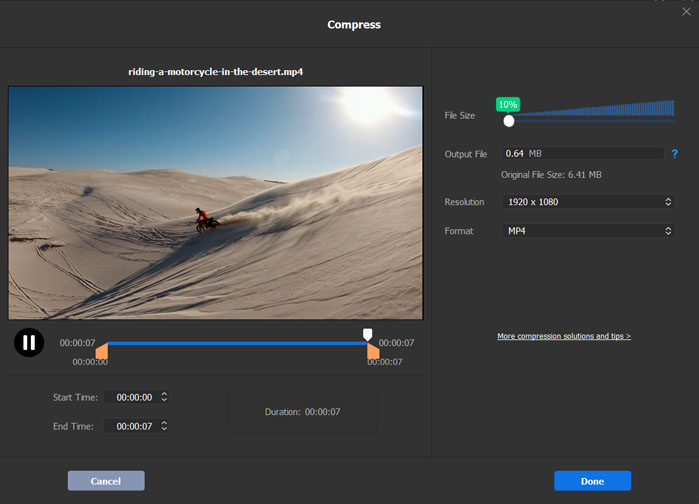
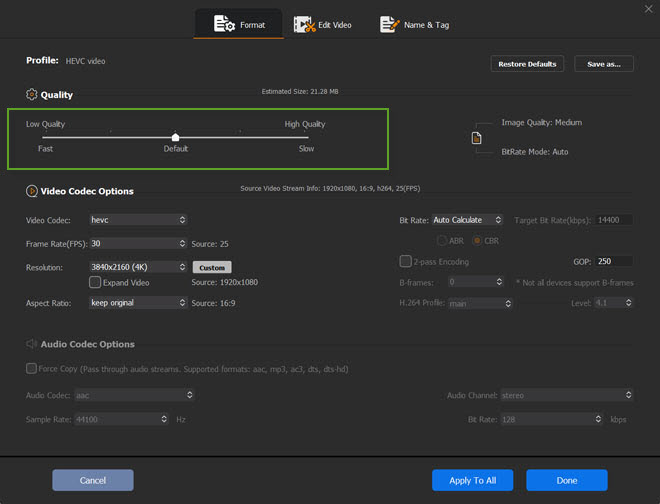
Step 5. Adjust video resolution, bit rate, frame rate, etc. (lossy compression). On the video info window, tap the gear-shaped Settings button to get more options to tweak your video parameters for smaller file sizes. Generally speaking, compress 4K to 1080p, lower frame rate from 120FPS/60FPS to 30FPS, and adjust bit rate. These will further compress your video at high compression ratio. Keep in mind that do not lower down them too much. Or the small size will come at the price of poor quality.
Step 6. Click the RUN button to start reducing video file size even from GB to MB with virtually no quality loss (High Quality Engine support).
Warm prompt: for iPhone iPad users who demand to compress videos, are high suggested to transfer iPhone iPad videos to computer and use the above video reduce software to do the shrinking task. iMovie for iOS can make video size smaller, but it doesn't you the file size and aspect ratio after using cropping feature. What's worse, the cut feature will result in some clips being deleted by mistake because of the small-sized iPhone or iPad screen. Desktop video compressor program is much better than iMovie for iPhone iPad esp. for integrated video editing with long duration.
Part 3. FAQs about How to Compress Video Size in iMovie
How do I compress an iMovie video to email
From the Projects browser, tap the video you’ve compressed and you want to share. If you are editing the video, tap Done in the upper-left corner. Tap the Share button , then tap Mail. Complete the created email , then tap Send. Now, you should compress the iMovie video to email.
Is there a compressor in iMovie?
iMovie offers compress settings: Faster or Better Quality under the Export settings. Faster means smaller file size but worse quality. Better Quality means larger file size. Quality has options: Low, medium and high, which can also be used to compress video in iMovie. Resolution options are also good ways to reduce video size in iMovie.
Why is my iMovie video so large?
If you export video with the Best Quality (pro res), you will get a video file several times larger. This is because of the much higher bitrate of the Best Quality option. On the other hand, when a movie clip is imported into iMovie, iMovie uncompresses it for editing, and then export it with less compression.