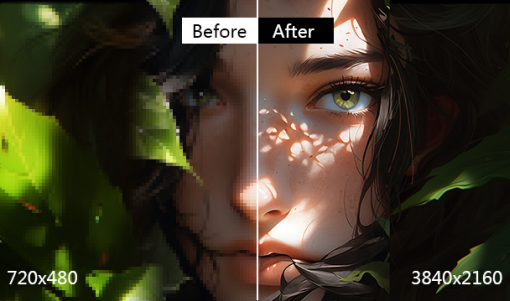
Depixelate Image: How to Unpixelate an Image to High Quality
 Mike Rule
Updated on
Ever zoom in on a photo only to be met with a frustrating mess of blocky squares? Pixelation, the bane of low-resolution images, can steal the clarity and detail from your treasured memories and projects. It's a battle against blurry faces, unreadable text, and a general feeling of disappointment.
The good news is there's no single approach to fix pixelated images. Whether you're dealing with minor blurriness or facing a pixelated catastrophe, there's a solution waiting to be discovered. Follow to learn how to unpixelate an image online, in Photoshop, on iPhone, etc.
How to Unpixelate an Image (Software & Techniques)
How to Depixelate Image with Winxvideo AI
Faded memories trapped in pixelated photos? Winxvideo AI uses the power of artificial intelligence to bring those moments back into focus with a single click. It removes the technical barriers, automatically detect and address pixelation, restoring lost details and creating a smoother, more natural appearance. This goes beyond just unpixelation – Winxvideo AI also sharpens the overall image, enhancing clarity.
Winxvideo AI offers a multi-step approach to transform your pixelated images to high quality. It can upscale your images to resolutions as high as 4K, 8K, or even 10K. Additionally, Winxvideo AI tackles common imperfections like compression artifacts and blur, resulting in cleaner and more polished images.
 Free Download
  Free Download
Note: AI tools for Mac are currently unavailable, but they're coming soon. Stay tuned.
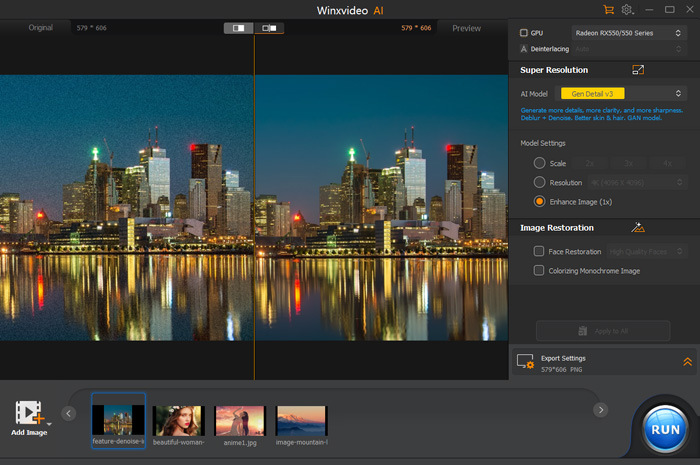
Step 1. Free download and install Winxvideo AI, fire it up and head straight for the "Image AI" section on the main screen to open the Image AI window.
Step 2. Click the "Add Image" button. Pick the photos you want to depixelate.
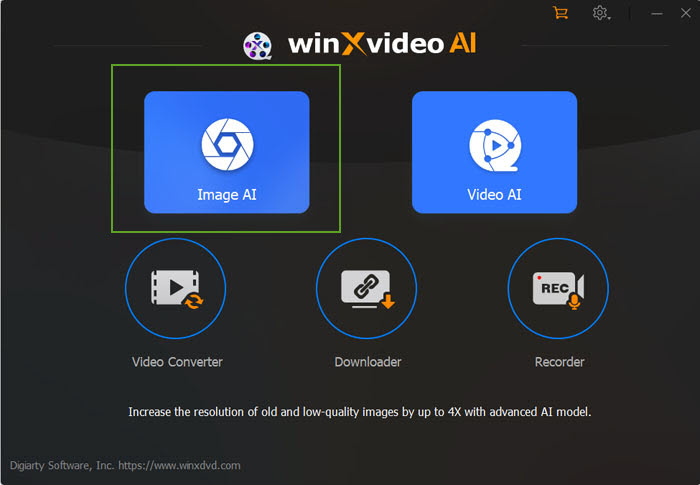
Adjust Super Resolution Model Settings
- Scale: Enlarge your image cleanly for larger displays, prints, or distortion-free viewing. Select 2x, 3x, or 4x to scale up to 4K, 8K, or 10K resolution.
- Resolution: Directly convert your image to a specific resolution like 1080p, 2K, or 4K.
- Enhance Image (1x): Improve image quality by removing noise, grain, blur, and pixelation, or restore old photos.
If significant resolution improvement isn't your goal, simply keep the default setting - "Enhance Image (1X)" under "Model Settings." This setting tackles common imperfections like scratches, dust, and of course, those pesky pixilation that steal clarity. There are 4 dedicated AI models for image enhancement.
- Gen Detail v2: Ideal for enhancing image detail.
- Real Smooth v2: Best for smoothing, clarifying, and brightening images.
- Anime: Optimized for enhancing animated cartoon images.
- Zyxt: Specifically designed for improving low-resolution photorealistic photos.
Step 3. Once you're happy with your photo selection and settings, hit the "RUN" button. This initiates the depixelation process. Winxvideo AI's AI algorithms will meticulously analyze and fix pixelated image.
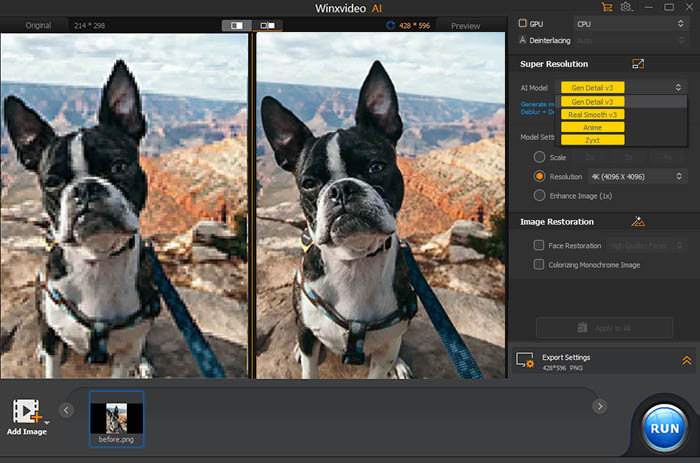
Step 3. Click the "RUN" button to initiate the repair process. Once finished, your restored photos will be ready for you to save and enjoy.
Read more: How to Sharpen Blurry Image (AI & Free)
How to Unpixelate an Image in Photoshop
Photoshop boasts a comprehensive set of tools for image manipulation, allowing for precise control over every aspect of your photo and to depixelate images. Photoshop utilizes the power of artificial intelligence to fill in missing information when you increase image size. This helps to reduce pixelation while maintaining detail.
Tools like "Sharpen" and "Unsharp Mask" enhance edges and create the illusion of sharper details. However, overuse can introduce artifacts, so use them with caution. While blurring can seem counterintuitive, strategic use of tools like "Gaussian Blur" can soften harsh pixelation and create a smoother appearance. Use it subtly to avoid blurring important details. This blending mode allows you to manipulate light and shadow within an image. This can help mask pixelated areas by subtly adjusting exposure and contrast.
Mastering Photoshop requires time and dedication due to its vast feature set. Photoshop is a paid subscription service, which may not be ideal for casual users. Beginners might find the interface and tools overwhelming at first.
Fix Pixelated Image in Photoshop
Step 1. Open the image. Navigate to "File" > "Open" and select your image.
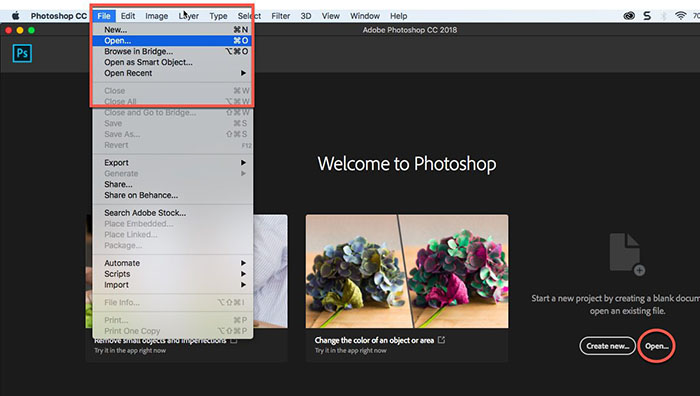
Sep 2. Access image size. Locate "Image" > "Image Size" in the top menu bar.
Step 3. Make a small size adjustment and choose "Bicubic Smoother" or "Automatic" from the "Resample" dropdown menu. These options use AI to fill in missing information while enlarging.
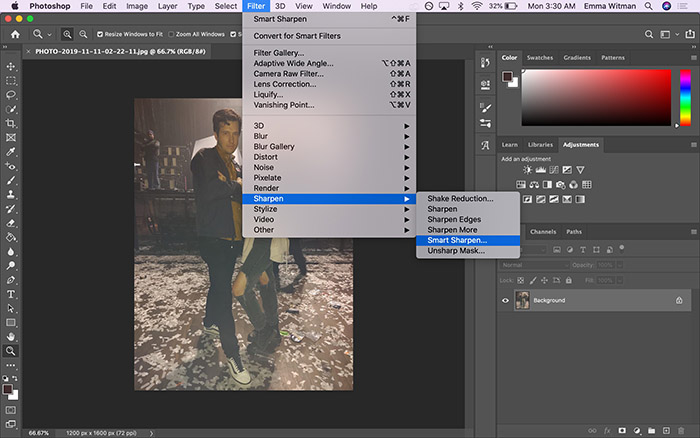
Step 4. Click "OK" and assess the results. Use "Edit" > "Undo" if you need to adjust the settings. For tools like "Sharpen" and "Unsharp Mask", "Gaussian Blur" to unpixelate an image, check the following Photoshop toturials.
More photoshop tutorials
How to Unpixelate an Image Online Free Easily
If you're a beginner or someone seeking a convenient solution, Fotor offers a good choice. This free, web-based image editor features a user-friendly interface, making it perfect for navigating the world of image unpixelation, even for those with no prior experience.
Fotor utilizes AI technology to analyze your image and automatically enhance its clarity, reducing pixelation and sharpening details. The process is straightforward: upload your image, select the "AI Enlarger" tool (or "Effects" depending on the version), and Fotor does the heavy lifting. You can then further refine the results with additional editing options before downloading your improved image.
While Fotor shines in its accessibility and ease of use, it does come with limitations. Compared to robust software like Photoshop, Fotor offers a more limited set of editing tools. Additionally, the AI unpixelation process is automatic, providing less control over the final outcome. Finally, for heavily pixelated images with strong compression, achieving optimal results might be challenging.
How to Depixelate an Image Online with Fotor
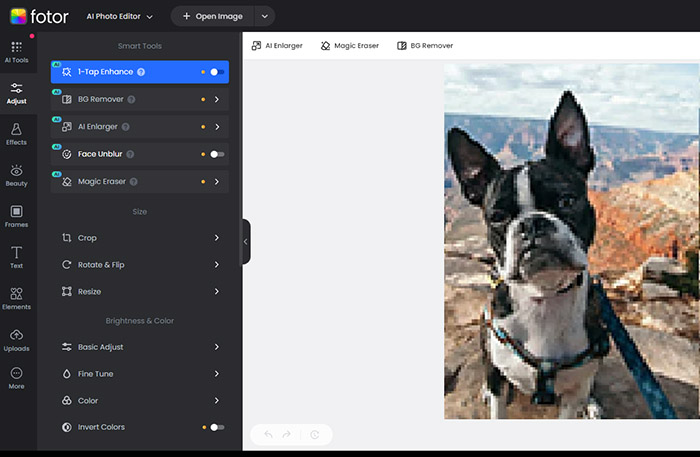
Step 1. Head over to Fotor and click the "Unpixelate image now" button to begin.
Step 2. Upload your pixelated photo using the upload option or simply drag and drop it onto the editing area.
Step 3. With a single click on "1-Tap Enhance" in the left sidebar, Fotor will automatically work its magic to unpixelate your image while preserving quality.
Fotor provides a toolbox of editing options like brightness, contrast, and sharpness to further refine your unpixelated image.
Step 4. Once you're happy with your masterpiece, save and download your enhanced image in your preferred file format.
How to Unpixelate an Image on iPhone
While the iPhone's Photos app doesn't have a specific "unpixelate" function, you can use the built-in sharpening tool to improve the clarity of blurry or low-resolution images. Significantly improving a heavily pixelated image might not be achievable. Excessive sharpening can create unwanted artifacts that further detract from the image.
This method can provide some clarity enhancement, but it can't magically create details absent in the original photo. Here's how to depixelate an image on iPhone.
Step 1. Open the Photos app and locate the image you want to enhance. Tap "Edit" in the top right corner.
Step 2. Swipe right on the bottom toolbar until you see three dots (...) and additional editing options appear. Look for the icon with three sliders forming a triangle (Sharpen) or the label "Sharpen" itself.
Slide the "Sharpen" slider to the right. This increases the sharpness of edges in the image, potentially minimizing the appearance of pixelation. Be cautious, though – overdoing it can create unwanted artifacts. While sharpening helps, you can explore other editing tools in the Photos app. Adjust brightness, contrast, and saturation to improve the overall visual appeal of the image.
Step 3. Once satisfied, tap "Done" in the top right corner to save your enhanced image.
How to Depixelate an Image on Android
Android images being heavily pixelated issue occur from time to time when sending and receiving images between Android users, regardless of which messaging app they use. Some users have tried sending a picture to themselves and it is still pixelated.
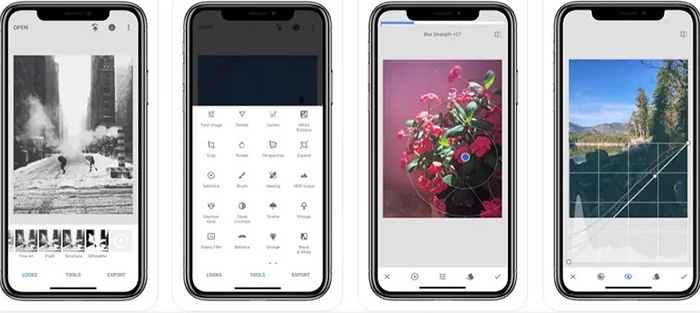
While Remini excels at enhancing overall image quality, its effectiveness in unpixelating images is limited. While it can improve the appearance of slightly pixelated photos by reducing noise and sharpening details, it struggles with severely pixelated images. The app's AI is primarily designed to restore lost information, but when pixels are missing entirely, there's little data for the algorithm to work with. Remini requires internet and has ads. Results can sometimes look unnatural or different from the original.
For minor pixelation issues, Remini can be a useful tool to enhance clarity. However, you should not expect miracles when dealing with heavily pixelated images.
How to Unpixelate Images on Android by Sharpening
Step 1. Free download, install, and open the Remini app. Begin by launching the Remini application on your Android device.

Step 2. Access the enhancement feature. Look for and tap on the "Enhance" button or option within the app.
Step 3. Select the image. Choose the specific photo you want to improve from your device's gallery or photo library.
Step 4. Start the enhancement process. Confirm your selection to initiate the image enhancement process. After a short processing time, view the enhanced image. You may need to watch an ad or use a paid subscription to access the final result.
Main Techniques for Unpixelating Images
1. Sharpening
Sharpening focuses on enhancing edges within an image. This creates the illusion of sharper details and increased clarity, particularly beneficial for slightly blurry or low-resolution photos. Sharpening tools typically adjust the contrast between neighboring pixels, making edges appear more defined. Imagine outlining the shapes and details in your photo with a pencil – sharpening works similarly in the digital realm.
While sharpening can be effective, it's important to use it judiciously. Over-sharpening can introduce unwanted artifacts like halos (bright edges around objects) and make noise (random pixel variations) more prominent, ultimately creating a less natural-looking image.
2. Interpolation
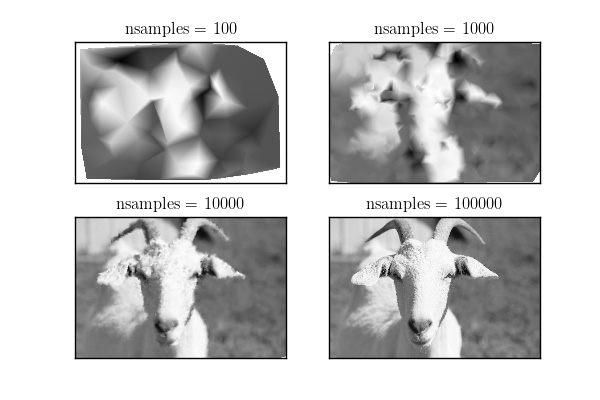
Interpolation is a technique for creating new pixels based on the information present in existing pixels. This approach aims to fill in the gaps between pixels, effectively increasing the image resolution and reducing pixelation.
There are different interpolation algorithms, but the basic concept involves analyzing the surrounding pixels and predicting the color values for the new pixels being created. Imagine a mosaic where some tiles are missing; interpolation attempts to recreate those missing tiles using the colors and patterns of the surrounding ones.
Interpolation can be helpful for mild pixelation, but it has its limitations. Since it relies on existing information, it cannot truly create entirely new details that weren't captured in the original image. Additionally, different interpolation algorithms may introduce blurring or artifacts depending on the complexity of the image content.
3. Machine Learning (AI)
Machine learning is a cutting-edge approach to unpixelation that leverages the power of artificial intelligence (AI). AI algorithms are trained on massive datasets of high-resolution images, allowing them to learn how to recognize patterns and predict missing details.
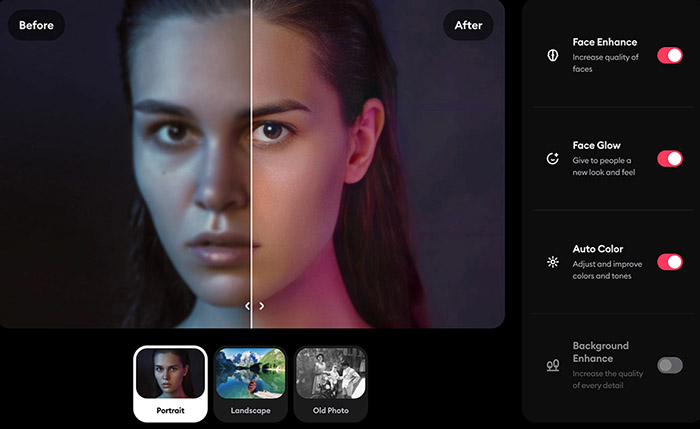
AI-powered unpixelation tools analyze a low-resolution or pixelated image and attempt to "fill in the blanks" by intelligently predicting what the missing information might be. These tools can not only enhance edges and reduce pixelation but also potentially restore finer details and textures.
While AI unpixelation shows great promise, it's still under development. The effectiveness of the technology depends on the quality of the training data and the complexity of the image content. Heavily pixelated or damaged images might not be completely restored to pristine condition, but AI can still offer significant improvements compared to traditional methods.
Understanding Pixelation
What Are Pixels?
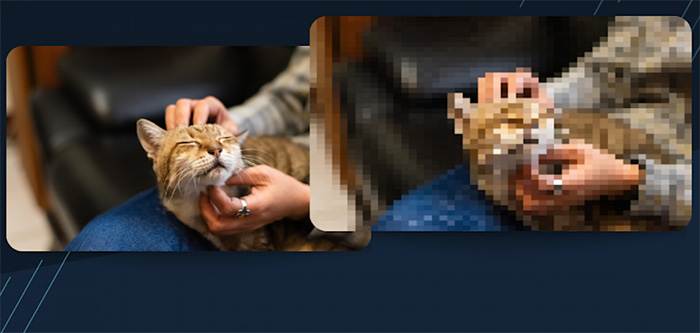
Imagine your favorite photograph as a giant mosaic. Each tiny tile in that mosaic is a pixel, the fundamental unit of a digital image. Just like individual bricks come together to form a wall, pixels combine to create the pictures we see on our screens and printed photos. Each pixel holds information about color and brightness, and the overall number of pixels determines the image's resolution.

The Causes of Pixelation
Low Resolution. Think of resolution as the density of those tiny tiles in our mosaic. A low-resolution image simply doesn't have enough pixels to capture all the details, resulting in a blurry or blocky appearance. This can happen when taking photos with a low-quality camera or downloading images from the internet at a reduced size.
Zooming In. Ever zoomed in on a photo only to see it become increasingly pixelated? When you zoom in on a digital image, you're essentially magnifying a limited number of pixels. This stretches the information available, leading to a loss of detail and a grainy look.
Image Compression. To save storage space and bandwidth, digital images are often compressed. While this is crucial for efficient storage and transmission, it can sometimes come at the cost of reduced image quality. Highly compressed images may exhibit noticeable pixelation, especially in areas with intricate details.

The Limits of Unpixelation
It's important to understand that unpixelation techniques have limitations. These tools are like skilled art restorers, working with the existing information in an image to enhance its clarity. However, they cannot recreate information that's simply not there. Heavily pixelated images or those with significant data loss may not achieve a dramatic improvement. The key takeaway is that unpixelation offers remarkable capabilities, but it's not a magic solution that can conjure missing details out of thin air.

Conclusion
Unpixelation techniques work their magic by analyzing existing image data and intelligently filling in the gaps. This can involve various methods, such as AI-powered algorithms that learn from vast databases of high-resolution images. The result? A significant improvement in image clarity, allowing you to recover details and bring those cherished memories back into focus.
Whether it's a blurry family photo from your childhood or a low-resolution image from a special trip, unpixelation tools offer the potential to depixelate them. With a variety of free and paid options available, you can rediscover the joy of your past in stunning clarity.


