[Fixed] MakeMKV AV Synchronization Issues when Ripping DVDs
Here are many users on MakeMKV forum and similar forums talking about MakeMKV AV synchronization issues when ripping a DVD. For example, when a user tries to rip the DVD Finding Nemo, MakeMKV shows a bunch AV sync issue warning messages in the log:
AV sync issue in stream 1 at 0:03:18.240 with duration of 1.666ms : 2 frame(s) dropped to reduce audio skew to -0.019ms
AV sync issue in stream 1 at 0:08:14.327 with duration of 1.666ms : 2 frame(s) dropped to reduce audio skew to +0ms
AV sync issue in stream 1 at 0:09:34.991 with duration of 1.666ms : 2 frame(s) dropped to reduce audio skew to -0.016ms
In most cases, MakeMKV will display AV synchronization issues when ripping Disney DVDs and some TV show DVDs. But for some users, every DVD rip with MakeMKV will get the audio out of sync error. So are the AV synchronization issues a problem in MakeMKV and how to fix?
Part 1. Is MakeMKV AV Synchronization Issues A Problem?
Answer: Though there are many discussions about A/V sync issues on the MakeMKV forum, the error is mainly caused by a bug in MakeMKV, not a real problem. When you look at the final MKV rip video, you won’t see any audio delay or out of sync. So it’s safe to ignore the warning messages in most cases.
However, if you find any AV out of sync in the end DVD rip, then it will be a problem and learn how to fix it below.
Part 2. Fix an AV Sync Issue in MakeMKV Ripped Video
1. Update your MakeMKV to the latest version.
The AV sync issues are a kind of a known bug with MakeMKV versions before V1.15.2. Newer MakeMKV has fixed it and the AV synchronization issues occur less often since then. So if the problem happens to you, first, re-download the latest version and try again.
2. Check the source DVD.
Make sure the source DVD is a badly authored disc. If there are some authoring problems in the source DVD, it may result in an audio out of sync issue. The workaround is to make a MKV copy of the DVD with a folder structure using MakeMKV, then demux it with DGDemux or similar apps, to separate the audio, video, and subtitle tracks. Then remux the tracks generated by DGDemux using apps like MKVToolNix.
3. Disable Dolby Atmos tracks.
When you rip a Blu-ray disc with MakeMKV and get the audio not sync error, you can try another audio track. In a Blu-ray disc, there may be audio tracks in Dolby Digital (AC-3), DTS codecs, Dolby Digital Plus, DTS-HD High Resolution Audio, Dolby TrueHD DTS-HD Master Audio, Linear PCM, as well as Dolby Atmos and DTS-X. Sometimes, MakeMKV will display AV sync issues when a Dolby Atmos track is selected. So try another audio track.
4. Play the AV-out-of-sync MKV in VLC.
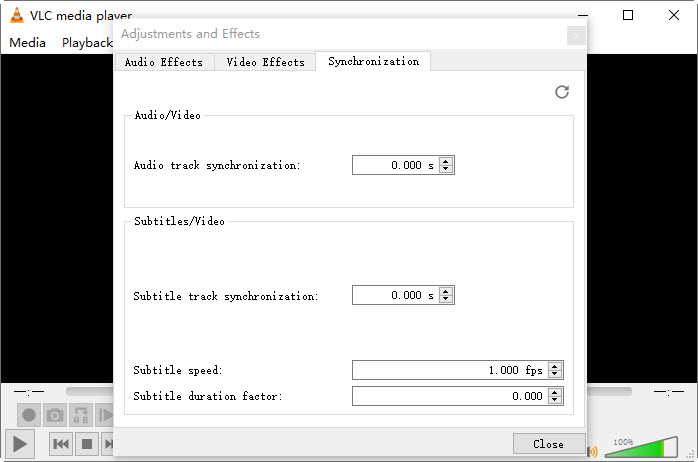
If you don’t want to go back through the ripping process in MakeMKV or other apps, and the result MKV video has an audio delay or out of sync issue, you can still fix the AV sync issues and play the ripped DVD movie smoothly using VLC. Below are the steps:
- When playing the MKV video in VLC, go to the Tools > click on Track Synchronization.
- Then you can adjust the audio and subtitle tracks to sync with the video by entering a number in the Audio track synchronization section. A positive value will delay the audio while a negative entry will hasten the audio in the video.

5. Try another DVD ripper.
You can also try another DVD ripper instead of MakeMKV to rip a DVD if the AV synchronization issues continue. WinX DVD Ripper can help. It's free and is able to rip DVDs to MP4, MKV, MOV, ISO image, Video_TS folder, MPG, and 370+ other profiles. Similarly, it supports DVDs protected by region codes, CSS, RCE, UOPs, Sony ARccOS, Playlist Obfuscation, Disney DRMs, etc. It offers reliable performance when ripping Disney and TV show DVDs. So don’t worry about the AV sync issues using this MakeMKV alternative.
For Windows and Mac only. If you are a mobile user, please click here.
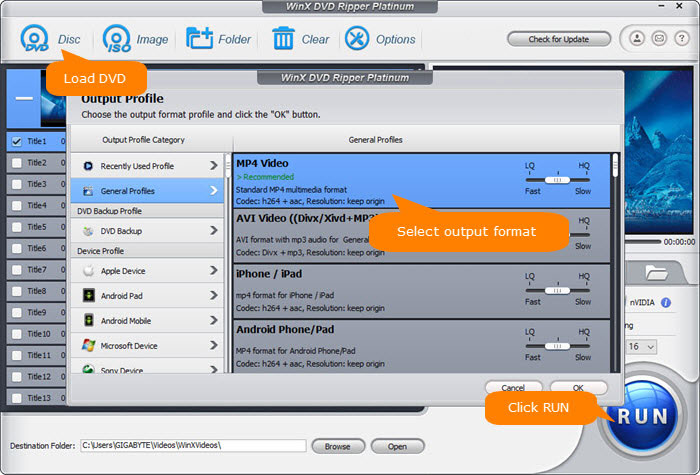
Step 1. Free download the MakeMKV alternative on your computer and run it. Insert your DVD disc into DVD drive. Click the DVD Disc button at the top menu bar of the DVD ripper, choose your DVD disc to load.
Step 2. The Output Profile windows appears when the DVD title is selected. You can choose MP4, AVI, MOV, WMV, etc. or an output profile for HDTVs, mobile devices, iPhone, iPad, hard drive, or back up DVDs to ISO images, TS folders.

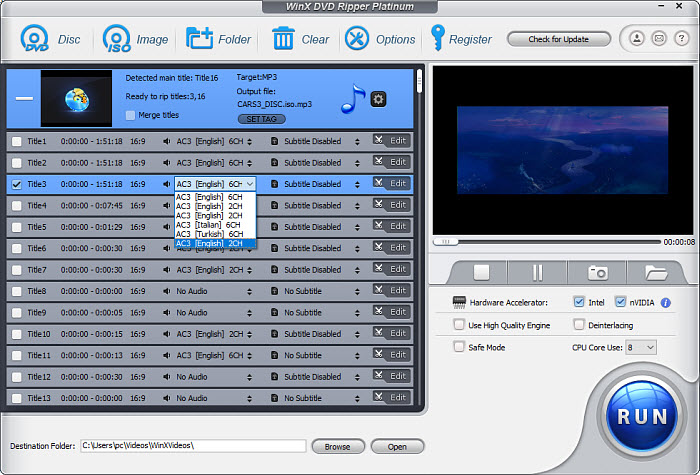
Step 3. Back on the main interface, you can click on the selected title and choose the audio track.
Step 4. Click the RUN button to start ripping the DVD. To avoid the AV out of sync issues or other ripping errors, check the Safe Mode box on the right lower part of the interface.


