


How to Burn a DVD on Windows 11/10/8/7 and Mac for Free
If you want to write your movies, music, photos, and other data onto a writable DVD disc, you've come to the right place. This article will show you how to burn a DVD on Windows (11/10/8/7) and Mac. No matter you want to burn a data DVD or a video DVD, you'll find a solution.
Burn DVDs Easily with the Best DVD Burner Software for Windows 11/10/8/7
WinX DVD Copy Pro [100% Clean and Safe!] - a top-notch DVD burner for Windows.
- 1:1 burn DVD to DVD R/RW disc and burn ISO/folder to DVD with no quality loss.
- Burn homemade discs and DVDs protected by region codes, CSS, RCE, Sony ARccOS, 99 titles, and any other copy protections.
- Burn severely scratched DVDs with its Advanced Bad Sector Recover Engine.
- The fastest burning speed and smoothest DVD burning process with its Multi-core CPU, sector-by-sector copy mode and other edge-cutting technologies.
Table of Contents
Part 1. How to Free Burn a DVD on Windows
- How to Free Burn a Video DVD on Windows with WinX DVD Author
- How to Burn a Video DVD on Windows with WinX DVD Copy Pro
- How to Free Burn a Data DVD on Windows with File Explorer
- How to Free Burn a DVD with Windows Media Player?
Part 1. How to Burn a DVD on Windows for Free
If you want to burn a data DVD on Windows, you can make use of Windows Media Player or File Explorer. As for burning a video DVD, you need to download and install a third-party program, such as WinX DVD Author and WinX DVD Copy Pro. Now, we'll show you how to burn a DVD with these programs.
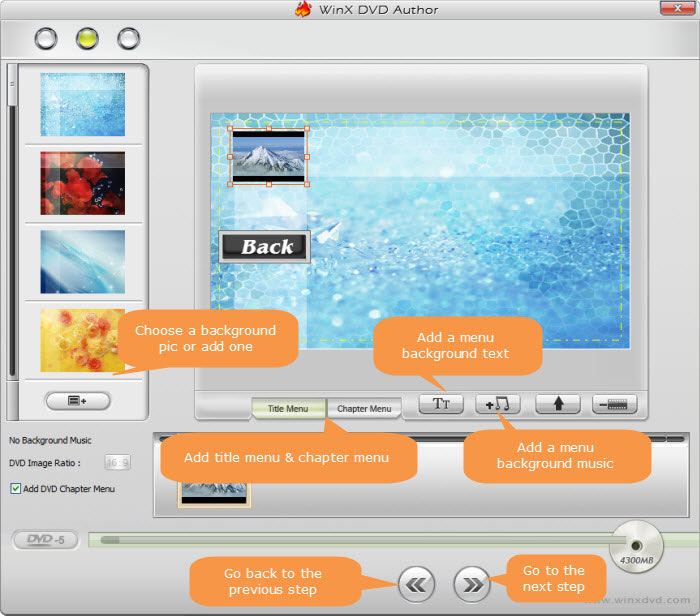
How to Burn a Video DVD on Windows with Free WinX DVD Author
WinX DVD Author is a 100% free DVD burning software for Windows 11/10/8/7. It can burn videos of all formats (such as MP4, MKV, VOB, and MOV) to DVD±R/±RW, DVD DL+R, and DVD DL±RW. It allows you to add subtitles and create DVD menu to make your DVD look professional. Its fast and powerful decode encoder engine will ensure the best burning quality.
Before you learn how to burn videos to DVD, free download and install this free DVD burner on your Windows 11/10/8/7 PC.
Step 1: Insert a blank disc into the computer's disc drive.
Step 2: Run Winx DVD Author and click Video DVD Author button on the main interface.
Step 3: Click the Add Files (+) button to add the videos you want to burn to DVD. Then, add subtitles and adjust the settings based on your needs.
Step 4: Create DVD menu if you checked this option before.
Step 5: Click "Start" button to begin burning videos to DVD.
How to Burn a Video DVD on Windows with WinX DVD Copy Pro
WinX DVD Copy Pro is a software program designed for copying and burning DVDs. It allows you to create backups of your DVDs, including those stored as ISO files, VIDEO_TS folders, or actual physical discs.
WinX DVD Copy Pro offers features like:
- 1:1 DVD cloning: Creates a perfect copy of your DVD, preserving menus, chapters, audio tracks,and more.
- Burn ISO/VIDEO_TS folders: Lets you burn existing ISO image files or VIDEO_TS folders containing DVD data onto a blank disc.
- Disc format compatibility: Supports burning DVDs to various formats like DVD-R, DVD+R, DVD-RW, DVD+RW, and DVD-RAM.
How to Burn a DVD from ISO Image/Video_TS Folder
If you have a pile of DVD ISO image files or Video_TS folders on hard drive waiting to burn to DVD disc, just follow the 3 steps below to burn ISO/folder to DVD easily. Burning ISO to DVD is much faster and smoother. Because they are not encrypted files as DVD disc, it can be read faster and burned without freezes or stops time to time, and reserves the original quality.
Before you begin to burn DVD, free download, install and launch WinX DVD Copy Pro on your Windows 11/10/8/7 PC.
Step 1: Choose "DVD Burner" function under Tools option.
Step 2: Click "Load ISO" button to load the ISO image files already stored on your PC hard drive and select the Target DVD Burner. If you've inserted a blank DVD, this DVD burner will auto check and display the basic disc info and burning info. (Here if your resource data file is DVD Video_TS folder, you can choose "Load DVD Folder" button to burn DVD folder to DVD.)
Step 3: Confirm the disc info and click "Run" button to start to burn ISO/Folder to DVD.

How to Burn a DVD to DVD on Windows
You may also want to burn a DVD to a blank disc to have a safe copy. This is easy with WinX DVD Copy Pro as it offers the ability to clone DVD to DVD. You don't need to worry about any copy protections on the original disc.
Before you begin to burn DVD, free download, install and launch this DVD burning software on your computer.
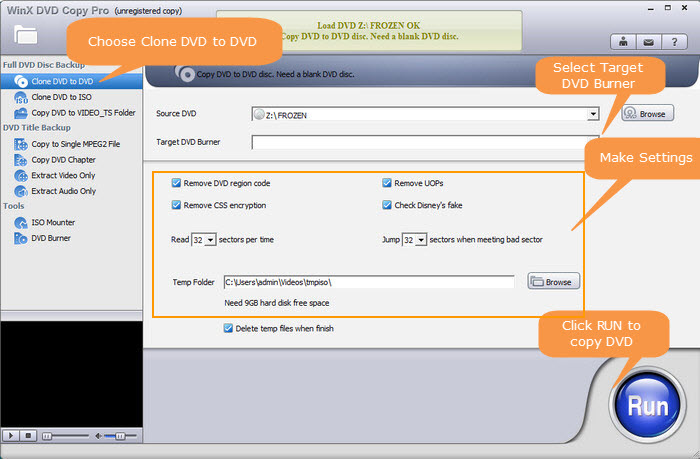
Step 1: Choose "Clone DVD to DVD" mode under Full DVD Disc Backup category.
Step 2: Set the Source DVD and Target DVD Burner. Usually WinX DVD Copy Pro will auto detect your inserted DVD disc. If you have multiple DVD drives, click "Browse" button to choose one you want.
Step 3: Preset the Temp Folder with "Browse" button to temporarily store the copied media file if you only have one DVD drive. Make sure the temp destination folder has larger than 9GB free space.
Step 4: Then click "Run" button to start to burn DVD to DVD.
Final step: After finishing the above steps, if you only have one drive, it will pop up a window asking you to insert a blank DVD disc, do as it said and click "Burn" button to burn DVD to new disc; If you have two rewritable DVD drives, WinX DVD Copy Pro will auto analyze your DVD drive data and just click the "Burn" button to burn DVD to DVD directly.
How to Burn a Data DVD on Windows for Free with File Explorer
This guide covers burning discs on Windows 11, 10, 7, and 8.1. The process is similar across versions. Here we'll focus on Windows 10 with screenshots for clarity.
Step 1: Insert a blank or rewritable disc into your drive. Windows will recognize it and display an AutoPlay prompt offering various actions. To burn a DVD, you need to choose "Burn files to disc".
Tips: If AutoPlay is disabled, open File Explorer and double-click your disc drive under "This PC" (Windows 10) or "Computer" (Windows 7/8.1).

Step 2: Choose how you like to use the DVD.
A window will appear with two options for burning your disc:
- Like a USB Flash Drive: This uses the Live File System, allowing you to add or remove files later, just like a flash drive. However, discs burned this way are only readable on Windows computers.
- With a CD/DVD Player: This burns your files permanently, closing the disc for playback on CD/DVD players and most computers. You can still add files after closing the disc, but you won't be able to delete existing ones.
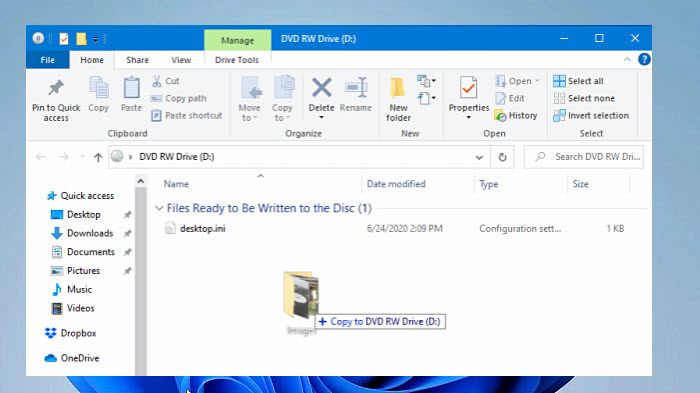
Step 3: Once you've chosen your burning mode (Like a USB Flash Drive or With a CD/DVD Player), a window will appear displaying your blank disc. This is your burning workspace. Here, you need to drag and drop the files you want to burn onto the disc window, located under "Files Ready to Be Written to the Disc".
Step 4: Click the "Drive Tools" tab in the toolbar menu, and then select "Finish burning". Then, a "Burn to Disc" window will pop up. Here you need to enter a disc title to help identify it later and choose a recording speed. While higher speeds are faster, they can increase the risk of errors. Choose a moderate speed for optimal results. Once you've entered a title and chosen a speed, click "Next". The burning process will begin, and you'll see a progress bar.

Windows will notify you when the burning is complete. Your disc will likely be ejected automatically.
How to Burn a DVD for Free with Windows Media Player?
While the Windows Media Center is no longer available, the Windows Media Player can help burn CDs, Data CDs or DVDs.
Step 1: Open Windows Media Player and click the Burn tab, and then click the Burn options arrow.
Step 2: To burn video to a DVD, click Data CD or DVD.

Step 3: Open the disc drive and insert a blank DVD.
Step 4: Drag the videos that you want to burn to the list pane on the right side of Windows Media Player.
Step 5: You can rearrange the order of your burn list, drag items up or down the list, remove videos, etc.
Step 6: Then simply click Start Burn and it will burn the video to the disc.
Part 2. How to Burn a DVD on Mac for Free?
To burn a DVD on Mac, you can use the Finder method or the macOS app Burn. Below is how to burn a video to a DVD with Finder on Mac:
Step 1: Create a new folder on your desktop (or any preferred location) and drag the files you want to burn onto the disc into this folder.
Step 2: Go to the top menu bar and click "File" > "Burn Disc [Folder name] to Disc...".

Step 3: A "Burn Disc" window will appear. Insert your blank disc into the drive and give your disc a recognizable name in the "Disc Name" field.
Step 4: Choose a burning speed (slower is usually safer) and click "Burn" to begin the process. The burning time depends on the amount of data and the disc type (CD or DVD).
Once burning is complete, you can eject the disc and use it on any compatible computer.
Part 3. FAQs about Burning a DVD
1. What do I need to burn a DVD?
- A computer with a DVD drive. If your computer doesn't contain an internal DVD drive, get an external disc drive.
- A DVD burning program.
- A blank disc. Choose a single-layer disc (4.7GB) or a dual-layer disc (8.5GB) based on the size of the video/DVD you need to burn.
2. How to burn a DVD with VLC?
VLC media player is not designed for burning DVDs. While it is a multifunctional tool, it lacks the functionalities needed for the burning process.
3. How to Burn a DVD with HandBrake?
HandBrake is a powerful tool for converting video files and ripping DVDs, but it doesn't burn DVDs directly. HandBrake focuses on preparing video files for playback on various devices, including converting them to formats compatible with DVD players.
However, you can use the files converted by HandBrake to burn a DVD with dedicated burning software. Popular options include WinX DVD Author, ImgBurn, BurnAware, and CDBurnerXP. These programs allow you to import the converted video files and burn them onto a blank DVD.
4. What is the best DVD burning speed?
You may have seen DVD burning speeds like 4X, 8X, 16X, 24X, etc. The faster the burning speeds, the shorter time it requires to burn a DVD. For example, 4x DVD burn takes approximately 14-16 minutes while 8x DVD burn takes about 8-9 minutes. However, burning at very fast speeds is inherently less accurate than burning at low speeds. Moreover, if the DVD is burned at a higher speed while the DVD player plays the disc at a lower read speed, there will be freeze and skips during the playback.
Therefore, 8x speed is normally recommended to burn a DVD.
Disclaimer: Digiarty Software does not advocate burning copy-protected DVDs for any commercial purpose and suggests referring to the DVD copyright laws in your countries before doing so.